How to Configure JPA One-to-Many Mappings for Beginners
0 CommentsLast Updated on October 20, 2024 by jt
When you work in Enterprise Spring applications, you will often need to establish mappings between your entities. JPA one-to-many mapping is one such example. At the database level, one-to-many mapping means that one row in a table is mapped to multiple rows in another table.
In this post, I’ll explain how to implement JPA one-to-many mapping in a Spring Boot application.
The Example Application
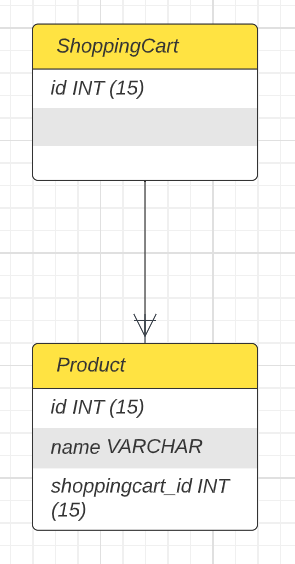
To understand one-to-many mapping, think of a shopping cart that can contain many products. In the database, we will have a ShoppingCart table and a Product table.
Below is the ER diagram.
The Application POM
For this post, we will create a Spring Boot Maven project. The application POM is this.
pom.xml
<?xml version="1.0" encoding="UTF-8"?>
<project xmlns="http://maven.apache.org/POM/4.0.0" xmlns:xsi="http://www.w3.org/2001/XMLSchema-instance"
  xsi:schemaLocation="http://maven.apache.org/POM/4.0.0 https://maven.apache.org/xsd/maven-4.0.0.xsd">
  <modelVersion>4.0.0</modelVersion>
  <parent>
    <groupId>org.springframework.boot</groupId>
    <artifactId>spring-boot-starter-parent</artifactId>
    <version>2.7.5</version>
    <relativePath/> <!-- lookup parent from repository -->
  </parent>
  <groupId>guru.springframewok</groupId>
  <artifactId>jpa-one-to-many</artifactId>
  <version>0.0.1-SNAPSHOT</version>
  <name>jpa-one-to-many</name>
  <description>Demo project for One to Many relationship</description>
  <properties>
    <java.version>17</java.version>
  </properties>
  <dependencies>
    <dependency>
      <groupId>org.springframework.boot</groupId>
      <artifactId>spring-boot-starter-data-jpa</artifactId>
    </dependency>
    <dependency>
      <groupId>org.springframework.boot</groupId>
      <artifactId>spring-boot-starter-web</artifactId>
    </dependency>

    <dependency>
      <groupId>org.projectlombok</groupId>
      <artifactId>lombok</artifactId>
      <optional>true</optional>
    </dependency>
    <!-- https://mvnrepository.com/artifact/com.h2database/h2 -->
    <dependency>
      <groupId>com.h2database</groupId>
      <artifactId>h2</artifactId>
      <scope>runtime</scope>
    </dependency>

    <dependency>
      <groupId>org.springframework.boot</groupId>
      <artifactId>spring-boot-starter-test</artifactId>
      <scope>test</scope>
    </dependency>
  </dependencies>

  <build>
    <plugins>
      <plugin>
        <groupId>org.springframework.boot</groupId>
        <artifactId>spring-boot-maven-plugin</artifactId>
        <configuration>
          <excludes>
            <exclude>
              <groupId>org.projectlombok</groupId>
              <artifactId>lombok</artifactId>
            </exclude>
          </excludes>
        </configuration>
      </plugin>
    </plugins>
  </build>

</project>
The Entities
We will first create a ShoppingCart entity, like this.
ShoppingCart.java
package guru.springframewok.jpaonetomany.model;

import lombok.Getter;
import lombok.Setter;

import javax.persistence.*;
import java.util.HashSet;
import java.util.Set;

@Getter
@Setter
@Entity
public class ShoppingCart {
    @Id
    @GeneratedValue(strategy = GenerationType.IDENTITY)
    private Long id;
    @OneToMany(cascade = CascadeType.ALL,mappedBy = "shoppingCart",fetch = FetchType.EAGER)
    private Set<Product> products= new HashSet<>();

    public ShoppingCart addProduct(Product product){
        product.setShoppingCart(this);
        this.products.add(product);
        return this;
    }
}
In the preceding code, @Getter and @Setter are Lombok annotations. They will generate the getter and setter methods of the fields.
If you are new to Lombok, I suggest going through my series of posts Spring Boot with Lombok
On Line 17, the Set<Product> field is annotated with @OnetoMany to indicate that one shopping cart can have a set of products.
The cascade = CascadeType.ALL attribute specifies that any action (PERSIST, REMOVE, REFRESH, MERGE, DETACH) on the target entity (ShoppingCart) will propagate to the associated entity (Product).
The mappedBy attribute signals the underlying Hibernate ORM that the key for the relationship is on the other side – that is on the product side.
Finally, we have the attribute fetch = FetchType.EAGER. This instructs Hibernate to load the Set<Product> collection fully at the time their parent (ShoppingCart) is fetched.
Note: By default, @OneToMany annotation has FetchType.LAZY.
We will next create the owning side of the relationship, which is Product. We call Product the owning side because it will hold the foreign key of ShoppingCart.
The code of the Product class is this:
Product.java
package guru.springframewok.jpaonetomany.model;

import lombok.EqualsAndHashCode;
import lombok.Getter;
import lombok.Setter;

import javax.persistence.*;
import java.math.BigDecimal;

@Getter
@Setter
@EqualsAndHashCode(exclude = {"shopingCart"})
@Entity
public class Product {
    @Id
    @GeneratedValue(strategy = GenerationType.IDENTITY)
    private Long id;
    @ManyToOne
    private ShoppingCart shoppingCart;
    private String name;
    private String description;
    private BigDecimal price;

    public Product() {
    }

    public Product(String name, String description, BigDecimal price) {
        this.name=name;
        this.description = description;
        this.price = price;
    }
}
In the preceding Product class, the ShoppingCart field is annotated with @ManyToOne. This makes the mapping bidirectional. You can now navigate the association in both directions in your domain model
The Application.properties File
We are using embedded H2. We shall set its properties in the application.properties file, like this.
spring.h2.console.enabled=true
spring.datasource.url=jdbc:h2:mem:cartdb
spring.jpa.defer-datasource-initialization=true
The BootstrapData Class
We will create a BootsrapData class. This class will load data once the application starts up. This will allow us to test how data are getting persisted and retrieved.
BootstrapData.java
package guru.springframewok.jpaonetomany.bootstrap;

import guru.springframewok.jpaonetomany.model.Product;
import guru.springframewok.jpaonetomany.model.ShoppingCart;
import guru.springframewok.jpaonetomany.repositories.ShoppingCartRepository;
import org.springframework.context.ApplicationListener;
import org.springframework.context.event.ContextRefreshedEvent;
import org.springframework.stereotype.Component;

import java.math.BigDecimal;
import java.util.Set;

@Component
public class BootstrapData implements ApplicationListener<ContextRefreshedEvent> {
    private ShoppingCartRepository shoppingCartRepository;
    public BootstrapData(ShoppingCartRepository shoppingCartRepository) {
        this.shoppingCartRepository=shoppingCartRepository;
    }

    @Override
    public void onApplicationEvent(ContextRefreshedEvent event) {
        ShoppingCart shoppingCart = new ShoppingCart();
        Product product1=new Product("Luxor Pen","Perfect gift to your office colleague",new BigDecimal(88));
        Product product2=new Product("Wind of life","A best seller for self motivation",new BigDecimal(30));
        shoppingCart.addProduct(product1);
        shoppingCart.addProduct(product2);
        shoppingCartRepository.save(shoppingCart);
        loadData();
    }

    private void loadData() {
        Iterable<ShoppingCart> cart=shoppingCartRepository.findAll();
        for(ShoppingCart shoppingCartIterable: cart){
           shoppingCartIterable.getProducts().stream().forEach((items) -> {
                System.out.println(items.getName());
                System.out.println(items.getDescription());
                System.out.println(items.getPrice());
                System.out.println("_____________________");
            });
        }
    }
}
The class is a Spring component and implements the ApplicationListener<ContextRefreshedEvent> interface. Spring will call the onApplicationEvent(ContextRefreshedEvent) event either during initializing or refreshing the ApplicationContext. In this method, the code creates and persists Product and ShoppingCart objects.
We also have a loadData() method to retrieve persistent shopping cart and its products. We then print out the product information.
Running the Application
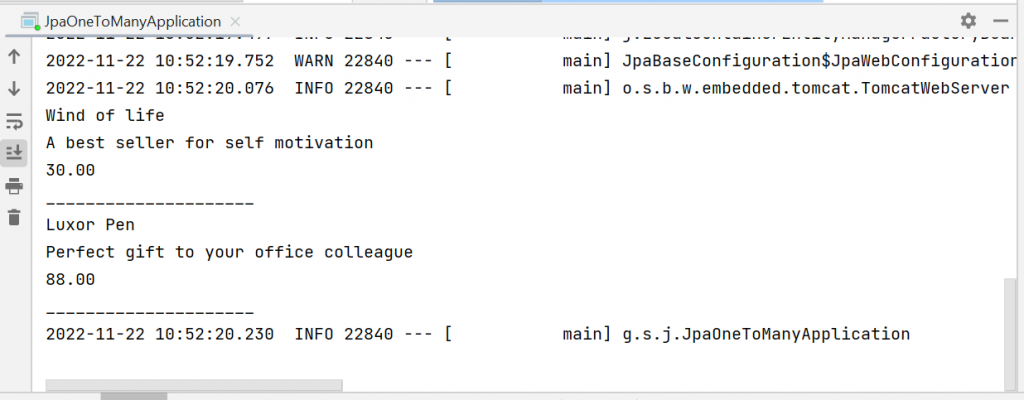
When we build and run the application, we get the following output on the console.
Let’s check the H2 console by pointing the browser to http://localhost:8080/h2-console
Then, on logging in, we can see the PRODUCT and SHOPPING_CART tables getting created.
Next, let’s query the SHOPPING_CART table. In the output, notice that one table has been created.
Next, let’s query the PRODUCT table.
In the preceding figure notice the foreign key column SHOPPING_CART_ID that identifies the ShoppingCart Id that the product belongs to.
Finally, let’s add the following before Line 28 in the BootStrapData class.
shoppingCartRepository.delete(shoppingCart);
When you rerun your application, the shopping cart will get saved first and the products will be printed on the console. But when the delete() method is called to delete the shopping cart, the corresponding products in the shopping cart will also get deleted.
You can verify this through the H2 Console. This is the effect of the cascade attribute we set on the @OneToMany annotation in the ShoppingCart class.
You can find the corresponding code of this post on Github.
To learn in-depth about different types of JPA relationships, you can go through my Udemy course Hibernate and Spring Data JPA: Beginner to Guru


