

JWT Token Authentication in Spring Boot Microservices
6 CommentsLast Updated on September 24, 2022 by jt
Spring Boot Microservices requires authentication of users, and one way is through JSON Web Token (JWT). JWT is an open standard (RFC 7519) that defines a compact mechanism for securely transmitting information between parties.
In this post, I will explain how to implement JWT authentication in Spring Microservices.
JWT Token Overview
JWT is of relatively small size. Therefore it can be sent through a URL, :
- Through a POST parameter, or
- Inside an HTTP header.
However, take note that sending tokens through HTTP headers is the most common approach.
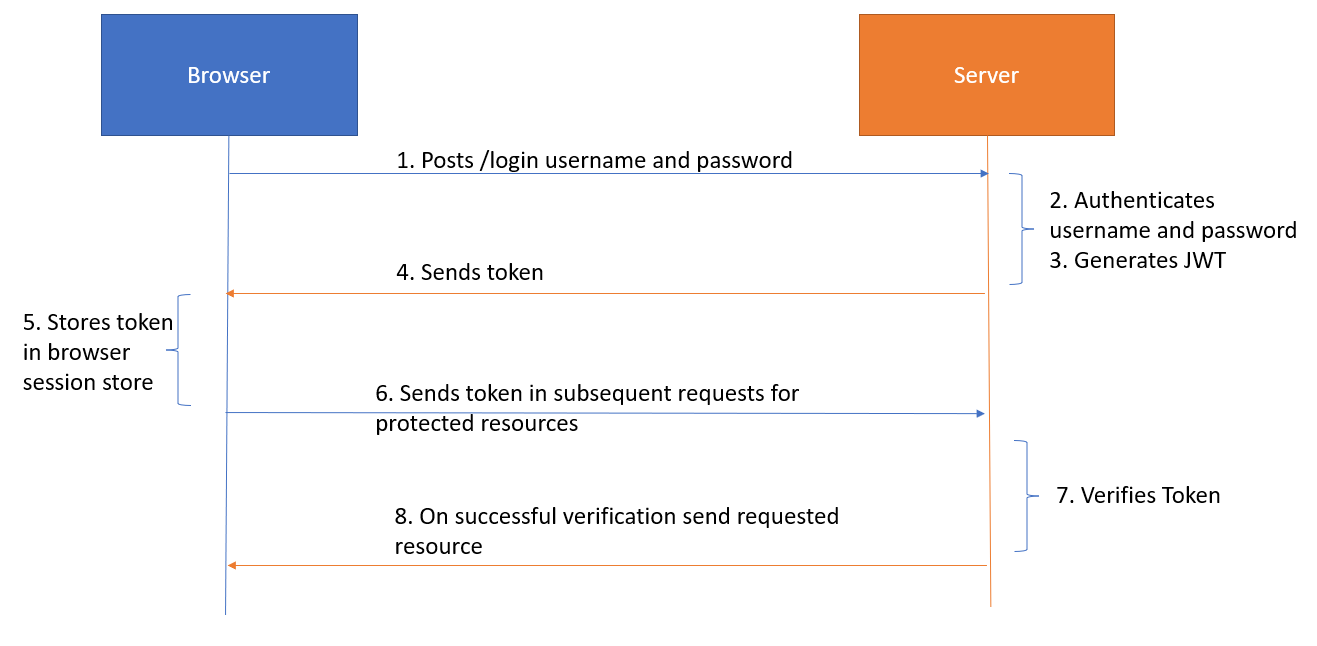
A JWT token contains all the required information about an entity, which can be a user or a service.
This figure shows a typical use case of JWT authentication.
The Example Application
For this post, I have created two services:
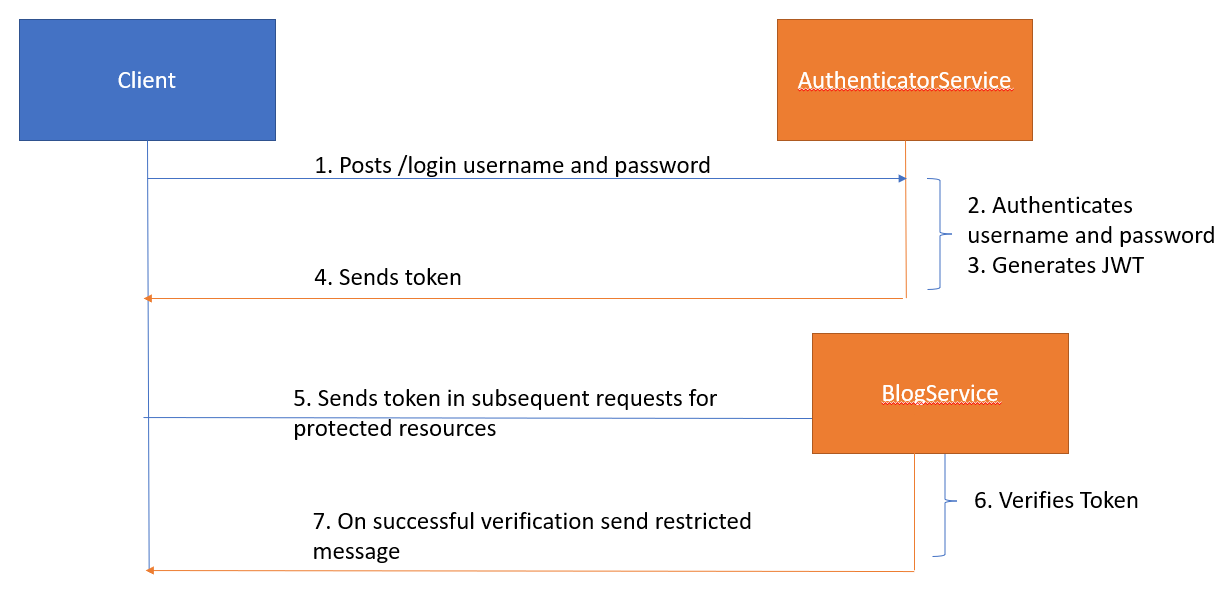
AuthenticatorService: Responsible for authenticating user name and password. On successful authentication, this service generates and returns a JWT token.BlogService: A protected service. This service contains a filter that verifies the JWT token that a client sends. On successful verification, this service returns a secured message.
This figure shows the interaction between the client and the preceding services.
The AuthenticatorService
Maven POM
To generate JWT token, you need the jjwt artifact as a dependency of your module.
The following code snippet shows the Maven POM dependency.
<dependencies>
<dependency>
    <groupId>io.jsonwebtoken</groupId>
    <artifactId>jjwt</artifactId>
    <version>0.9.1</version>
</dependency>
. . . . .
The Entity
AuthenticatorService contains a User entity to represent user credentials. The code of the User entity is this.
User.java
package com.stackroute.AuthenticatorService.model;

import javax.persistence.Entity;
import javax.persistence.Id;
import javax.persistence.Table;

@Entity
@Table(name="users")
public class User {

@Id
private String userName;
private String password;

public User() {
}

public User(String userName, String password) {
    this.userName = userName;
    this.password = password;
}

public String getUserName() {
    return userName;
}

public void setUserName(String userName) {
    this.userName = userName;
}

public String getPassword() {
    return password;
}

public void setPassword(String password) {
    this.password = password;
}
}
The Token Generator
Then comes the JwtGeneratorInterface. This interface contains a single generateToken() method that accepts a User object.
JwtGeneratorInterface.java
package com.stackroute.AuthenticatorService.config;

import com.stackroute.AuthenticatorService.model.User;
import java.util.Map;

public interface JwtGeneratorInterface {

Map<String, String> generateToken(User user);
}
JwtGeneratorImpl is the implementation of JwtGeneratorInterface.
JwtGeneratorImpl.java
package com.stackroute.AuthenticatorService.config;

import com.stackroute.AuthenticatorService.model.User;
import io.jsonwebtoken.SignatureAlgorithm;
import org.springframework.beans.factory.annotation.Value;
import org.springframework.stereotype.Service;

import java.util.Date;
import java.util.HashMap;
import java.util.Map;
import io.jsonwebtoken.Jwts;

@Service
public class JwtGeneratorImpl implements JwtGeneratorInterface{

  @Value("${jwt.secret}")
  private String secret;

  @Value("${app.jwttoken.message}")
  private String message;

  @Override
  public Map<String, String> generateToken(User user) {
    String jwtToken="";
    jwtToken = Jwts.builder().setSubject(user.getUserName()).setIssuedAt(new Date()).signWith(SignatureAlgorithm.HS256, "secret").compact();
    Map<String, String> jwtTokenGen = new HashMap<>();
    jwtTokenGen.put("token", jwtToken);
    jwtTokenGen.put("message", message);
    return jwtTokenGen;
  }
}
The Repository
I am using the Repository programming model of Spring Data JPA by implementingJpaRepository.
The code of the UserRepository repository interface is this.
UserRepository.java
package com.stackroute.AuthenticatorService.repository;

import com.stackroute.AuthenticatorService.model.User;
import org.springframework.data.jpa.repository.JpaRepository;
import org.springframework.data.repository.CrudRepository;
import org.springframework.stereotype.Repository;

@Repository
public interface UserRepository extends JpaRepository<User, String> {

public User findByUserNameAndPassword(String userName, String password);
}
The Service Layer
The service interface in this module is UserService. This interface declares two methods: saveUser() to store a User object in the database. The second method is getUserByNameAndPassword() to retrieve a user with the given user name and password.
Here is the code of theUserService interface .
UserService.java
package com.stackroute.AuthenticatorService.service;

import com.stackroute.AuthenticatorService.exception.UserNotFoundException;
import com.stackroute.AuthenticatorService.model.User;
import org.springframework.stereotype.Service;

@Service
public interface UserService {
    public void saveUser(User user);
    public User getUserByNameAndPassword(String name, String password) throws UserNotFoundException;
}
The implementation class of UserService is UserServiceImpl.
The code of UserServiceImpl is this.
UserServiceImpl.java
package com.stackroute.AuthenticatorService.service;

import com.stackroute.AuthenticatorService.exception.UserNotFoundException;
import com.stackroute.AuthenticatorService.model.User;
import com.stackroute.AuthenticatorService.repository.UserRepository;
import org.springframework.beans.factory.annotation.Autowired;
import org.springframework.stereotype.Service;

@Service
public class UserServiceImpl implements UserService {

  private UserRepository userRepository;

  @Autowired
  public UserServiceImpl(UserRepository userRepository){
    this.userRepository=userRepository;
  }
  @Override
  public void saveUser(User user) {
    userRepository.save(user);
  }

  @Override
  public User getUserByNameAndPassword(String name, String password) throws UserNotFoundException {
    User user = userRepository.findByUserNameAndPassword(name, password);
    if(user == null){
       throw new UserNotFoundException("Invalid id and password");
    }
    return user;
  }
}
The Controller
The controller has two endpoints: /register and /login. The first one is responsible to save a new user. The latter endpoint authenticates a user. On successful authentication, the latter endpoint returns a JWT token.
The code of the controller is this.
UserController.java
package com.stackroute.AuthenticatorService.controller;

import com.stackroute.AuthenticatorService.config.JwtGeneratorImpl;
import com.stackroute.AuthenticatorService.config.JwtGeneratorInterface;
import com.stackroute.AuthenticatorService.exception.UserNotFoundException;
import com.stackroute.AuthenticatorService.model.User;
import com.stackroute.AuthenticatorService.service.UserService;
import org.springframework.beans.factory.annotation.Autowired;
import org.springframework.http.HttpStatus;
import org.springframework.http.ResponseEntity;
import org.springframework.web.bind.annotation.*;

@RestController
@RequestMapping("api/v1/user")
public class UserController {
private UserService userService;
private JwtGeneratorInterface jwtGenerator;

  @Autowired
  public UserController(UserService userService, JwtGeneratorInterface jwtGenerator){
    this.userService=userService;
    this.jwtGenerator=jwtGenerator;
  }

  @PostMapping("/register")
  public ResponseEntity<?> postUser(@RequestBody User user){
  try{
     userService.saveUser(user);
     return new ResponseEntity<>(user, HttpStatus.CREATED);
   } catch (Exception e){
     return new ResponseEntity<>(e.getMessage(), HttpStatus.CONFLICT);
   }
  }

  @PostMapping("/login")
  public ResponseEntity<?> loginUser(@RequestBody User user) {
    try {
      if(user.getUserName() == null || user.getPassword() == null) {
      throw new UserNotFoundException("UserName or Password is Empty");
    }
    User userData = userService.getUserByNameAndPassword(user.getUserName(), user.getPassword());
    if(userData == null){
       throw new UserNotFoundException("UserName or Password is Invalid");
    }
       return new ResponseEntity<>(jwtGenerator.generateToken(user), HttpStatus.OK);
    } catch (UserNotFoundException e) {
       return new ResponseEntity<>(e.getMessage(), HttpStatus.CONFLICT);
    }
  }
}
Verifying Tokens in the BlogService
BlogService is the one to be protected through JWT. It’s a simple service with the following components:
• The controller that exposes endpoints
• The configuration file that registers the filter
• Filter is the component to do the token verification
Also, to perform verification, ensure you have this dependency in pom.xml.
<dependency>
  <groupId>io.jsonwebtoken</groupId>
  <artifactId>jjwt</artifactId>
  <version>0.9.1</version>
</dependency>
The Controller
The controller has two endpoints. The first is an unrestricted endpoint that simply returns a message. The second one is a JWT-restricted endpoint.
The code of the controller is this.
BlogControlleer.java
package guru.springframework.controller;

import org.springframework.http.HttpStatus;
import org.springframework.http.ResponseEntity;
import org.springframework.web.bind.annotation.GetMapping;
import org.springframework.web.bind.annotation.RequestMapping;
import org.springframework.web.bind.annotation.RestController;

@RestController
@RequestMapping("api/v1/blog")
public class BlogController {

    @GetMapping("/unrestricted")
        public ResponseEntity<?> getMessage() {
        return new ResponseEntity<>("Hai this is a normal message..", HttpStatus.OK);
    }

    @GetMapping("/restricted")
    public ResponseEntity<?> getRestrictedMessage() {
        return new ResponseEntity<>("This is a restricted message", HttpStatus.OK);
    }
}
The Configuration
The configuration is responsible for registering the authentication filter.
The code of the configuration class is this.
FilterConfig.java
package guru.springframework.config;

import guru.springframework.filter.JwtFilter;
import org.springframework.boot.web.servlet.FilterRegistrationBean;
import org.springframework.context.annotation.Bean;
import org.springframework.context.annotation.Configuration;

@Configuration
public class FilterConfig {

    @Bean
    public FilterRegistrationBean jwtFilter() {
        FilterRegistrationBean filter= new FilterRegistrationBean();
        filter.setFilter(new JwtFilter());

        // provide endpoints which needs to be restricted.
        // All Endpoints would be restricted if unspecified
       filter.addUrlPatterns("/api/v1/blog/restricted");
    return filter;
    }
}
Test the JWT Token in the Filter
The filter is responsible for verifying the JWT token. The filter class extends the GenericFilter class and overrides the doFiter() method.
This method accepts as input parameter:
- ServletRequest
- ServletResponse
- FilterChain
The code of the filter class is this.
JwtFilter.java
package guru.springframework.filter;

import io.jsonwebtoken.Claims;
import io.jsonwebtoken.Jwts;
import org.springframework.web.filter.GenericFilterBean;

import javax.servlet.FilterChain;
import javax.servlet.ServletException;
import javax.servlet.ServletRequest;
import javax.servlet.ServletResponse;
import javax.servlet.http.HttpServletRequest;
import javax.servlet.http.HttpServletResponse;
import java.io.IOException;

public class JwtFilter extends GenericFilterBean {
    @Override
    public void doFilter(ServletRequest servletRequest, ServletResponse servletResponse, FilterChain filterChain) throws IOException, ServletException {
           final HttpServletRequest request = (HttpServletRequest) servletRequest;
           final HttpServletResponse response = (HttpServletResponse) servletResponse;
           final String authHeader = request.getHeader("authorization");
           if ("OPTIONS".equals(request.getMethod())) {
               response.setStatus(HttpServletResponse.SC_OK);
               filterChain.doFilter(request, response);
           } else {
               if(authHeader == null || !authHeader.startsWith("Bearer ")){
                   throw new ServletException("An exception occurred");
               }
           }
           final String token = authHeader.substring(7);
           Claims claims = Jwts.parser().setSigningKey("secret").parseClaimsJws(token).getBody();
           request.setAttribute("claims", claims);
           request.setAttribute("blog", servletRequest.getParameter("id"));
           filterChain.doFilter(request, response);
    }
}
Test the Application with JWT Token
To test the application:
- Start POSTMAN or a REST client to access the
AuthenticarService - Send a POST request to the login endpoint with
Aliceandpass123as credentials in the request body. 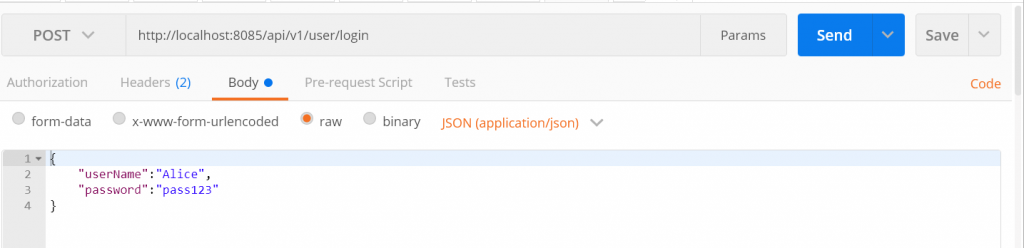
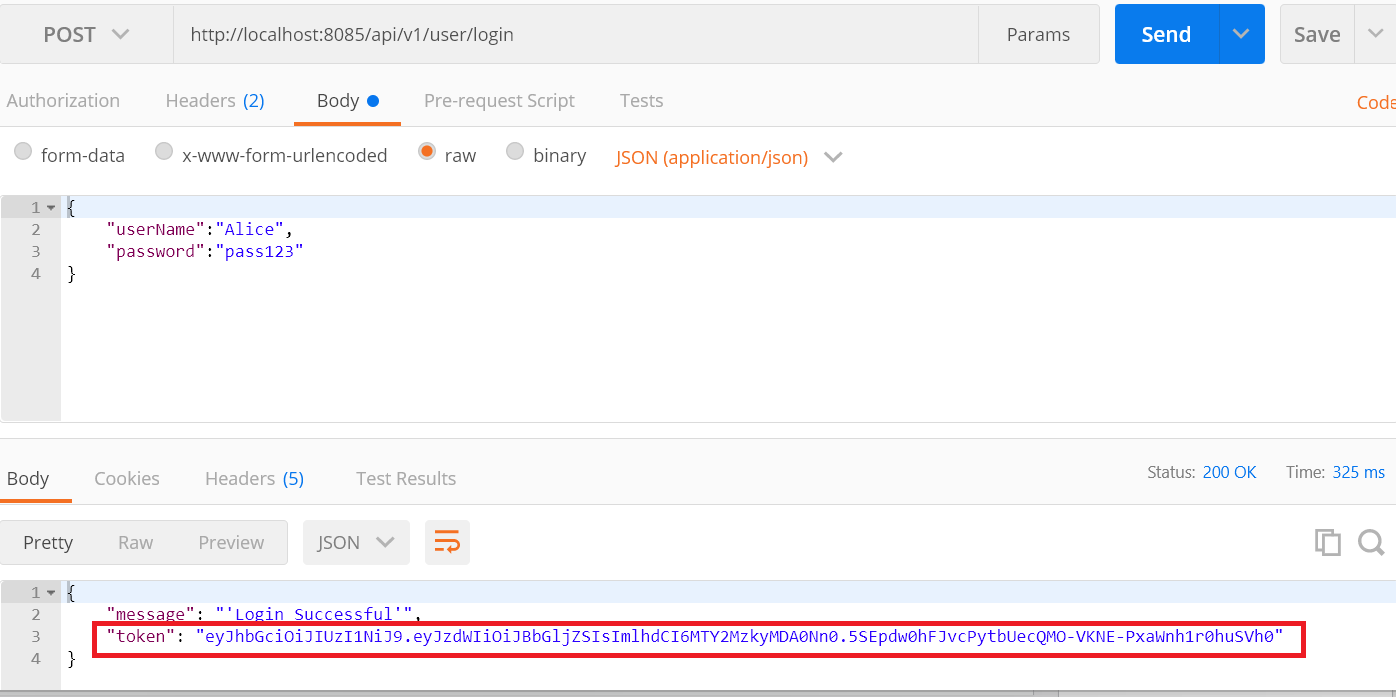
 Notice the JSON web token returned by the Authenticator service.

- Next, start
BlogServiceand make aGETrequest to the restricted endpoint. Ensure, you add the token in theAuthorizationheader.
The value Authorization header value must be Bearer, separated by a space and followed by the token
Once you send the request, you will receive a restricted response.
Summary
I have seen lots of developers verifying JWT tokens in their services. Microservices have a pattern called Gateway Offloading. This pattern enables each microservice to offload shared service functionality, such as the use of SSL certificates, Token verification, to an API gateway.
In addition, Microservices Gateways can tend to become Single Point of Failure. However, with Technology evolving fast and moving to the cloud. There are hardware load balancers, software load balancers, and cloud load balancers. And all of these have redundancy and various failover schemes to prevent a single point of failure.
You can access the AuthenicatorService here at Github, For the Blogservice, access here at Githuub.
If you want to deep-dive into Spring Security, I have a Udemy Bestseller Spring Security Core: Beginner to Guru


Yasir Raza
I have a user service which contains login endpoint. The login endpoint generates jwt token. I want to authenticate the jwt token using api gateway. Also want to authorize role based authentication in api gateway filter. I am unable to implement spring security in api gateway.
Hoang Trung
If I have more service, i must config jwt filter for them?
Arvind
what is this ? if you pass the auth token or not it will give you the “This is a restricted message” msg??
there is no matter you are passing or not
Manish
I like your explanation, Thank You so much Guru
Rahul
This example does not suits for microservice architecture.
Kris
Thanks for the article.
It gives a good overview, but the code contributor did not write the code cleanly. Exceptions thrown from controllers. return new ResponseEntity(jwtGenerator.generateToken(user), HttpStatus.OK); ignoring User userData = userService.getUserByNameAndPassword(user.getUserName(), …
Lots of code smells