

Spring Boot Web Application – Part 2 – Using ThymeLeaf
43 CommentsLast Updated on June 21, 2019 by Simanta
In the first part of this tutorial series for building a web application using Spring Boot, we looked at creating our Spring project using the Spring Initializr. This handy tool gave us a Spring project to work with, jump starting our development effort by creating the project structure and Maven dependencies for us.
In this post I am going to walk you through enabling rendering a webpage using Thymeleaf and Spring MVC.
Why Thymeleaf?
Traditionally, Spring MVC applications used Java Server Pages, or JSPs to generate html content. JSPs are a mature technology and has been around since the early days of Java. In terms of raw speed, JSPs are hard to beat too. But when you do not need the absolute raw speed of a JSP, you may want to consider alternatives to JSPs which help improve developer productivity.
JSPs offer an HTML ‘like’ syntax. Meaning its close, but not completely compatible with HTML. Thymeleaf on the other hand, aims to be a “Natural Template”. This means the Thymeleaf template file will open and display normally in a browser, while a JSP file does not.
I also have selfish reasons for using Thymeleaf in this tutorial on Spring Boot. I’ve never used it, and I thought it looked like a cool technology to try out.

Thymeleaf Configuration and Spring Boot
If you were using just Spring MVC, you would need to configure the Thymeleaf template engine for use. That’s not so when you’re using Spring Boot, because we’ve included the dependency spring-boot-starter-thymeleaf in our Maven POM for the project, so Spring Boot will do some things automatically for us.
By default, Spring Boot configures the Thymeleaf template engine to read template files from /resources/templates .
Effectively, you as the developer just need to start making Thymeleaf templates and dropping them into /resources/templates.
Thymeleaf Template
Let’s start with a very basic HTML file to show.
Thymeleaf Template – index.html
A few things I’d like to point out in the HTML:
- Line 1 – Is the standard declaration for HTML 5
- Line 2 – sets a XML Namespace for Thymeleaf. This is important as you start to use the Thymeleaf extensions.
- Line 6 – Defines the character set for the HTML file.
<!DOCTYPE html>
<html xmlns:th="http://www.thymeleaf.org">
<head lang="en">

    <title>Spring Framework Guru</title>
    <meta http-equiv="Content-Type" content="text/html; charset=UTF-8"/>
</head>
<body>
<h1>Hello</h1>

<h2>Fellow Spring Framework Gurus!!!</h2>
</body>
</html>
Spring MVC Controller
The next step we need to take care of is creating a Spring MVC controller. Because we’ve included the dependency spring-boot-starter-web, Spring Boot automatically configured Spring MVC for us. We also get an embedded instance of Tomcat to run our application in too. This may sound simple, but it does take care of a lot of setup tasks that we would normally need to do if we were using Spring MVC without Spring Boot.
With using Spring Boot, we only need to define our controller class, nothing else. Like other things, Spring Boot sets up sensible defaults for us.
IndexController.java
At this point, we just need a very simple controller. We want to map the web root path "/" to the index template. A common convention used in Spring MVC is to return the string name of the template file, less the file extension. Thus to show the index.html file we defined above, our controller method needs to return the string "index"
On Line 6, I’ve used the @Controller annotation to make this class a Spring component and a Spring MVC controller. On line 9, you can see that I annotated the index() method with a @RequestMapping annotation. By doing this, I’ve configured the root path to this controller method.
package guru.springframework.controllers;

import org.springframework.stereotype.Controller;
import org.springframework.web.bind.annotation.RequestMapping;

@Controller
public class IndexController {
    @RequestMapping("/")
    String index(){
        return "index";
    }
}
Running the Example
If you’re using IntelliJ, you can go into the class SpringBootWebApplication and right click on the main() method, then click on run. This will run the Spring Boot application. Spring Boot will startup an embedded instance of Tomcat and deploy our application to it.
BUT – if you navigate to http://localhost:8080 via your browser, the port Tomcat is listening on, you will see this:
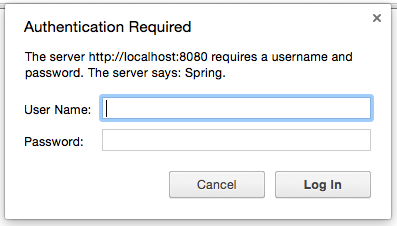
So, what’s happening here? Because we added Spring Security into our build, Spring Boot has configured Spring Security for our use. The default behavior is to require basic auth for all endpoints. This is a good approach to secure everything by default, but it can trip you up if you’re not accustomed to working with Spring Security.
Spring Security Configuration
What we need to do, is tell Spring Security to allow all requests access to the root path. I’ll be covering Spring Security in additional detail in a future post, but for now, we need to add a Spring Configuration class to allow us to configure Spring Security.
SecurityConfiguration.java
To accommodate the Spring Security configuration, I created a new package and added the SecurityConfiguration class. By annotating the class with the @Configuration annotation, I’m telling Spring this is a configuration class. When doing Java configuration for Spring Security, you need to extend the WebSecurityConfigurerAdapater class and override the configure method.
package guru.springframework.configuration;

import org.springframework.context.annotation.Configuration;
import org.springframework.security.config.annotation.web.builders.HttpSecurity;
import org.springframework.security.config.annotation.web.configuration.WebSecurityConfigurerAdapter;

@Configuration
public class SecurityConfiguration extends WebSecurityConfigurerAdapter {

    @Override
    protected void configure(HttpSecurity httpSecurity) throws Exception {
        httpSecurity.authorizeRequests().antMatchers("/").permitAll();
    }

}
Spring Boot and Package Scans
One quick note I want to call out here, the controller and configuration classes I’ve just defined are annotated Spring Components. Spring will only pick these up when their respective package is included in a component scan. A default behavior of Spring Boot when using the @SpringBootApplication annotation is to perform a package scan on its package (and all sub packages). Because my Spring Boot application resides in the package guru.springframework, the annotated Spring Components in the child packages are automatically found by Spring. If they were in a different package tree, I would need to explicitly tell Spring Boot to scan that package. This is important to know, and is something that could easily trip up a beginner with Spring Boot.
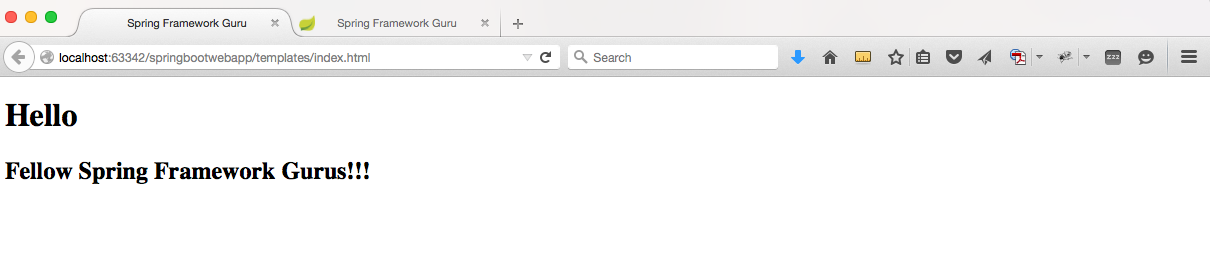
Example Web Page:
At this point in building our Spring Boot web application, we have not applied any styling to our Thymeleaf template file. Its pure simple, unstyled HTML.
Managing Web Resources Under Spring Boot
At this point our Spring Boot Web application is working, in the sense, it generates some HTML. But that’s not very realistic for today’s web applications. Any modern web application is going to have some web resources to manage. Web resources typically include:
- CSS files.
- Javascript assets
- Images
Right now, our web page is very boring. Let’s dress it up using Bootstrap CSS and JQuery.
Static Resources with Spring Boot
Spring Boot will automatically serve static resources from the path /resources/static. By a generally accepted convention, you will typically put CSS files in /resources/static/css, Javascript files in /resources/static/js, and images in resources/static/images. You could name the directories after /resources/static/ whatever you wish, this is just a convention you will likely see used and it helps you organize the static resources.
I like to add a CSS file for any overrides and customization I’ll need. I’m going to add an empty CSS file into /resources/static/css and then add it to the Thymeleaf template as follows:
    <link href="../static/css/guru.css"
          th:href="@{css/guru.css}" rel="stylesheet" media="screen"/>
Notice how the link tag has two href attributes? The first one in normal HTML will be used by the browser when the template is read from the file system. The second with the th namespace is used by Thymeleaf when the template is rendered via Spring Boot. In this case a SPeL expression is being used to resolve the path of the static asset under Spring Boot, and this will be used as the path when the template is rendered by Spring Boot for the browser via a request through Tomcat.
This is what is meant when Thymeleaf is called a natural template engine. In this case, the CSS file is found for the HTML file via the relative path in the file system, then again when it’s deployed using a SPeL notation.
Spring Boot and WebJars
More than once I’ve copied all the files for Bootstrap CSS or JQuery into a resources folder, and then managed the lifecycle of their versions. This can be a manual and tedious process. WebJars is a very cool concept which packages web assets into a JAR file for your use. The JAR s are available in public Maven repositories, making them build assets you can easily include in your project. (Did you know JAR files are just zip files, with the extension changed to JAR?)
Spring Boot supports WebJars out of the box. We just need to include the dependency in our Maven POM file for the project, then add it to our Thymeleaf template file.
We can declare the WebJar dependencies for Bootstrap CSS and JQuery by adding the following lines to our Maven POM file:
		<!--WebJars-->
		<dependency>
			<groupId>org.webjars</groupId>
			<artifactId>bootstrap</artifactId>
			<version>3.3.4</version>
		</dependency>
		<dependency>
			<groupId>org.webjars</groupId>
			<artifactId>jquery</artifactId>
			<version>2.1.4</version>
		</dependency>
Now we can add the Bootstrap CSS and JQuery dependencies to our index.html file as follows:
    <meta http-equiv="Content-Type" content="text/html; charset=UTF-8"/>

    <link href="http://cdn.jsdelivr.net/webjars/bootstrap/3.3.4/css/bootstrap.min.css"
          th:href="@{/webjars/bootstrap/3.3.4/css/bootstrap.min.css}"
          rel="stylesheet" media="screen" />

    <script src="http://cdn.jsdelivr.net/webjars/jquery/2.1.4/jquery.min.js"
            th:src="@{/webjars/jquery/2.1.4/jquery.min.js}"></script>

    <link href="../static/css/guru.css"
          th:href="@{css/guru.css}" rel="stylesheet" media="screen"/>
Note: In this example I’m using a public CDN for the Bootstrap CSS and JQuery assets. By doing this I can preserve the natural templating of the Thymeleaf template file.
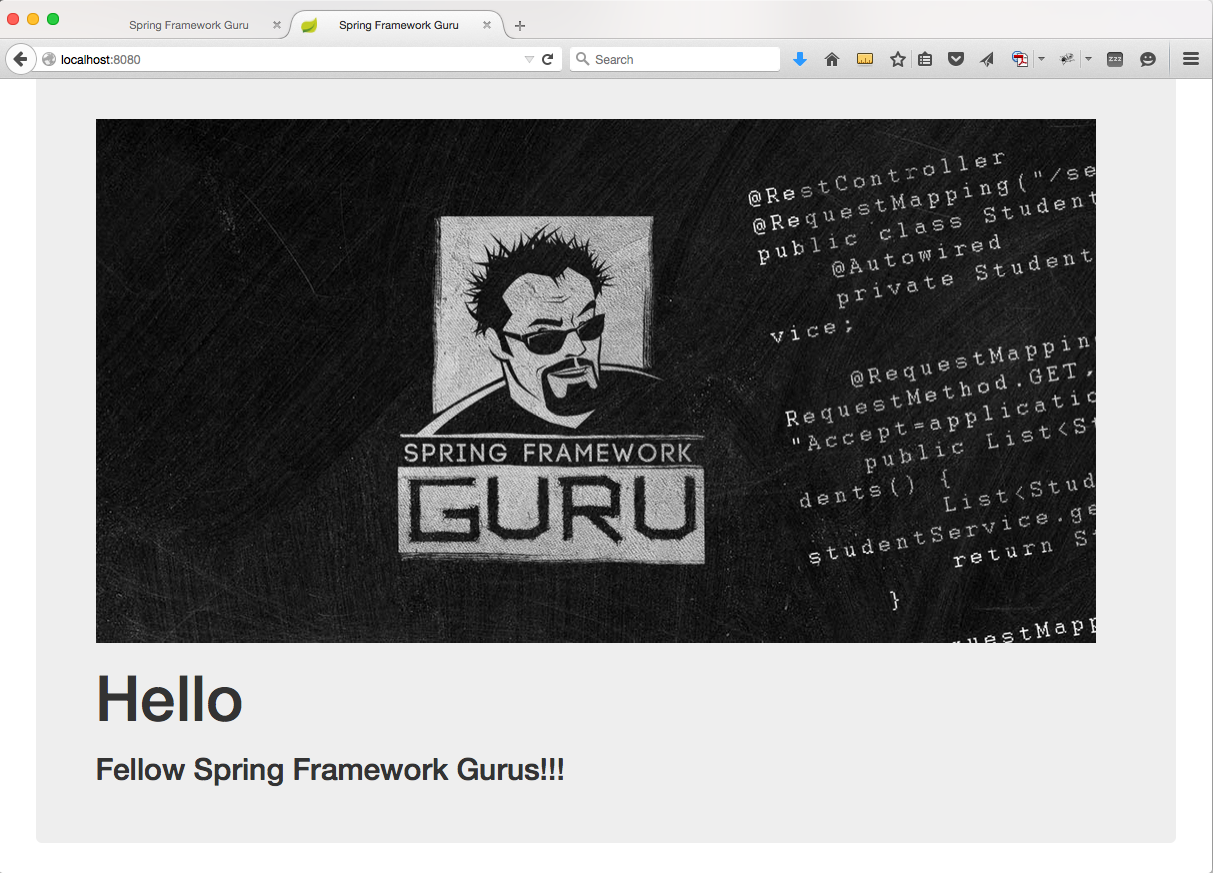
Styling Our Example
Now that we have the Bootstrap CSS and JQuery resources loading with our Spring Boot web application, lets add a little Bootstrap styling to our index.html file.
index.html
<!DOCTYPE html>
<html xmlns:th="http://www.thymeleaf.org">
<head lang="en">

    <title>Spring Framework Guru</title>
    <meta http-equiv="Content-Type" content="text/html; charset=UTF-8"/>

    <link href="http://cdn.jsdelivr.net/webjars/bootstrap/3.3.4/css/bootstrap.min.css"
          th:href="@{/webjars/bootstrap/3.3.4/css/bootstrap.min.css}"
          rel="stylesheet" media="screen" />

    <script src="http://cdn.jsdelivr.net/webjars/jquery/2.1.4/jquery.min.js"
            th:src="@{/webjars/jquery/2.1.4/jquery.min.js}"></script>

    <link href="../static/css/guru.css"
          th:href="@{css/guru.css}" rel="stylesheet" media="screen"/>
</head>
<body>
<div class="container">
    <div class="jumbotron">
        <img src="../static/images/FBcover1200x628.png" width="1000"
             th:src="@{images/FBcover1200x628.png}"/>
        <h1>Hello</h1>

        <h2>Fellow Spring Framework Gurus!!!</h2>
    </div>
</div>

</body>
</html>
Example web page:
Conclusion
At this point in this tutorial series on building a Spring Boot web application using Spring Boot, we’ve shown you how to create a basic project using the Spring Initializr and setup support for Thymeleaf. You can see how Spring Boot has made some common sense choices for us, like configuring the Thymeleaf template engine for use with Spring MVC, defaulting the locations for static resources, and providing out of the box support for WebJars.
In our next post on Spring Boot, we will take a look at setting up the persistence layer with Spring Boot, H2 and Spring Data JPA.
Get The Code
I’ve committed the source code for this post to GitHub. It is a Maven project which you can download and build. If you wish to learn more about the Spring Framework, I have a free introduction to Spring tutorial. You can sign up for this tutorial in the section below.
The source code for this post is available on GitHub. You can download it here.
Video
I went through the content of this post on YouTube video. You can check it out below.


davidma7685
Were you able to get Bootstrap webjars working for Intellij’s code completion? I tried using webjars before, but (unlike with regular css inclusion) intellij can’t seem to scan the webjars for code completion of css classes in html.
Mladen J.
Very clear and concise description. Touch all important points. Thanks a lot for sharing this.
jt
Thanks!
pedram
thankd it really helped
jt
Thanks!
James Scott Tayler
This is a wicked tutorial, always refer back to it. One thing I did note though was I personally thought thymeleaf was horrible after using it because you have to put in dummy html code that takes up space, doesn’t do anything and makes the code less readable without really providing a benefit.
I tried freemarker and was really happy with that. No B.S, just what you want.
So for any newbies (and pros too), opt for freemarker in favour of thymeleaf if you haven’t tried either of these templating engines and you’re wanting to give something a go.
jt
Freemarker is a great option. Unlike Thymeleaf, it is not a natural template.
Jingyi
I didn’t understand why you have to put 2 hrefs as the following,
Can you remove the cdn one?
thanks
Jingyi
Actually, i didn’t understand this:
In this example I’m using a public CDN for the Bootstrap CSS and JQuery assets. By doing this I can preserve the natural templating of the Thymeleaf template file.
What does “by doing this I can preserve the natural templating of the Thymeleaf template file” mean?
jt
The CDN resource is used when the html file is viewed directly in the browser. The other url is rendered by the Thymeleaf template engine when deployed under Tomcat.
Jingyi
Got it. thanks.
Om
hey JT after done everything still i get that authentication requried….please help me on this.
George
Great tutorial.Thanks alot!
Roman
Can you help me?
You are using:
th:href=”@{/webjars/bootstrap/3.3.4/css/bootstrap.min.css}” – (with a slash before “webjars”) to include webjars resources to the web page. I was doing the same thing and it didn’t work. Removing the first slash solved the problem. So:
th:href=”@{webjars/bootstrap/3.3.4/css/bootstrap.min.css}” – works fine for me.
But why?
jt
Not sure. Maybe a OS quirk? I’m using OSX.
Roman
It’s interesting. I’m using Windows. Can any Windows user confirm it?
chris
Excellent post, thank you!
Trevor Thompson
Do you have an example where you created a custom Thymeleaf config class? I’ve tried to turn a bootstrap template I purchased into Thymeleaf files but found the thymeleaf template resolvers were too strict with the HTML5 and I’ve tried to templateResolver.setTemplateMode(“LEGACYHTML5”); on the templateResolver to relax the HTML parsing that was breaking on tags.
jt
No, sorry I don’t.
Srao
Do you know what configuration changes needs to be added to include spring webflow here? Thanks
Agboka Atsou Elom
Very excellent post, I went through it and it works fine. I am using Linux Ubuntu 14.04.
vssequeiraVaness
Would you have an example with a one-to-many relationship? For some reason I can’t get my data to persist in the owned (many) table.
jt
This is something I cover in my Spring Core course.
You can find an example of the one to many here: https://github.com/springframeworkguru/spring-core-spring-mvc/tree/spring-data-jpa
Vanessa
Thnx. That definitely helped. I now have my 1-many bidirectional relationship working. The link that you provided comes with a tutorial. I want to understand the Spring framework from a beginners point of view. Would the course be targeted for someone like me?
jt
Yes, my Spring Core courses are for people new to Spring. I do expect you to have basic Java skills though.
Sanchit
Hi John, What are the advantage of thymeleaf over apache tiles. And we are not using Jsp in your above demo?
jt
Thymeleaf is a natural templating language. Meaning, unlike JSP, you can view the templates directly browser. No JSP used in this example.
Lena
Hi John, thank you for great tutorial! Do you know how can I configure the spring boot project so that I can use both, Thymeleaf template and plain static html? At the moment I get “HTTP Status 500 – Request processing failed;” whenever I put static html file in “static” folder and it drives me nuts 🙁
jt
I actually have not tried that. I’d expect it would work. 500 is a server error. You’ll need to look into the cause of the exception.
ffratoni
Hello, thanks for this tutorial. I like to point out anyway that without adding explicitly a resource handler in web configuration webjars are not working in eclipse Mars.
@Override
public void addResourceHandlers(ResourceHandlerRegistry registry) {
registry.addResourceHandler(“/webjars/**”).addResourceLocations(“classpath:/META-INF/resources/webjars/”);
}
gil
great tuts
Pablo
Just to point that the import of SpringBootServletInitializer in ServletInitializer.cass is deprecated and everyone should update it to import org.springframework.boot.web.support.SpringBootServletInitializer;. Otherwise your IDE won´t recognize the import at all
Jhon
Thanks!!!
Mark Garcia
Hello, so I’m having a bit of a problem following your tutorial/guide. I’m new to SpringBoot but not to Spring.
I have my SpringBoot starter project with Web, Thymeleaf, Security, JPA, and H2 components added. Currently, my SpringBoot version is 1.5.6-Release which is different than your post.
When I try to run the application with no Code except the Controller and SecurityConfiguration @Beans I get startup errors because of the missing Hibernate EntityManagerFactory. I noticed there are no other @Bean configurations defined so I guess this is only because I’m using a new version of SpringBoot?
I assume the EntityManger is configured in a later part of this guide. Maybe that I can find out here.
mbeddedsoft
NVM… I just added a HibernateConfiguration class from one of my other spring projects and fixed it.
Om
hey JT after done security Configuration still i get that authentication requried….please help me on this.
itypedthis1
Im Getting the same Error, pleasse assist
Dmitry
Use @SpringBootApplication(exclude = { SecurityAutoConfiguration.class }
Luke Dutton
So, in your example, It looks like the only app you are running on your local host is this app. What if you had other apps on your local host and you needed to do something like “localhost:8080/SpringGuru/”? Do you need to have all of your base request mapping start with “SpringGuru/” instead of just “/”?