Bean Validation in Spring Boot
0 CommentsLast Updated on May 19, 2021 by Simanta
Data validation is a basic requirement for any application. This is more significant for web applications that accept data as input. Bean Validation or commonly known as JSR-380 is a Java standard that is used to perform validation in Java applications.
To perform validation, data Items are applied constraints. As long as the data satisfies these constraints, it will be considered valid.
You can apply the built-in constraints as annotation in the fields of a Java class. The constraints can be a numerical value range, being null or not null, having a specific number of items or length, for instance.
In this post, I will explain how to use Bean Validation in a Spring Boot application.
Dependencies
For this post, you will need the spring-boot-starter-validation dependency in your pom.xml file.
  <dependency>
      <groupId>org.springframework.boot</groupId>
      <artifactId>spring-boot-starter-validation</artifactId>
  </dependency>
Bean Validation Example
I have created a Blog JPA entity class and added constraints to its fields.
The Entity
The code for the entity class is this.
Blog.java
@Entity
public class Blog {
      public Blog() {
   }
   @Id
   @GeneratedValue(strategy = GenerationType.AUTO)
   private long id;

   @NotNull
   @Size(min = 2, message = "Blog Title must have at least 2 characters")
   private String blogTitle;

   @NotBlank(message = "Blog Editor cannot be blank")
   private String blogEditor;

   @Email(message = "Email should be valid")
   private String blogEmail;

// Getters and Setters
}
The preceding JPA entity uses several validation constraints in form of annotations on the fields of the entity. Each annotation has a message attribute that specifies the constraint violation message. The annotations used in the code are:
@NotNull: Indicates that the annotatedblofTitlefield should not be null.@Size: Indicates that blogTitle should have a minimum of two characters. The@Sizeannotation can also be used to set the minimum and maximum size of arrays, collections such as lists, sets, and maps.@NotBlank: Validates that the property is not null or whitespace. But, it can be applied only to text values.@Email: Validates that the annotated property is a valid email address.
You can also use these annotations to variables such as method and constructor arguments.
This code shows how you can apply the Java validation annotations to constructor arguments.
public Blog(long id, @NotNull(message = "Blog Title must have at least 2 characters") String blogTitle, @NotBlank(message = "Blog Editor cannot be blank") String blogEditor, @Email(message = "Email
  should be valid") String blogEmail) {
      this.id = id;
      this.blogTitle = blogTitle;
      this.blogEditor = blogEditor;
      this.blogEmail = blogEmail;
  }
The Repository
This is the repository interface that extends CrudRepository of Spring Data JPA. This interface is responsible for the basic CRUD operations on Blog objects.
BlogRepository.java
package org.springframework.guru.repository;

import org.springframework.data.repository.CrudRepository;
import org.springframework.guru.model.Blog;
import org.springframework.stereotype.Repository;

@Repository
public interface BlogRepository extends CrudRepository<Blog,Long> {
}
The Controller
The code for the Controller class is this.
BlogController.java
@RestController
@RequestMapping("api/v1")
public class BlogController {

   @Autowired
   private BlogRepository blogRepository;

   @GetMapping("/blogs")
   public List findAll() {
       return (List) blogRepository.findAll();
   }

   @PostMapping("/blog")
   @ResponseStatus(HttpStatus.CREATED)
  public Blog saveBlog(@Valid @RequestBody Blog savedBlog) {
       return blogRepository.save(savedBlog);
   }
The code in Line 15 passes the @Valid annotation as a method parameter. This tells Spring to automatically instantiate a Validator and to validate the Blog object.
Before the handler method body executes, validation takes place. If the validation fails, the method will throw a MethodArgumentNotValidException. This exception is mapped to the 400 Bad Request response status by default.
Note: For the purpose of this post, I have autowired the repository directly in the constructor. Ideally, we should have an intermediate service layer to handle the busin=ess requirements of the application.
This Figure shows an invalid request where blogEditor is blank and blogEmail is an invalid email address. You can also see the response sent by the application post validation failures.
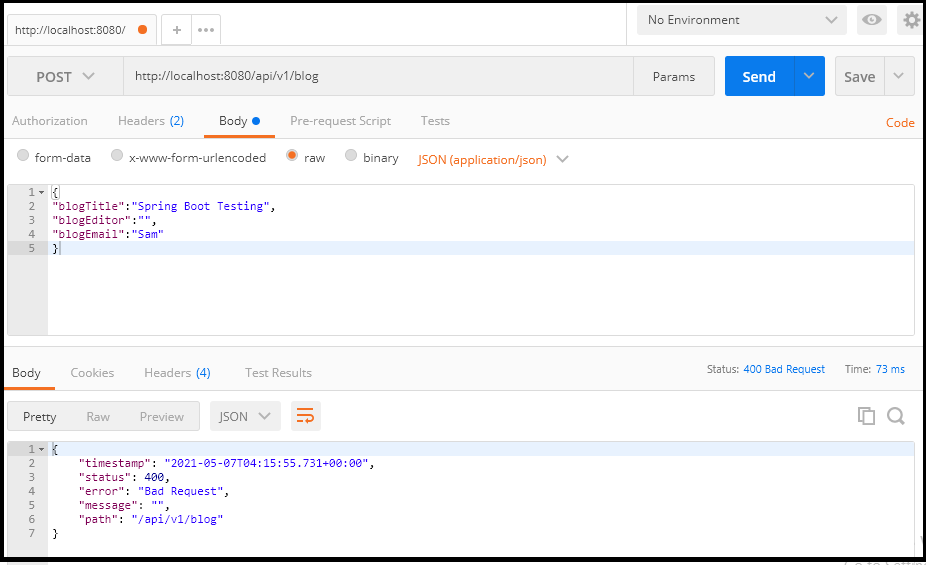
As you can see in the preceding figure, users sending the request won’t have specific information on validation failures. We can address this by sending meaningful failure messages.
Bean Validation Failure Messages
To return user-friendly messages to the client, you can use an exception handler to process validation errors.
You can read my post Exception Handling in Spring Boot REST API to learn more about exception handling in Spring.
The message handler code in the REST controller class is this.
BlogController.java
@ResponseStatus(HttpStatus.BAD_REQUEST)
@ExceptionHandler(MethodArgumentNotValidException.class)
public Map<String, String> handleMethodArgumentNotValid(MethodArgumentNotValidException ex) {
   Map<String, String> errors = new HashMap<>();

   ex.getBindingResult().getFieldErrors().forEach(error ->
           errors.put(error.getField(), error.getDefaultMessage()));

   return errors;
}
Here, the handleMethodArgumentNotValid() method is decorated with two annotations:
@ResponseStatus: Specifies that a 400 Bad Request status will be returned in the response.@ExceptionHandler: Marks this method as a handler for allMethodArgumentNotValidExceptions.in the controller.
In Line 6, you get the BindingResult for the class by calling getBindingResult() on MethodArgumentNotValidException. The BindingResult interface encapsulates information about errors that result from validating a class instance. You obtain a collection of FieldError instances from BindingResult by calling its getFieldErrors() method.
Line 6 – 7 you iterate through the collection and retrieve the field name and error message for each field and put them in the errors Map.
In Line 8 the Map is returned to the client in JSON format by default.
Run the application and resend the invalid request to post a blog.

This time, you will see, the validation error messages for both BlogTitle and BlogEditor fields.
Common Bean Validation Annotations
In addition to the validation annotations we used in the application, some other key JSR 303 (Bean Validation) are:
@AssertFalsestates that the value of the field or property must be false.@AssertTruestates that the value of the field or property must be true.@Maxensures a number whose value must be lower or equal to the specified maximum.@Minensures a number whose value must be higher or equal to the specified minimum.@Futureensurest that the date or time is in the future.@Pastensures that the date is in the past.@DecimalMaxa decimal number whose value must be lower or equal to the specified maximum.@DecimalMina decimal number whose value must be higher or equal to the specified minimum.
You can find the source code of this post on Github.
For in-depth knowledge of the Spring Framework and Spring Boot, you can check my Udemy Best Seller Course Spring Framework 5: Beginner to Guru