

Using YAML in Spring Boot to Configure Logback
11 CommentsLast Updated on October 21, 2024 by jt
When it comes to logging in enterprise applications, logback makes an excellent choice – it’s simple and fast, has powerful configuration options, and comes with a small memory footprint. I have introduced logback in my introductory post, Logback Introduction: An Enterprise Logging Framework. YAML is just one option you can use for Spring Boot configuration. In a series of posts on logback, I’ve also discussed how to configure Logback using XML and Groovy and how to use Logback in Spring Boot applications. The posts are available as:
In my earlier post on Using Logback with Spring Boot, I used a properties file to configure logback. In this post, I’ll discuss how to configure Logback using Spring Boot’s YAML configuration file. If you’re a seasoned user of the Spring Framework, you’ll find YAML a relatively new configuration option available to you when using Spring Boot.
Creating a Logger
We’ll use a simple Spring Boot web application and configure logback with YAML in that application. Please refer my previous post, where I wrote about creating a web application using Spring Boot. This post expands upon concepts from the previous post, but is focused on the use of YAML configuration with Spring Boot.
The application from the previous post contains a controller, IndexController to which we’ll add logging code, like this.
IndexController.java
package guru.springframework.controllers;


import org.slf4j.Logger;
import org.slf4j.LoggerFactory;
import org.springframework.stereotype.Controller;
import org.springframework.web.bind.annotation.RequestMapping;

@Controller
public class IndexController {
    private final Logger logger = LoggerFactory.getLogger(this.getClass());
    @RequestMapping("/")
    String index(){
        logger.debug("This is a debug message");
        logger.info("This is an info message");
        logger.warn("This is a warn message");
        logger.error("This is an error message");
        return "index";
    }
}
Since Logback is the default logger under Spring Boot, you do not need to include any additional dependencies for Logback or SLF4J.
Run the SpringBootWebApplication main class. When the application starts, access it from your browser with the URL, http://localhost:8080
The logging output on the IntelliJ console is this.
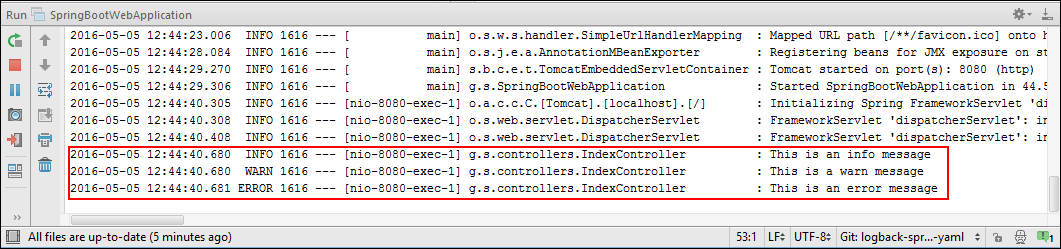
In the output above, the logging messages from IndexController are sent to the console by the logback root logger. Notice that the debug message of IndexController is not getting logged. Logback by default will log debug level messages. However, the Spring Boot team provides us a default configuration for Logback in the Spring Boot default logback configuration file, base.xml. In addition, Spring Boot provides provide two preconfigured appenders through the console-appender.xml and file-appender.xml files. The base.xml file references both of them.
The code of the base.xml file from the spring-boot github repo is this.
<?xml version="1.0" encoding="UTF-8"?>

<!--
Base logback configuration provided for compatibility with Spring Boot 1.1
-->

<included>
  <include resource="org/springframework/boot/logging/logback/defaults.xml" />
  <property name="LOG_FILE" value="${LOG_FILE:-${LOG_PATH:-${LOG_TEMP:-${java.io.tmpdir:-/tmp}}}/spring.log}"/>
  <include resource="org/springframework/boot/logging/logback/console-appender.xml" />
  <include resource="org/springframework/boot/logging/logback/file-appender.xml" />
  <root level="INFO">
    <appender-ref ref="CONSOLE" />
    <appender-ref ref="FILE" />
  </root>
</included>
Here you can see that Spring Boot has overridden the default logging level of logback by setting the root logger to INFO, which is the reason we did not see the debug messages in the example above. As we’ll see in the next section, changing log levels in Spring Boot is very simple.

YAML Configuration via Spring Boot’s application.yml File
In a Spring Boot application, you can externalize configuration to work with the same application code in different environments. The application.yml file is one of the many ways to externalize configuration. Let’s use it to externalize logging configuration.
If you wish to use YAML for your Spring configuration, you simply need to create a YAML file. Spring Boot will look for a application.yml file on the classpath. In the default structure of a Spring Boot web application, you can place the file under the Resources directory. To parse YAML files, you need a YAML parser. Out of the box, Spring Boot uses SankeYAML, an YAML parser. There is nothing you need to do to enable YAML support in Spring Boot. By default under Spring Boot, YAML is ready to go.
Here is an example of an application.yml file with basic configurations of logging levels.
spring:
logging:
  level:
    org.springframework.web: DEBUG
    guru.springframework.controllers: DEBUG
    org.hibernate: DEBUG
In the configuration code above, we set the log levels of the Spring framework, any application logger of the guru.springframework.controllers package and its sub-packages, and hibernate to DEBUG. Although, we are not using Hibernate in our example application, I have added the Hibernate logging configuration for demonstration purposes so you can see how to configure logging for various Java packages.
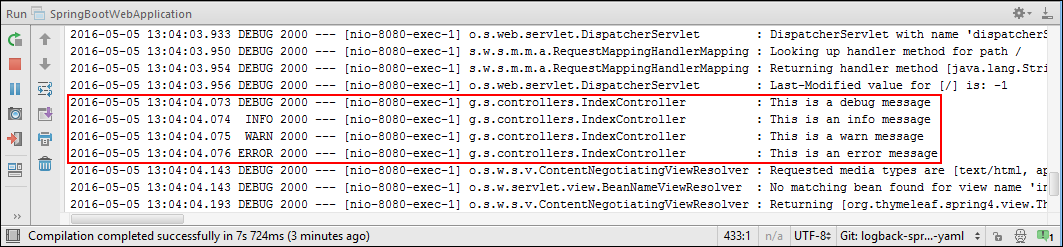
When you run the application, you’ll notice DEBUG messages of the Spring frameworks’ startup on the console. When you access the application, notice the log messages of the IndexController now include the debug message.
At this point, log messages are only being sent to the console. You can configure Spring Boot to additionally log messages to log files. You can also set the patterns of log messages both for console and file separately, like this.
spring:
logging:
  file: logs/dev_app.log
  pattern:
    console: "%d %-5level %logger : %msg%n"
    file: "%d %-5level [%thread] %logger : %msg%n"
  level:
    org.springframework.web: DEBUG
    guru.springframework.controllers: DEBUG
    org.hibernate: DEBUG
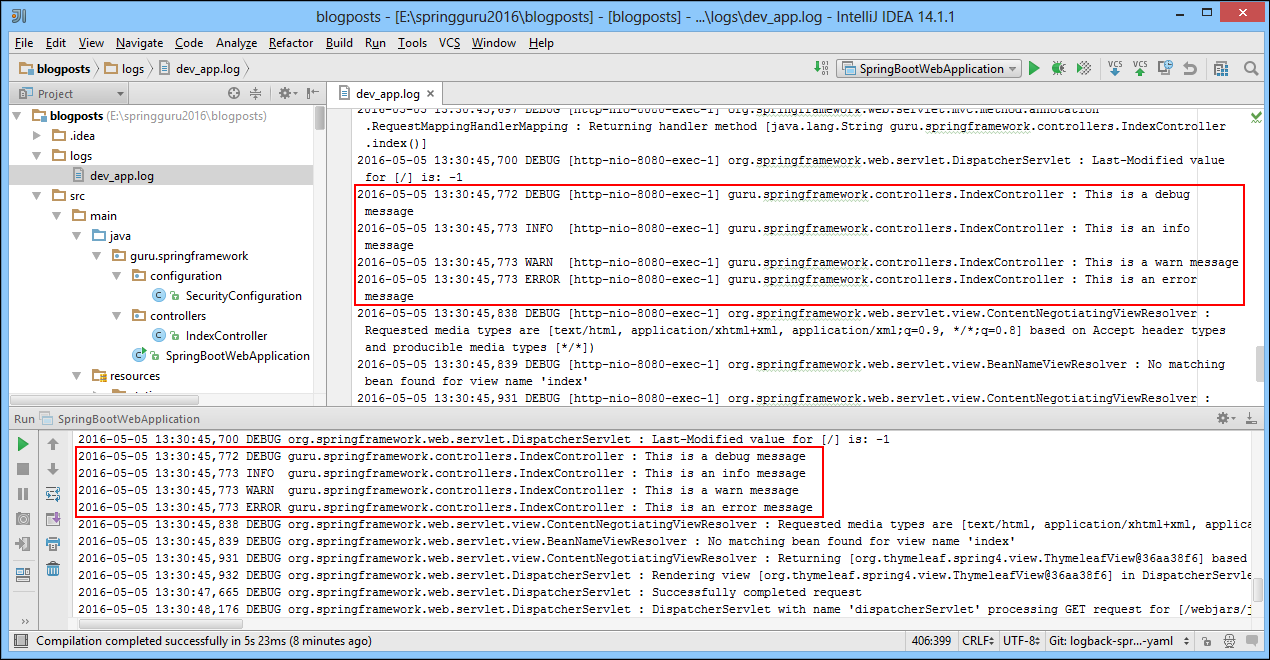
With the updated YAML configuration, here is an example of the logging output.
Spring Active Profile Properties in YAML
Spring Profiles are commonly used to configure Spring for different deployment environments. For example, while developing in your local machine, it is common to set the log level to DEBUG. This will give you detailed log messages for your development use. While on production, its typical set the log level to WARN or above. This is to avoid filling your logs with excessive debug information and incurring the overhead of excessive logging.
You can segregate a YAML configuration into separate profiles with a spring.profiles key for each profile. Then, add the required logging configuration code to each profile and ensure that the profile lists are separated by the --- lines. In the same file, you can use the spring.profiles.active key to set the active profile. However, this is not mandatory. You can also set the active profile to use programmatically or passing it as a system property or JVM argument while running the application.
The complete application.yml file with logging configuration based on Spring profiles is this.
spring:
  profiles.active: dev
---
spring:
  profiles: dev
logging:
  file: logs/dev_app.log
  pattern:
    console: "%d %-5level %logger : %msg%n"
    file: "%d %-5level [%thread] %logger : %msg%n"
  level:
    org.springframework.web: DEBUG
    guru.springframework.controllers: DEBUG
    org.hibernate: DEBUG
---
spring:
  profiles: production
logging:
  file: logs/production_app.log
  pattern:
    file: "%d %-5level [%thread] %logger{0} : %msg%n"
  level:
    org.springframework.web: WARN
    guru.springframework.controllers: WARN
    org.hibernate: WARN
In the configuration code above, we defined two profiles: dev and production with different logging configurations. We also set the active profile to dev.
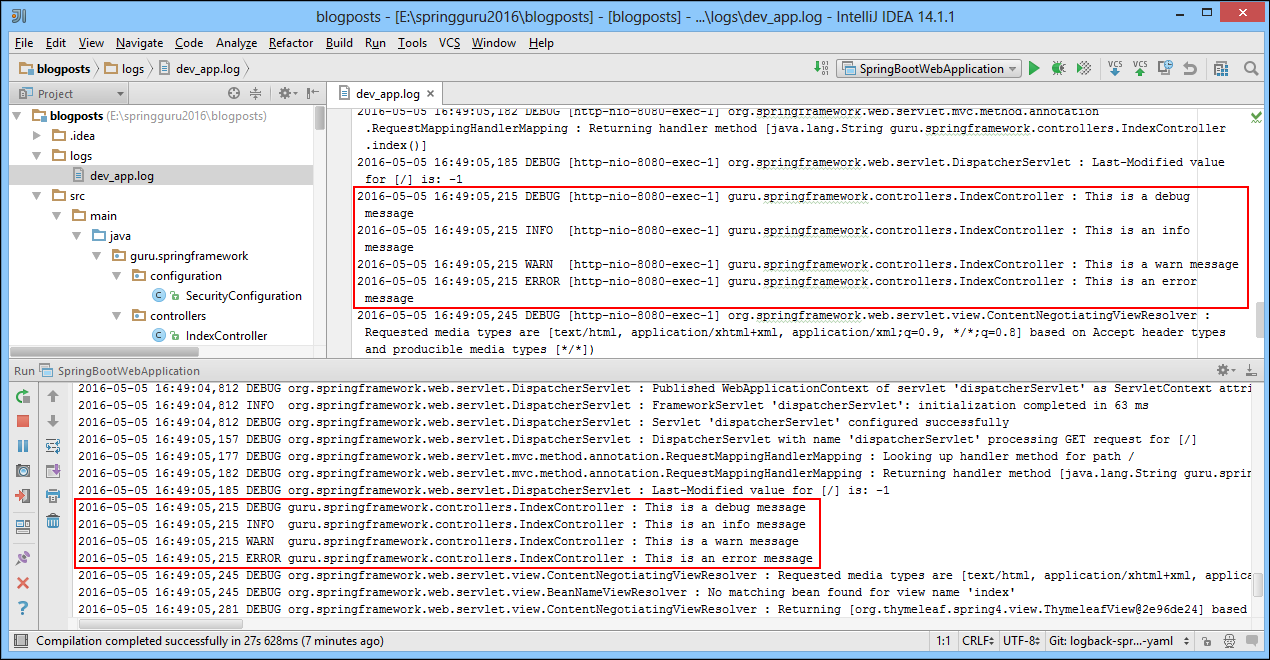
When you run and access the application, the logging configuration of the dev profile will be used and the logging outputs will be similar to this.
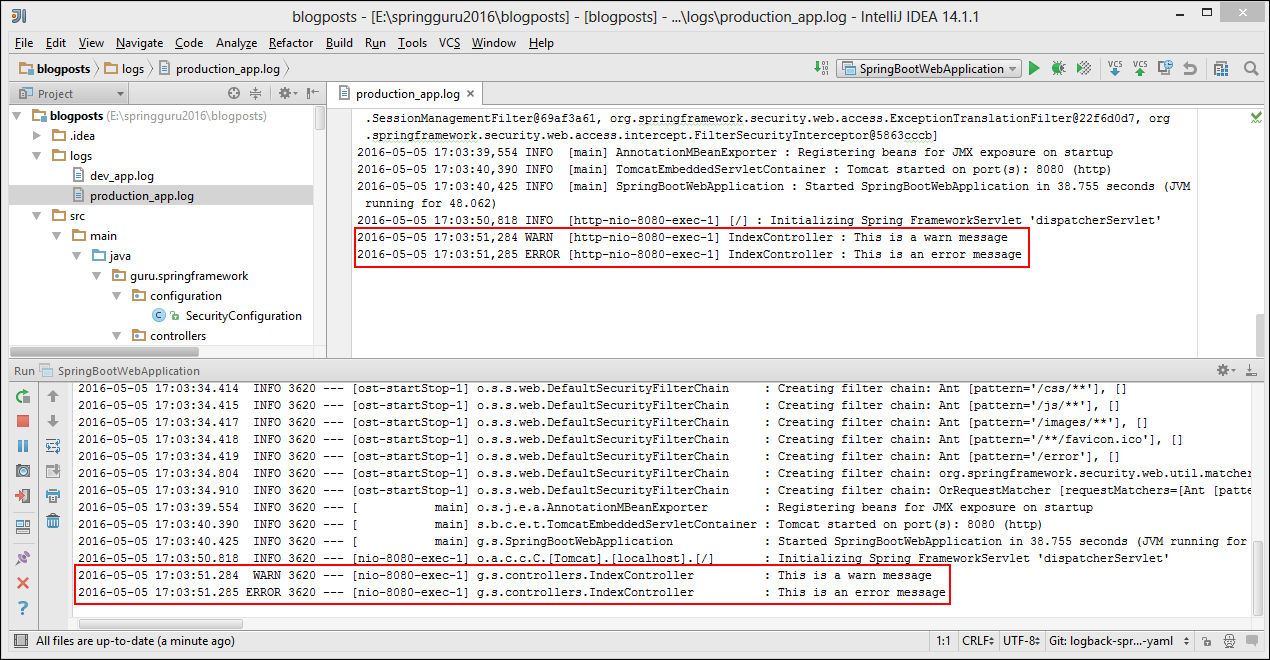
Now let’s make production the active profile by passing the -Dspring.profiles.active=production JVM argument.
In IntelliJ, select Run-> Edit Configurations, and set the JVM argument in the Run/Debug Configurations dialog box that appears, like this.

The logging output on accessing the application with production as the active profile is this.
Separating Profiles in YAML Configuration Files
A Spring Boot configuration file is not limited to logging configurations only. Typically, several different types of configurations go into the different profiles of an enterprise application. Configurations can be of bean registrations, database connection settings, SMTP settings, etc. spread across development, testing, staging, production, and other profiles.
It’s both tedious and error prone to maintain a single file with multiple profiles with each profile containing different types of configuration settings. Remember, much more time is spent reading code and configuration files than is spent writing it. At some point in the future, yourself, or someone else, will be reading or updating the configuration files. And for monolithic configuration files with low readability, the chances of errors creeping in is high. Spring addresses such challenges by allowing separate configuration files – one for each profile. With separate configuration files, you improve the long term maintainability of your application.
Each of such configuration file must follow the application-.yml naming convention. For example, for the dev and production profiles, you need the application-dev.yml and application-production.yml files in the classpath. You should also add a application-default.yml file containing default configurations. When no active profile is set, Spring Boot falls back to the default configurations in application-default.yml.
It’s important to note that if you have a application.yml file (with no suffix) on your path, that it will always be included by Spring, regardless of what profiles are or not active.
The project structure of the Spring Boot web application with different profile-specific configuration files is this.
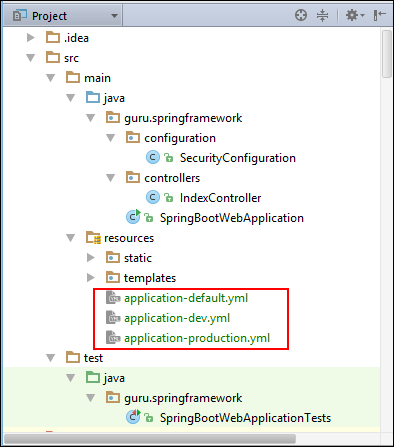
Following are the code for each of the configuration files.
application-default.yml
logging:
  pattern:
    console: "%msg%n"
  level:
    org.springframework.web: INFO
    guru.springframework.controllers: INFO
    org.hibernate: INFO
application-dev.yml
logging:
  file: logs/dev_profile_app.log
  pattern:
    console: "%d %-5level %logger : %msg%n"
    file: "%d %-5level [%thread] %logger : %msg%n"
  level:
    org.springframework.web: DEBUG
    guru.springframework.controllers: DEBUG
    org.hibernate: DEBUG
application-production.yml
logging:
  file: logs/production_profile_app.log
  pattern:
    file: "%d %-5level [%thread] %logger{0} : %msg%n"
  level:
    org.springframework.web: WARN
    guru.springframework.controllers: WARN
    org.hibernate: WARN
Test the application by first starting it without any profile, then with the dev profile, and finally the production profile. Ensure that the expected configurations are being used for different environments.
Conclusion
YAML configuration file in Spring Boot provides a very convenient syntax for storing logging configurations in a hierarchical format. YAML configuration, similar to Properties configuration cannot handle some advanced features, such as different types of appender configurations, and also encoders and layout configurations.
Functionally, YAML is nearly the same as using a traditional properties file. Personally, I find YAML fun to write in. It feels more expressive than the old school properties files and it has a nice clean syntax. Often you don’t need many of the more advanced logging features of logback. So you’re fine using the simplicity of the YAML file configuration. For advanced logging configurations using XML and Groovy, explore my earlier posts on them available here, and here.
I have encountered one issue with using YAML files for Spring Boot configuration. When setting up a JUnit test outside of Spring Boot, it was problematic to read the YAML properties file with just Spring. Remember, YAML support is specific to Spring Boot. I suspect at some point it will get included into the core functionality of Spring (If it has not already been).


Taller
Hi, very useful article.
Could you please explain in details how I can switch between different application-*.yml configurations?
I want to use one application-default.yml for local build, and application-ci.yml for CI build.
digitalrurouni
I agree with the other posted. Very useful article but I could not follow exactly how to switch. But am I incorrect in saying you start the app with -Dspring.profiles.active= ?
Oleg Kaluzny
Hello! Thank you for helping!
Arpan
Hi , How can I mention rolling appender from a YMl file. i have tried several options but not working. Can you give an example of size based/ time based rolling appenders from an YML file
Pierre
YML file logging configurations doesn’t works if logback.xml files is in the path of your app. Remove the logback.xml file and YML file configuration will work.
Mingwei Zhao
Hi , How can I mention rolling appender from a YMl file. i have tried several options but not working. Can you give an example of size based/ time based rolling appenders from an YML file
Sunil George
Hi My current Application is run on docker container and we are replacing all the application.yml entries with docker-compose.yml and environment variables. But we were unable to change the logging level for application through environment variables.
Could you share a better approach for same
Ashok
Hi, how to append config rollingfileappender in applicaiton.yml?
Oriol Jara
Hi. First of all, greetings for your awesome web!!!!
And I have a question.
I want to get the application.properties out of the project to change some properties whenever I want without recompile.
How can I get thsi file out of my project and have access to this properties?
Lot’s of thanks!!!
jeganathan amaladhas
log file was not getting generated
need to use file.name