

Spring Boot Web Application, Part 5 – Spring Security
14 CommentsLast Updated on October 21, 2024 by jt
This is the fifth part of my tutorial series on building a Spring Boot Web Application. We started off in the first part looking at using the Spring Initializr to start our Spring Boot project. In part 2, we configured Spring MVC and ThymeLeaf templates to display a basic web page. This was followed by part 3 where we setup the H2 database and Spring Data JPA and used them to persist data of our application to the database. In part 4, we consolidated everything to provide a working Spring Boot MVC Web Application capable of performing CRUD operations. We now have an application which displays data from the database, allows you to create new records, update existing records, and delete selected records too.
In part 5, we will use Spring Security to set up authentication and authorization in our application.
Spring Security, one of the most commonly used project in the Spring family of projects, provides a powerful and highly customizable authentication and authorization framework designed specifically to secure Java applications. In this part, I’ll show you how to setup Spring Security to secure our Spring Boot Web Application using the basic in-memory authentication provider.
Security Requirements
Our Spring Boot Web application in the current state is accessible to all users. Any user can create and view products, and also edit or delete them. Before we setup Spring Security to secure our application, let’s set few security requirements:
- An anonymous user (user who doesn’t sign in) should be able to view the home page and product listing.
- An authenticated user, in addition to the home page and product listing, should be able to view the details of a product.
- An authenticated admin user, in addition to the above, should be able to create, update, and delete products.
Maven Dependencies
Spring Security is already listed as a dependency of our application in the Maven POM.
. . .
<dependency>
   <groupId>org.springframework.boot</groupId>
   <artifactId>spring-boot-starter-security</artifactId>
</dependency>
. . .
In the Maven Projects pane of IntelliJ we can see the additional dependencies of Spring Security.
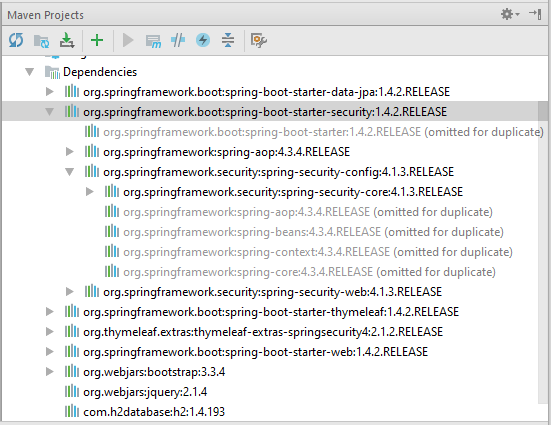
As we can see the Spring Security starter has brought in Spring AOP, Spring Security web, and Spring Security config, which in turn bring in Spring Security core.
Authentication and Authorization
Before we go deep, we need to understand what authentication and authorization means in Spring Security. Although both sound similar and it’s very easy to confuse them..
Authentication means ascertaining that somebody really is who they claim to be. Authentication is performed using different mechanisms. One simple and common mechanism is through user credentials in the form of user name and password. These are stored in some type back end data store, such as a SQL database. Others include LDAP, Single Sign-On (SSO), OpenID, and OAuth 2.0.
Authorization, on the other hand, defines what you are allowed to do. For example, an authenticated user may be authorized to view products but not to add or delete them.
Remember that authentication is “Who I am?” as a user to the system. While authorization is “You are either allowed or not to do this” from the system.
Securing URLs
In part 1, where we added Spring Security into our build, Spring Boot configured Spring Security to require Basic authentication for all endpoints. In part 2, we configured Spring Security to allow all requests access to the root path. We did this by creating a SecurityConfiguration class that extends the WebSecurityConfigurerAdapater class and overridden the configure() method. We will now update the same configure() method to define which URL paths should be secured and which should not.
Here is the the updated configure() method:
. . .
@Override
protected void configure(HttpSecurity httpSecurity) throws Exception {
    httpSecurity
            .authorizeRequests().antMatchers("/","/products","/product/show/*","/console/**").permitAll()
            .anyRequest().authenticated()
            .and()
            .formLogin().loginPage("/login").permitAll()
            .and()
            .logout().permitAll();

   httpSecurity.csrf().disable();
   httpSecurity.headers().frameOptions().disable();
}
. . .
This security configuration will:
- Allows all requests to the
/,/products,/product/show/*,/console/**paths (Line 5) - Secures all other paths of the application to require authentication (Line 6)
- Allows everyone to view a custom
/loginpage specified byloginPage()(Line 8) - Permits all to make logout calls (Line 10)
- Disables CSRF protection (Line 12)
- Disables X-Frame-Options in Spring Security (Line 13) for access to H2 database console. By default, Spring Security will protect against CRSF attacks.
Note: Although this is not a production-level configuration, it should get us started with the basic in-memory authentication. I’ll revisit this part, when I discuss more advanced security configuration in my upcoming posts.
In the same SecurityConfiguration class, we will also autowire a configureGlobal() overridden method of WebSecurityConfigurerAdapter. At runtime, Spring will inject an AuthenticationManagerBuilder that we will use to configure the simplest, default in-memory authentication with two users. The complete code of the
SecurityConfiguration class is this.
SecurityConfiguration.java
//404: Not Found
In this code, Line 27 – Line 30 configures in-memory authentication with two users. The first user with the username user and a password user is assigned a role of USER. The second user with the username admin and a password admin is assigned a role of ADMIN.
The Login Page
Our application will have a login page to capture user credentials in the form of user name and password. The login page, a Thymeleaf template will be served whenever a request to /login is received. We will configure the request mapping in ProductController like this.
. . .
@RequestMapping(value = "/login", method = RequestMethod.GET)
public String login(){
     return "login";
}
. . .
The code of the login template is this.
login.html
<!DOCTYPE html>
<html xmlns:th="http://www.thymeleaf.org">
<head>
<title>Login Form</title>
<!--/*/ <th:block th:include="fragments/headerinc :: head"></th:block> /*/-->
</head>
<body>
<div class="container">
<!--/*/ <th:block th:include="fragments/header :: header"></th:block> /*/-->
<div th:if="${param.error}">
<label style="color:red">Invalid username and password.</label>
</div>
<div th:if="${param.logout}">
<label>
You have been logged out.
</label>
</div>
<form th:action="@{/login}" method="post">
<table class="table table-striped">
<tr>
<td><label> User Name : <input type="text" name="username"/> </label></td>
</tr>
<tr>
<td><label> Password : <input type="password" name="password"/> </label></td>
</tr>
<tr>
<td> <button type="submit" class="btn btn-default">Sign In</button></td>
</tr>
</table>
</form>
</div>
</body>
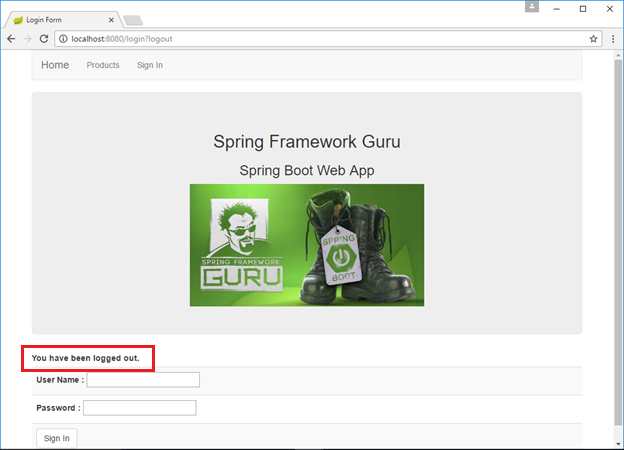
</html>This is a standard Thymeleaf template that presents a form to capture a username and password and post them to /login. Spring Security provides a filter that intercepts that request and authenticates the user with our configured in-memory authentication provider. If authentication succeeds, the application displays the requested page. If authentication fails, the request is redirected to /login?error and the login page displays the appropriate error message (Line 10 – Line 12). Upon successfully signing out, our application is sent to /login?logout and the login page displays a sign out message (Line 13 – Line 17).
This is how the login page displays an error message on authentication failure.

Spring Security Integration in Thymeleaf
To integrate Spring Security in our Thymeleaf templates, we will use the Thymeleaf “extras” integration module for Spring Security. For this, we need to add a JAR dependency in our Maven POM like this.
. . .
<dependency>
   <groupId>org.thymeleaf.extras</groupId>
   <artifactId>thymeleaf-extras-springsecurity4</artifactId>
   <version>2.1.2.RELEASE</version>
</dependency>
. . .
The Thymeleaf “extras” module is not a part of the Thymeleaf core but fully supported by the Thymeleaf team. This module follows its own schema, and therefore we need to include its XML namespace in those templates that will use security features, like this.
. . .
<html xmlns:th="http://www.thymeleaf.org" xmlns:sec="http://www.thymeleaf.org/extras/spring-security">
. . .
Showing Content based on Role
One of our application requirement states that only authenticated users with the ADMIN role can create products. To address this, we will configure authorization in the header.html Thymeleaf fragment to display the Create Product link only to users with the ADMIN role. In this template, we will also display a welcome message with the user name to an authenticated user. The code of the header.html template file is this:
header.html
<!DOCTYPE html>
<html xmlns:th="http://www.thymeleaf.org" xmlns:sec="http://www.thymeleaf.org/extras/spring-security">
<head lang="en">
    <link rel="stylesheet" type="text/css" href="../static/css/guru.css" />
</head>
<body>

<div class="container">
    <div th:fragment="header">
        <nav class="navbar navbar-default">
            <div class="container-fluid">
                <div class="navbar-header">
                    <a class="navbar-brand" href="#" th:href="@{/}">Home</a>
                    <ul class="nav navbar-nav">
                        <li><a href="#" th:href="@{/products}">Products</a></li>
                        <li><a href="#" th:href="@{/product/new}" sec:authorize="hasRole('ROLE_ADMIN')">Create Product</a></li>
                        <li><a href="#" th:href="@{/login}">Sign In</a></li>
                    </ul>
                </div>
            </div>
        </nav>
        <div class="welcome">
            <span sec:authorize="isAuthenticated()">Welcome <span sec:authentication="name"></span></span>
        </div>
        <div class="jumbotron">
            <div class="row text-center">
                <div class="">
                    <h2>Spring Framework Guru</h2>

                    <h3>Spring Boot Web App</h3>
                </div>
            </div>
            <div class="row text-center">
                <img src="../../static/images/NewBannerBOOTS_2.png" width="400"
                     th:src="@{/images/NewBannerBOOTS_2.png}"/>
            </div>
        </div>
    </div>
</div>

</body>
</html>
The Thymeleaf security extension provides the sec:authorize attribute that renders its content when the corresponding Spring Security expression evaluates to true.
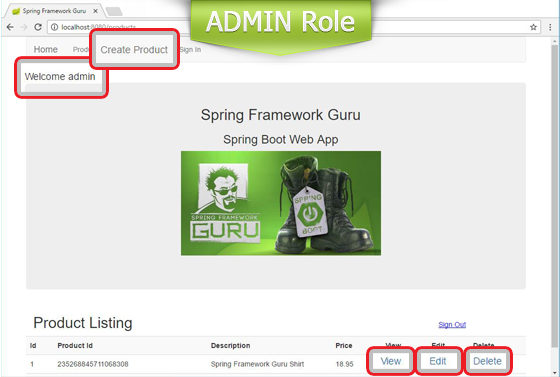
In Line 16 we used the sec:authorize attribute to display the Create Product link only if the authenticated user has the ADMIN role. Observe that we are checking against ROLE_ADMIN instead of the ADMIN role. This is because of Spring Security’s internal feature of mapping a configured role to the role name prefixed with ROLE_. In Line 23 we again used the sec:authorize attribute to check whether the user is authenticated, and if so, displayed the name using the sec:authenticate attribute.
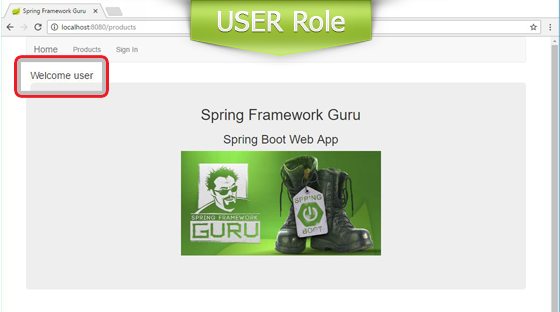
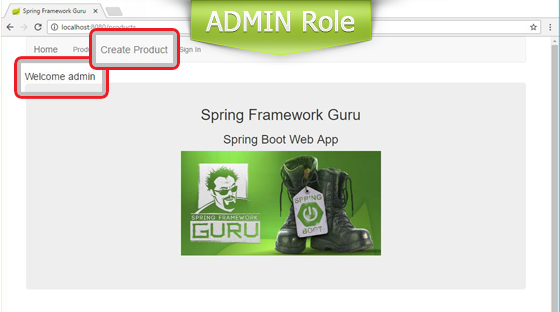
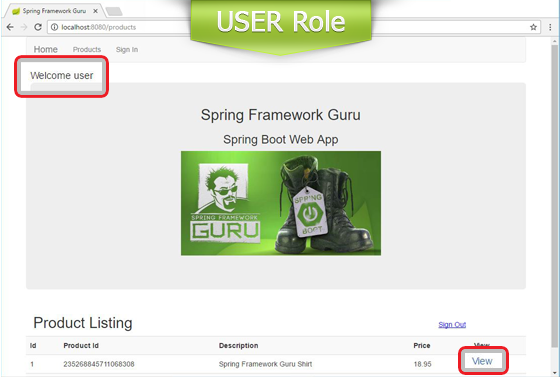
This is how the home page appears to authenticated users with USER and ADMIN roles.
Our current Product Listing page rendered by the products.html template displays the View, Edit, and Delete links to all users. In this template, we will configure authorization:
- To show the View, Edit, and Delete links to a user with
ADMINrole - To show only the View link to a user with
USERrole - Not to show any links to an anonymous user who hasn’t signed in
The code of the products.html page is this.
products.html
<!DOCTYPE html>
<html xmlns:th="http://www.thymeleaf.org" xmlns:sec="http://www.thymeleaf.org/extras/spring-security">
<head lang="en">

    <title>Spring Framework Guru</title>

    <!--/*/ <th:block th:include="fragments/headerinc :: head"></th:block> /*/-->
</head>
<body>
<div class="container">
    <!--/*/ <th:block th:include="fragments/header :: header"></th:block> /*/-->


    <div th:if="${not #lists.isEmpty(products)}">
        <form th:action="@{/logout}" method="post">
            <div class="col-sm-10"><h2>Product Listing</h2></div>
            <div class="col-sm-2" style="padding-top: 30px;">
                     <span sec:authorize="isAuthenticated()">
                    <input type="submit" value="Sign Out"/>
                               </span>
            </div>
        </form>
        <table class="table table-striped">
            <tr>
                <th>Id</th>
                <th>Product Id</th>
                <th>Description</th>
                <th>Price</th>
                <th sec:authorize="hasAnyRole('ROLE_USER','ROLE_ADMIN')">View</th>
                <th sec:authorize="hasRole('ROLE_ADMIN')">Edit</th>
                <th sec:authorize="hasRole('ROLE_ADMIN')">Delete</th>
            </tr>
            <tr th:each="product : ${products}">
                <td th:text="${product.id}"><a href="/product/${product.id}">Id</a></td>
                <td th:text="${product.productId}">Product Id</td>
                <td th:text="${product.description}">descirption</td>
                <td th:text="${product.price}">price</td>
                <td sec:authorize="hasAnyRole('ROLE_USER','ROLE_ADMIN')"><a th:href="${'/product/show/' + product.id}">View</a></td>
                <td sec:authorize="hasRole('ROLE_ADMIN')"><a th:href="${'/product/edit/' + product.id}">Edit</a></td>
                <td sec:authorize="hasRole('ROLE_ADMIN')"><a th:href="${'/product/delete/' + product.id}">Delete</a></td>
            </tr>
        </table>

    </div>
</div>

</body>
</html>
In Line 16 the “Sign Out” form submits a POST to /logout. Upon successfully logging out it will redirect the user to /login?logout. The remaining authorization is performed using the sec:authorize attribute. The hasAnyRole('ROLE_USER','ROLE_ADMIN') expression on Line 30 and Line 39 evaluates to true if the user has either the ROLE_USER or ROLE_ADMIN.
With this configuration, the product listing page will appear to different roles like this.
If you are wondering why the Sign Out Submit button is getting displayed as a link, it’s due to this CSS code I added to the guru.css stylesheet.
guru.css
input[type=submit] {
     background:none!important;
     border:none;
     padding:0!important;
     color: blue;
     text-decoration: underline;
     cursor:pointer;
}
The code of productshow.html and productform.html templates, except for the addition of the “Sign Out” form, remains the same.
productshow.html
<!DOCTYPE html>
<html xmlns:th="http://www.thymeleaf.org" xmlns:sec="http://www.thymeleaf.org/extras/spring-security">
<head lang="en">

    <title>Spring Framework Guru</title>

    <!--/*/ <th:block th:include="fragments/headerinc :: head"></th:block> /*/-->
</head>
<body>
<div class="container">
    <!--/*/ <th:block th:include="fragments/header :: header"></th:block> /*/-->

     <form class="form-horizontal" th:action="@{/logout}" method="post">
        <div class="form-group">
            <div class="col-sm-10"><h2>Product Details</h2></div>
            <div class="col-sm-2" style="padding-top: 25px;">
          <span sec:authorize="isAuthenticated()">
              <input type="submit" value="Sign Out"/>
           </span>
            </div>
        </div>
                <div class="form-group">
                    <label class="col-sm-2 control-label">Product Id:</label>
                    <div class="col-sm-10">
                        <p class="form-control-static" th:text="${product.id}">Product Id</p></div>
                </div>
                <div class="form-group">
                    <label class="col-sm-2 control-label">Description:</label>
                    <div class="col-sm-10">
                        <p class="form-control-static" th:text="${product.description}">description</p>
                    </div>
                </div>
                <div class="form-group">
                    <label class="col-sm-2 control-label">Price:</label>
                    <div class="col-sm-10">
                        <p class="form-control-static" th:text="${product.price}">Priceaddd</p>
                    </div>
                </div>
                <div class="form-group">
                    <label class="col-sm-2 control-label">Image Url:</label>
                    <div class="col-sm-10">
                        <p class="form-control-static" th:text="${product.imageUrl}">url....</p>
                    </div>
                </div>
     </form>

</div>

</body>
</html>
productform.html
<!DOCTYPE html>
<html xmlns:th="http://www.thymeleaf.org">
<head>

    <title>Spring Framework Guru</title>
    <link rel="stylesheet" type="text/css" href="../static/css/guru.css" />
    <!--/*/ <th:block th:include="fragments/headerinc :: head"></th:block> /*/-->
</head>
<body>
<div class="container">
    <!--/*/ <th:block th:include="fragments/header :: header"></th:block> /*/-->

    <form class="form-horizontal" th:action="@{/logout}" method="post">
        <div class="form-group">
            <div class="col-sm-10"> <h2>Product Create/Update</h2></div>
            <div class="col-sm-2" style="padding-top: 30px;">
                <input  type="submit" value="Sign Out"/>
            </div>
        </div>
    </form>

    <div>
        <form class="form-horizontal" th:object="${product}" th:action="@{/product}" method="post">
            <input type="hidden" th:field="*{id}"/>
            <input type="hidden" th:field="*{version}"/>
            <div class="form-group">
                <label class="col-sm-2 control-label">Description:</label>
                <div class="col-sm-10">
                    <input type="text" class="form-control" th:field="*{description}"/>
                </div>
            </div>
            <div class="form-group">
                <label class="col-sm-2 control-label">Price:</label>
                <div class="col-sm-10">
                    <input type="text" class="form-control" th:field="*{price}"/>
                </div>
            </div>
            <div class="form-group">
                <label class="col-sm-2 control-label">Image Url:</label>
                <div class="col-sm-10">
                    <input type="text" class="form-control" th:field="*{imageUrl}"/>
                </div>
            </div>
            <div class="row">
                <button type="submit" class="btn btn-default">Submit</button>
            </div>
        </form>

    </div>
</div>

</body>
</html>
Finally, if any signed in user clicks on Sign Out in any one of the secured pages, the user is redirected to the login page with a message, like this.
Summary
Spring Security is a very popular project in the Spring Framework family of projects. When you need to secure content in a Spring Boot web application, Spring Security is a natural ‘go to’ tool to use.
In this post, I’ve only scratched the surface of the capabilities of Spring Security. For example, I used the in-memory authentication provider for Spring Security. This a great tool to demonstrate how to configure Spring Security. But, you probably would not use an in-memory authentication provider in production. It’s actually fairly common to store user credentials in a database. In the next post of this series, I’ll explain how to setup a DAO authentication provider for Spring Security.


Melnoch
I just finished this article series, thanks a lot! It is a great way to begin looking into SpringBoot 🙂
Wachirakorn Pimpong
Mee too. Thanks for great tutorial.
Nikita
I’m fail with this part… my app isn’t show me index page… chrome just waiting some response from server and do nothing… but compilation goes without any signs of problem…
Ables
The part i am actually looking for is missing. Its the part that receives the post request on clicking the login button. Most tutorials also miss this part.
Michael
There is possibility to edit Product by manual typing url “http://localhost:8080/product/edit/1” even I’m user.
Maxim Rs
Are you sure that you not logged in? I have completed this post now and if go to the “http://localhost:8080/product/edit/1” i getting redirected to the login page.
Maxim Rs
Sorry, you were right. I checked again, and it really a huge hole in security.
@jt
what is the best approach to fix this, annotated each route with permission or add permission for all routes (masks) in SpringSecurityConfig file?
like
protected void configure(HttpSecurity http) throws Exception {
http.authorizeRequests().antMatchers(“/”, “/products”, “/product/show/*”, “/console/**”).permitAll()
.antMatchers(“/product/**”, “/user/**”).hasAuthority(“ADMIN”)
.anyRequest().fullyAuthenticated()
.and().formLogin().loginPage(“/login”).permitAll()
.and().logout().permitAll();
http.csrf().disable();
http.headers().frameOptions().disable();
}
or add to the SpringSecurityConfig file annotation
@Configuration
@EnableGlobalMethodSecurity(prePostEnabled = true)
public class SecurityConfiguration extends WebSecurityConfigurerAdapter
and for controllers method add properly permissions
like
@PreAuthorize(“hasAuthority(‘ADMIN’)”)
@RequestMapping(value = “product/update/{id}”)
On my point, the best approach separate admin area and the user via a route, like for admin users route should start with /admin and add permission to the config. It should help as to cover as from providing permission to the admin area, in a case when you forget to add route permission.
IronBone
Unfortunately the given
configureGlobal
does not wotk well
We should use for example
auth.inMemoryAuthentication().withUser(“user”).password(“{noop}user”).roles(“USER”);
instead
Vikram Singh Gulia
Hi, How can i set up security with multi instance app? My app is deployed using rancher with 2 instances and whenever I am logging in I am redirected to one of the instances url instead of the VIP/F5 url for the app which breaks the whole point of having the app behind a global url.
Malice
Hi, when I run web app it seems that the scripts and css are not loaded because no bootstrapping style is applied to the page. Before adding the security features every thing have been working fine. Do you have the git repository where the security features were added. thanks
Natasha Verma
I read your blog its good but when i read comments few people are facing problem due to lack of understanding if someone want to more about spring security visit on link – http://blogs.innovationm.com/spring-security-with-oauth2/
Sahanur
what should i made to work this code with spring boot 2.0.2 . I mean I want to use “ ”
code in html. After adding all the dependencies also its working for spring boot 2. Please help.
Joe Oracle
I’ve recently upgraded to STS 4. While I was able to successfully complete this tutorial before, I am having issues with the Thymeleaf security extensions in this version of the tools (Eclipse based). While the Security configuration is working as expected, the Thymeleaf directives are not working. Are there any changes or bugs you are aware of with STS 4? For example, in the header.html file, the Create Product link always displays.
Create Product
Any tips are most appreciated.
drnidhijha
dr nidhi jha is the best gynecologist in south delhi and best IVF doctor in delhi and best IVF specialist in delhi.she is best IVF specialist in malviya nagar delhi click on http://www.drnidhijha.com