

Hikari Configuration for MySQL with Spring Boot 2
1 CommentLast Updated on October 21, 2024 by jt
Hikari Connection Pool commonly referred to as HikariCP is a very fast light weight Java connection pool. A connection pool is a cache of database connections. A Connection Pool maintains connections that can be reused when future requests to the database are required. In this post, I will explain Hikari Configuration for Spring Boot 2 and MySQL.
Hikari Setup with Spring Boot
In Spring Boot 1.x, the default connection pool was Tomcat. With Spring Boot 2.x, it has been changed to HikariCP.
So if you are using Spring Boot 2.X and have spring-boot-starter-data-jpaas a dependency, then it will transiently pull in HikariCP.
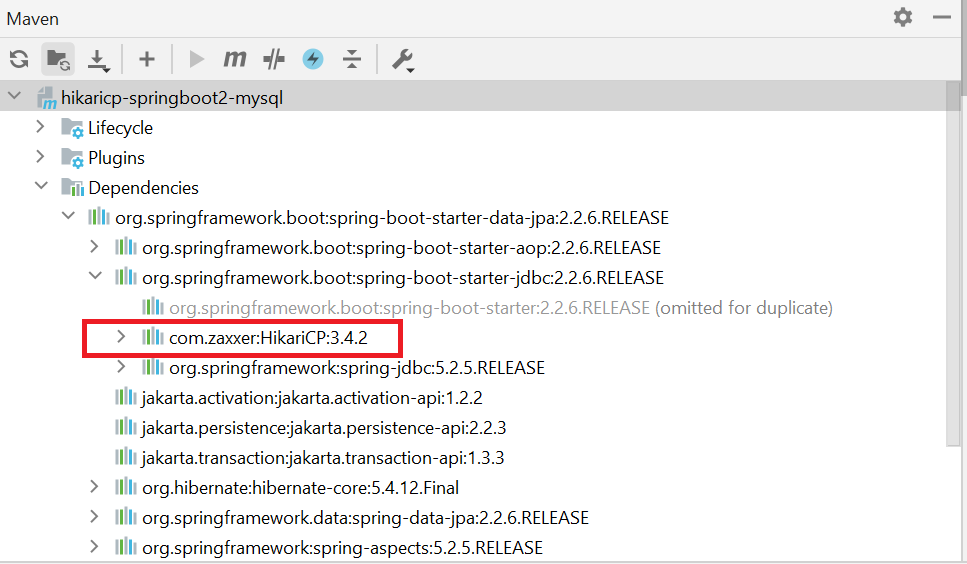
This Figure shows the Maven window of IntelliJ with the HikariCP dependency pulled in.
At times, you might want to use the latest HikariCP version. Spring Boot also allows that. You just need to add the latest version in your Maven POM, like this.
<!-- https://mvnrepository.com/artifact/com.zaxxer/HikariCP -->
<dependency>
      <groupId>com.zaxxer</groupId>
      <artifactId>HikariCP</artifactId>
      <version>5.0.1</version>
</dependency>
The Application
For this post, I have a minimalistic Spring Boot Restful API. The source code is present on Github.
This application has:
- Employee.java: Is a JPA Entity to be persisted in the MySQL database. This class uses Lombok to reduce boilerplate code. If you are new to Lombok, I suggest you go through my series Spring Boot with Lombok: Part 1.
- EmployeeRepository.java: Repository interface of Spring Data JPA
- EmployeeController.java: Controller to receive requests for posting an employee and retrieving all employees.
- InitializeEmployeeData.java: Bootstrap class to seed employee records when the application starts.
The primary HikariCP configurations are in application.properties.
The application.properties file is this.
application.properties
spring.datasource.type=com.zaxxer.hikari.HikariDataSource
jdbc properties to connect to database
spring.datasource.url=jdbc:mysql://localhost:3306/employee_db?createDatabaseIfNotExist=true
spring.datasource.username=root
spring.datasource.password=root
spring.jpa.database=mysql
spring.jpa.hibernate.ddl-auto=update
spring.datasource.hikari.connectionTimeout=2000
spring.datasource.hikari.maximum-pool-size=20
spring.datasource.hikari.data-source-properties.cachePrepStmts=true
spring.datasource.hikari.data-source-properties.prepStmtCacheSize=250
spring.datasource.hikari.data-source-properties.prepStmtCacheSqlLimit=2048
spring.datasource.hikari.data-source-properties.useServerPrepStmts=true
spring.datasource.hikari.data-source-properties.useLocalSessionState=true
spring.datasource.hikari.data-source-properties.rewriteBatchedStatements=true
spring.datasource.hikari.data-source-properties.cacheResultSetMetadata=true
spring.datasource.hikari.data-source-properties.cacheServerConfiguration=true
spring.datasource.hikari.data-source-properties.elideSetAutoCommits=true
spring.datasource.hikari.data-source-properties.maintainTimeStats=false
spring.datasource.hikari.poolName=spring-boot-hikari-mysql-cp
spring.datasource.hikari.maxLifetime: 1000000

logging.level.org.hibernate.SQL=DEBUG
logging.level.com.zaxxer.hikari.HikariConfig=DEBUG
logging.level.org.hibernate.type.descriptor.sql.BasicBinder=TRACE


management.endpoint.metrics.enabled= true
management.endpoints.web.exposure.include= metrics
In the preceding code, the first configuration spring.datasource.type is optional. Spring Boot through reflection automatically picks up the data source type.
You can remove the statement and run this test to confirm it.
HikariDSTest.java
package guru.springframework.hikaricp;

import org.junit.jupiter.api.Test;
import org.springframework.beans.factory.annotation.Autowired;
import org.springframework.boot.test.context.SpringBootTest;
import javax.sql.DataSource;
import static org.junit.jupiter.api.Assertions.assertEquals;

@SpringBootTest
public class HikariDSTest{
@Autowired
private DataSourcedataSource;

@Test
public void hikariConnectionPoolIsConfigured() {
        assertEquals("com.zaxxer.hikari.HikariDataSource", dataSource.getClass().getName());
    }
}
The other key properties are:
HikariCP Pool Management
The HikaricP settings have the spring.datasource.hikari.x prefix. The key settings relevant to the connection pool are:
datasource.hikari.maximum-pool-size: Sets the maximum size that the pool can reach. This includes both idle and in-use connections. Basically, this value determines the maximum number of actual connections to the database. The default value is zero.datasource.hikari.minimumIdle: This property sets the minimum number of idle connections that HikariCP tries to maintain in the pool.datasource.hikari.idleTimeout: Sets the maximum amount of time that a connection can to sit idle in the pool. This setting only applies whenminimumIdleis less thanmaximum-pool-size. The minimum value is 10000ms (10 seconds). The default value is 600000 (10 minutes).datasource.hikari.maxLifetime: Sets the maximum lifetime of a connection in the pool. An in-use connection will never retire. HikariCP removes it only when it is closed. The minimum value is 30000 ms (30 seconds). The default value is 1800000 ms (30 minutes)datasource.hikari.keepaliveTime: Sets how frequently HikariCP will attempt to keep a connection alive. The minimum value you can set is 30000 ms (30 seconds). However, a value in the range of minutes is most desirable. The default is 0 which disables this setting.datasource.hikari.poolName: Sets the name of the connection pool that logging statements should display.datasource.hikari.auto-commit: Sets the default auto-commit behavior of connections that the pool returns. The default value istrue.
HikariCP Performance Configurations
The performance-related settings are:
datasource.hikari.data-source-properties.cachePrepStmts: You should set the value totrueso that other configurations, likeprepStmtCacheSizeandprepStmtCacheSqlLimithave any effect. By default, HikariCP disables this. You must set this parameter totrue.datasource.hikari.data-source-properties.prepStmtCacheSqlLimit: Sets the maximum length of a prepared SQL statement that the driver will cache. The MySQL default is 256. The recommended setting is 2048 because ORM frameworks like Hibernate, this default is well below the threshold of generated statement lengths.datasource.hikari.data-source-properties.prepStmtCacheSize: Sets the number of prepared statements that the MySQL driver will cache per connection. The default is 25. The recommended setting is between 250-500.datasource.hikari.data-source-properties.useServerPrepStmts: Set this property totruefor newer versions of MySQL. This is because they support server-side prepared statements that provides a substantial performance boost.datasource.hikari.data-source-properties.elideSetAutoCommits: Sets the default auto-commit behavior of connections that the pool returns. It has a defaulttruevalue.
HikariCP Logging and Diagnostics
The logging and diagnostic settings are self-explanatory and listed below:
level.com.zaxxer.hikari.HikariConfig=DEBUGlevel.com.zaxxer.hikari=DEBUG
I have listed the most important and commonly used HikaricCP settings. For in-depth HikariCP configuration settings refer to the official documentation.
HikariCP Metrics
You can collect HikariCP metrics using Spring Boot Actuator.
The first step is to add the actuator starter to your Maven POM.
<dependency>
     <groupId>org.springframework.boot</groupId>
     <artifactId>spring-boot-starter-actuator</artifactId>
</dependency>
Next, in your application.properties configure Actuator to collect metrics.
management.endpoint.metrics.enabled=true
management.endpoints.web.exposure.include=metrics
Running the Application
Once you run the main class of the application, notice HikariCP starting up with the configurations on the console logs.
Once your application starts, access from your browser the Actuator metrics endpoint.
http://localhost:8080/actuator/metrics

Select a HikariCP metric and access it from the browser. One example is this.
http://localhost:8080/actuator/metrics/hikaricp-connections-max

Performance Benchmark
In addition to HikariCP, there are several connection pool frameworks, such as C3PO, DBCP2, Tomcat, and Vibur.
This figure shows the benchmark published by the Hikari Team.
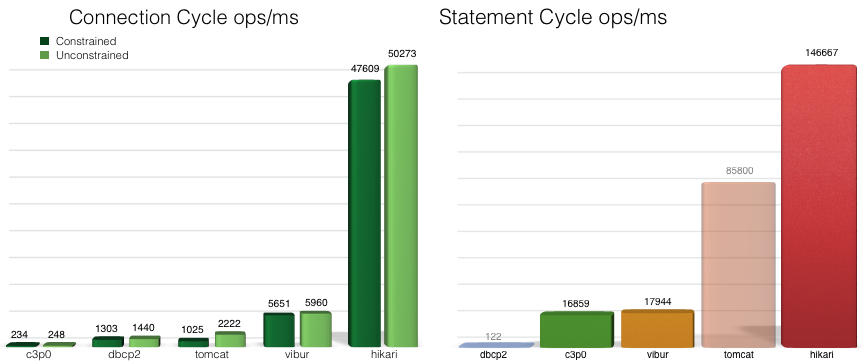
In the above figure, One Connection Cycle is defined as a single DataSource.getConnection() and Connection.close(). Whereas one Statement Cycle is defined as a single Connection.prepareStatement(), Statement.execute(), and Statement.close().
The primary reasons HikariCP is faster compared to other connection pool frameworks are:
- Bytecode-level engineering: Extreme bytecode-level engineering that includes assembly-level native coding.
- Micro-optimizations: Optimization at the code level.
- FastList over ArrayList: The team has replaced the traditional
ArrayList<Statement>; with a customFastListclassfor enhanced performance.
Summary
HikariCP performs better than the other connection pools. However, when selecting a connection pool, there are other aspects to consider. For example, configuration options it provides and connection testing. It is important for you to determine what’s most important to your business use before selecting one. Personally, I have got more chances to use HikariCP.


Stoyan
Is it possible to encode and decode data in MySql using jpa?