

Consul Miniseries: Spring Boot Application and Consul Integration Part 3
1 CommentLast Updated on May 28, 2020 by jt
Series Introduction
In this short series, we will look at how we can integrate the Spring Boot application with HashiCorp Consul.
Consul is a service that allows us to connect and secure services across platforms and clouds. It has many usages, such as service discovery, service mesh, or key-value store.
Introduction
In the first part of the series, we have prepared two services as docker containers and also Consul server container. You can find the first part here.
The second part of the series described a way in which we can connect our services using Consul service discovery. You can find it here: the second part.
In the third part of the tutorial, we will show how we can use the Consul key-value store. We will keep some properties there, which we will use to configure our applications and change those properties in runtime.
Setup
As IDE for this tutorial, we will use is the IntelliJ IDEA version 2020.1.
We will also use Java 14, Gradle in version 6.3, Lombok, and Spring Boot 2.2.6.
For containerization, we will use Docker version 19.03.8 and docker-compose version 1.25.0.
Code
User service
Dependencies
To use the Consul key-value store in our Spring Boot application, we first have to import consul config starter dependency. We will add that to our users service:
implementation 'org.springframework.cloud:spring-cloud-starter-consul-config:2.2.2.RELEASE'
Next thing is to add a new file in the resources folder, called bootstrap.yml. The configuration is loaded into Spring Environment during a special “bootstrap” phase, and this file allows us to configure some properties of this process. We will also move the configuration of service discovery there. So, our bootstrap.yml file looks like this:
spring:
  cloud:
    consul:
      host: 172.17.0.1
      discovery:
        prefer-ip-address: true
        instanceId: ${spring.application.name}:${spring.application.instance_id:${random.value}}
      config:
        failFast: false
        format: yaml
At the top, we have properties that we moved from application.yml file. Properties that we are interested in the most are under the config category.
This first property, failFast set to false, will be useful for us because we will still be able to start our application without a consul server. This is probably a bad idea to set that on the production server, as instead of failing during startup, because of the inability to connect to Consul, the application will only log a warning in the console. For our simple case though, this is fine.
Second property, format, describes the format used for storing properties. We have picked YAML for this tutorial.
Code
The next thing we have to do is to alter some application code, to get some values from the key-value store. To do that, we will create a new class in users-service, called UserProperties. This is how this class looks like:
@Getter
@Setter
@ConfigurationProperties("guru-user")
public class UserProperties {
    private String name = "Spring";
    private String surname = "Guru";
}
UserProperties class contains two private fields, name and surname, with some default values set to them. We have also added getter and setter for each of those fields, using Lombok annotations (if you do not know Lombok, be sure to check out this tutorial: Spring Boot with Lombok).
@ConfigurationProperties annotation means that we will use this class as a container for some externalized configuration. There is a single argument here, "guru-user". It is a prefix that we will use to assign properties. This will become clearer when we will add configuration to Consul key-value store.
For @ConfigurationProperties annotation to work, we have to add another annotation, @ConfigurationPropertiesScan to our main class, so it looks like this:
@SpringBootApplication
@ConfigurationPropertiesScan
public class UsersServiceApplication {

    public static void main(String[] args) {
        SpringApplication.run(UsersServiceApplication.class, args);
    }

}
Thanks to that Spring will be able to find our properties class automatically. Note that this was added in Spring Boot 2.2, so in case you are using an older version, you may need to add some other annotation to you properties class, do it can be registered as a bean (for example @Configuration or @Component).
Last change we are going to make in code, will be to change our user endpoint method:
@RestController
@RequiredArgsConstructor
class UserController {

    private final UserProperties properties;

    @GetMapping("/user")
    User getUser() {
        return new User(properties.getName(), properties.getSurname());
    }
}
We constructor-injected our properties class, using Lombok @RequiredArgsConstructor and changed static values inside the User instance constructor, to pick up values from properties.
Running containers
Let us now run our docker-compose file and see if everything works fine.
First, we should build our JAR file, so in the root folder of users service, we run /.gradlew clean build.
Next, we go to our docker-compose file and run docker-compose up (you may need to run docker-compose down first if you have any leftovers from previous tutorials, to clean up the containers).
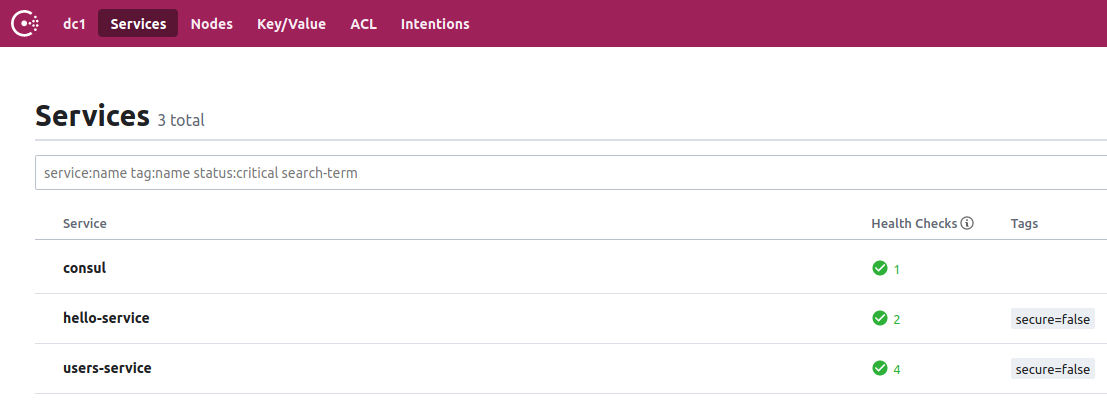
After the successful run, we should be able to see registered services in consul:
Our hello service should shout hello to our default-values user, taken from users-service:

So we see that everything works just fine.
Let us now see how we can change those properties. The easiest way to do this, is by using Consul server UI. If we go to http://localhost:8500 and pick the Key/Value menu option at the top bar, we will see our store. Right now there is only a message, that nothing is in our store: There are no Key / Value pairs..
To add a new property, click on the Create button. In the Key or folder text box type config/users-service/data (we will explain this in a short while). In the Value text box, type:
guru-user:
  name: Consul and Spring
  surname: Guru!!!
Also, pick a YAML option in the lower right corner of the text box and click Save.
You will now have a single folder in the key-value store, feel free to navigate there. Now, when we try to shout another hello:

And voila, works! We have values set in our Consul store refreshed automatically in the users service and displayed nicely by our hello service.
Consul configuration properties
We promised earlier to explain why we have such a key set in consul. This is because Spring Cloud Consul library has some default values set, from which such key is built. Let us break this up:
Key: config/users-service/data
- config – default prefix for our application. It can be changed in
bootstrap.ymlfile, by settingspring.cloud.consul.config.prefixproperty - users-service – next part is just our service name
- data – this is another default value, applicable only if we set format in
bootstrap.ymlfile to YAML or properties. It can be changed by alteringspring.cloud.consul.config.data-keyproperty inbootstrap.ymlfile
We should give some more explanation to the service name part of the key. By default Spring Cloud Consul library uses several naming patters to bind our properties. We can pass a service name here, or an application keyword. If we give a service name, those properties will be used only for this service, while using application makes those properties available for all services connected to the Consul server, that use the key-value store. We are able to change those values using some configuration properties (we will add a link to the official resource at the bottom of this paragraph).
Now, after each of those options (service name or application keyword), we may use profile that we use after the coma (so, for example, users-service,staging). These properties will be available only for services that run with that particular profile.
Note that all of these properties folders mimic Spring Cloud Config order of resolving properties (see the official doc for details: https://cloud.spring.io/spring-cloud-config/reference/html/).
For more information about Spring Cloud Consul, please check the official documentation here: https://cloud.spring.io/spring-cloud-consul/reference/html/.
For all configuration properties, see appendix page: https://cloud.spring.io/spring-cloud-consul/reference/html/appendix.html.
Loading configuration and security
Although out of the scope of this tutorial, there are two more important factors we should talk about. We have inserted properties into consul by hand. If we have a lot of services or a lot of configuration values, that we need to put in Consul, it becomes highly unpractical to add them using Consul UI. Fortunately, there are solutions to this problem.
There is a project called git2Consul, that loads files from the git repository, into individual keys in Consul. For more information on that, please check the official documentation here: https://cloud.spring.io/spring-cloud-consul/reference/html/#spring-cloud-consul-config-git2consul.
The second option would be to create a script that may load configuration keys using the Consul CLI interface or HTTP API. If you are interested in how these work in Consul, please see official documentation here of the CLI interface here: https://www.consul.io/docs/commands/config and HTTP API here: https://www.consul.io/api/kv.
For securing the Consul key-value store from unrestricted access, we can use ACLs. ACL is a built-in feature of Consul. After enabling and configuring ACLs, users and services will need to have a valid token with key-value privileges, to access the data store. If you are interested in ACL feature, you can read more about it here: https://learn.hashicorp.com/consul/security-networking/production-acls.
You can also do a Consul snapshot, which will create a snapshot of the Consul key-value data store that may be important in case of a complete outage of service. You can read more about that here: https://www.consul.io/docs/commands/snapshot/restore.
Summary
In this tutorial, we have learned a great way of how we can store configuration data in our distributed system. Although in our simple case we have used it to give some properties to the object we have created, there are countless possibilities of how we can use this key-value store.
You can find the source code for this post in GitHub here.
This tutorial concludes this short series on how we can use Consul to help us write distributed Spring Boot applications. You can find part one here: Consul Miniseries: Spring Boot Application and Consul Integration Part 1 and part two here: Consul Miniseries: Spring Boot Application and Consul Integration Part 2.


Ananda
Could you add links to source code for this series please? It will help to understand better.
Thanks