

Spring Boot RESTful API Documentation with Swagger 2
59 CommentsLast Updated on October 21, 2024 by jt
The Spring Boot makes developing RESTful services ridiculously easy, and using Swagger makes documenting your RESTful services much easier.
Building a back-end API layer introduces a whole new area of challenges that goes beyond implementing just endpoints. You now have clients which will now be using your API. Your clients will need to know how to interact with your API. In SOAP based web services, you had a WSDL to work with. This gave API developers a XML based contract, which defined the API. However, with RESTFul web services, there is no WSDL. Thus your API documentation becomes more critical.
API documentation should be structured so that it’s informative, succinct, and easy to read. However, the best practices on how you document your API, its structure, what to include and what not, are altogether a different subject. I won’t be covering it here in this post. For best practices on documentation, I suggest going through this presentation by Andy Wikinson.
In this post, I’ll cover how to use Swagger 2 to generate REST API documentation for a Spring Boot 2.0 project.
Swagger 2 in Spring Boot
Swagger 2 is an open source project used to describe and document RESTful APIs. It is language-agnostic and is extensible into new technologies and protocols beyond HTTP. The current version defines a set HTML, JavaScript, and CSS assets to dynamically generate documentation from a Swagger-compliant API. These files are bundled by the Swagger UI project to display the API on browser. Besides rendering documentation, Swagger UI allows other API developers or consumers to interact with the API’s resources without having any of the implementation logic in place.
The Swagger 2 specification, which is known as OpenAPI specification, has several implementations. Currently, Springfox, that has replaced Swagger-SpringMVC (Swagger 1.2 and older), is popular for Spring Boot applications. Springfox supports both Swagger 1.2 and 2.0.
We will be using Springfox in our project.
To bring it in, we need the following dependency declaration in our Maven POM.
. . .

<dependency>
    <groupId>io.springfox</groupId>
    <artifactId>springfox-swagger2</artifactId>
    <version>2.8.0</version>
    <scope>compile</scope>
</dependency>

. . .
In addition to Springfox, we also require Swagger UI. The code to include Swagger UI is this.
. . .

<dependency>
    <groupId>io.springfox</groupId>
    <artifactId>springfox-swagger-ui</artifactId>
    <version>2.8.0</version>
    <scope>compile</scope>
</dependency>

. . .

The Spring Boot RESTful Application
Our application implements a set of REST endpoints to manage products. We have a Product JPA entity and a repository named ProductRepository that extends CrudRepository to perform CRUD operations on products against an in-memory H2 database.
The service layer is composed of a ProductService interface and a ProductServiceImpl implementation class.
The Maven POM of the application is this.
pom.xml
<?xml version="1.0" encoding="UTF-8"?>
<project xmlns="http://maven.apache.org/POM/4.0.0" xmlns:xsi="http://www.w3.org/2001/XMLSchema-instance"
	xsi:schemaLocation="http://maven.apache.org/POM/4.0.0 http://maven.apache.org/xsd/maven-4.0.0.xsd">
	<modelVersion>4.0.0</modelVersion>
	<groupId>guru.springframework</groupId>
	<artifactId>spring-boot-web</artifactId>
	<version>0.0.1-SNAPSHOT</version>
	<packaging>jar</packaging>
	<name>Spring Boot Web Application</name>
	<description>Spring Boot Web Application</description>
	<parent>
		<groupId>org.springframework.boot</groupId>
		<artifactId>spring-boot-starter-parent</artifactId>
		<version>2.0.0.RELEASE</version>
		<relativePath/> <!-- lookup parent from repository -->
	</parent>
	<properties>
		<project.build.sourceEncoding>UTF-8</project.build.sourceEncoding>
		<java.version>1.8</java.version>
	</properties>
	<dependencies>
		<dependency>
			<groupId>org.springframework.boot</groupId>
			<artifactId>spring-boot-starter-data-rest</artifactId>
		</dependency>
		<dependency>
			<groupId>org.springframework.boot</groupId>
			<artifactId>spring-boot-starter-data-jpa</artifactId>
		</dependency>
		<dependency>
			<groupId>org.springframework.boot</groupId>
			<artifactId>spring-boot-starter-security</artifactId>
		</dependency>
		<dependency>
			<groupId>org.springframework.boot</groupId>
			<artifactId>spring-boot-starter-thymeleaf</artifactId>
		</dependency>
		<dependency>
			<groupId>org.springframework.boot</groupId>
			<artifactId>spring-boot-starter-web</artifactId>
		</dependency>
		<dependency>
			<groupId>com.jayway.jsonpath</groupId>
			<artifactId>json-path</artifactId>
			<scope>test</scope>
		</dependency>
        <dependency>
			<groupId>io.springfox</groupId>
			<artifactId>springfox-swagger-ui</artifactId>
			<version>2.8.0</version>
			<scope>compile</scope>
		</dependency>
		<dependency>
			<groupId>io.springfox</groupId>
			<artifactId>springfox-swagger2</artifactId>
			<version>2.8.0</version>
			<scope>compile</scope>
		</dependency>
        <!--WebJars-->
		<dependency>
			<groupId>com.h2database</groupId>
			<artifactId>h2</artifactId>
		</dependency>
		<dependency>
			<groupId>org.springframework.boot</groupId>
			<artifactId>spring-boot-starter-test</artifactId>
			<scope>test</scope>
		</dependency>
	</dependencies>
	<build>
		<plugins>
			<plugin>
				<groupId>org.springframework.boot</groupId>
				<artifactId>spring-boot-maven-plugin</artifactId>
			</plugin>
		</plugins>
	</build>
</project>
The controller of the application, ProductController, defines the REST API endpoints. The code of ProductController is this.
. . .
@RestController
@RequestMapping("/product")
public class ProductController {

    private ProductService productService;

    @Autowired
    public void setProductService(ProductService productService) {
        this.productService = productService;
    }


    @RequestMapping(value = "/list", method= RequestMethod.GET)
    public Iterable list(Model model){
        Iterable productList = productService.listAllProducts();
        return productList;
    }

    @RequestMapping(value = "/show/{id}", method= RequestMethod.GET)
    public Product showProduct(@PathVariable Integer id, Model model){
       Product product = productService.getProductById(id);
        return product;
    }


    @RequestMapping(value = "/add", method = RequestMethod.POST)
    public ResponseEntity saveProduct(@RequestBody Product product){
        productService.saveProduct(product);
        return new ResponseEntity("Product saved successfully", HttpStatus.OK);
    }


    @RequestMapping(value = "/update/{id}", method = RequestMethod.PUT)
    public ResponseEntity updateProduct(@PathVariable Integer id, @RequestBody Product product){
        Product storedProduct = productService.getProductById(id);
        storedProduct.setDescription(product.getDescription());
        storedProduct.setImageUrl(product.getImageUrl());
        storedProduct.setPrice(product.getPrice());
        productService.saveProduct(storedProduct);
        return new ResponseEntity("Product updated successfully", HttpStatus.OK);
    }


    @RequestMapping(value="/delete/{id}", method = RequestMethod.DELETE)
    public ResponseEntity delete(@PathVariable Integer id){
        productService.deleteProduct(id);
        return new ResponseEntity("Product deleted successfully", HttpStatus.OK);

    }

}
. . .
In this controller, the @RestController annotation introduced in Spring 4.0 marks ProductController as a REST API controller. Under the hood, @RestController works as a convenient annotation to annotate the class with the @Controller and @ResponseBody.
The @RequestMapping class-level annotation maps requests to “/product” onto the ProductController class. The method-level @RequestMapping annotations maps web requests to the handler methods of the controller.
Configuring Swagger 2 in the Application
For our application, we will create a Docket bean in a Spring Boot configuration to configure Swagger 2 for the application. A Springfox Docket instance provides the primary API configuration with sensible defaults and convenience methods for configuration. Our Spring Boot configuration class, SwaggerConfig is this.
. . .
@Configuration
@EnableSwagger2
public class SwaggerConfig extends WebMvcConfigurationSupport {
    @Bean
    public Docket productApi() {
        return new Docket(DocumentationType.SWAGGER_2)
                .select()                 .apis(RequestHandlerSelectors.basePackage("guru.springframework.controllers"))
                .paths(regex("/product.*"))
                .build();

    }
  @Override
    protected void addResourceHandlers(ResourceHandlerRegistry registry) {
        registry.addResourceHandler("swagger-ui.html")
                .addResourceLocations("classpath:/META-INF/resources/");

        registry.addResourceHandler("/webjars/**")
                .addResourceLocations("classpath:/META-INF/resources/webjars/");
    }
}
. . .
There are some breaking changes in Spring Boot 2 with Swagger 2 which affect the auto configuration of Swagger UI. To configure support for Swagger UI with Spring Boot 2, you need to extend the class WebMvcConfigurationSupport and add two resource handlers.
In this configuration class, the @EnableSwagger2 annotation enables Swagger support in the class. The select() method called on the Docket bean instance returns an ApiSelectorBuilder, which provides the apis() and paths() methods to filter the controllers and methods being documented using String predicates. In the code, the RequestHandlerSelectors.basePackage predicate matches the guru.springframework.controllers base package to filter the API. The regex parameter passed to paths() acts as an additional filter to generate documentation only for the path starting with /product.
At this point, you should be able to test the configuration by starting the app and pointing your browser to http://localhost:8080/v2/api-docs

Obviously, the above JSON dump, that Swagger 2 generates for our endpoints, is not something we want.
What we want is some nice human readable structured documentation, and this is where Swagger UI takes over.
On pointing your browser to http://localhost:8080/swagger-ui.html, you will see the generated documentation rendered by Swagger UI, like this.
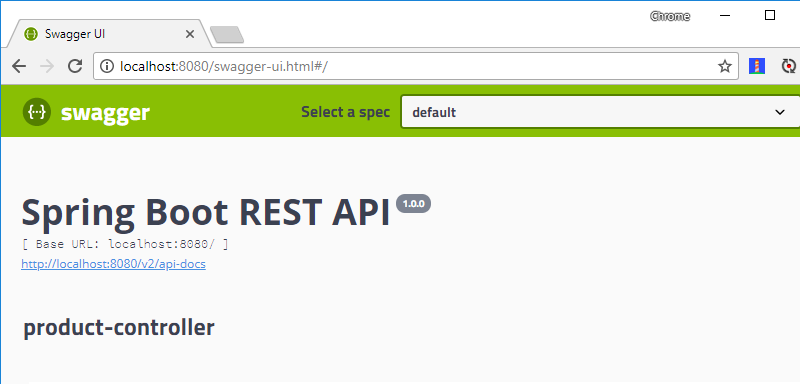
As you can see, Swagger 2 used sensible defaults to generate documentation from our ProductController .
Then Swagger UI wrapped everything up to provide us an intuitive UI. This was all done automatically. We did not write any code or other documentation to support Swagger.
Customizing Swagger
So far, we’ve been looking at Swagger documentation as it comes out of the box, but Swagger 2 has some great customization options.
Let’s start customizing Swagger by providing information about our API in the SwaggerConfig class like this.
SwaggerConfig.java
   //package guru.springframework.config;

import org.springframework.context.annotation.Bean;
import org.springframework.context.annotation.Configuration;
import org.springframework.web.servlet.config.annotation.ResourceHandlerRegistry;
import org.springframework.web.servlet.config.annotation.WebMvcConfigurationSupport;
import springfox.documentation.builders.ApiInfoBuilder;
import springfox.documentation.builders.RequestHandlerSelectors;
import springfox.documentation.service.ApiInfo;
import springfox.documentation.service.Contact;
import springfox.documentation.spi.DocumentationType;
import springfox.documentation.spring.web.plugins.Docket;
import springfox.documentation.swagger2.annotations.EnableSwagger2;
import static springfox.documentation.builders.PathSelectors.regex;

@Configuration
@EnableSwagger2
public class SwaggerConfig extends WebMvcConfigurationSupport {
    @Bean
    public Docket productApi() {
        return new Docket(DocumentationType.SWAGGER_2)
                .select()
                .apis(RequestHandlerSelectors.basePackage("guru.springframework.controllers"))
                .paths(regex("/product.*"))
                .build()
                .apiInfo(metaData());
    }
    private ApiInfo metaData() {
        return new ApiInfoBuilder()
                .title("Spring Boot REST API")
                .description("\"Spring Boot REST API for Online Store\"")
                .version("1.0.0")
                .license("Apache License Version 2.0")
                .licenseUrl("https://www.apache.org/licenses/LICENSE-2.0\"")
                .contact(new Contact("John Thompson", "http://springframework.guru/about/", "[email protected]"))
                .build();
    }
    @Override
    protected void addResourceHandlers(ResourceHandlerRegistry registry) {
        registry.addResourceHandler("swagger-ui.html")
                .addResourceLocations("classpath:/META-INF/resources/");

        registry.addResourceHandler("/webjars/**")
                .addResourceLocations("classpath:/META-INF/resources/webjars/");
    }
}
In the SwaggerConfig class, we have added a metaData() method that returns and ApiInfo object initialised with information about our API. Line 23 initialises the Docket with the new information.
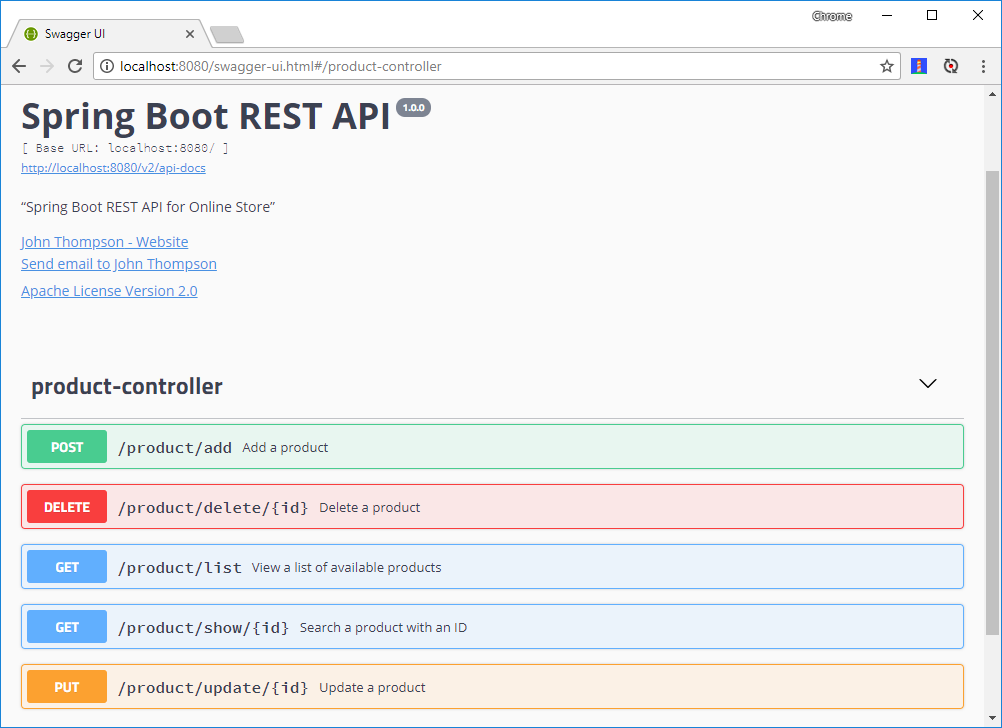
The Swagger 2 generated documentation, now look similar to this.


Swagger 2 Annotations for REST Endpoints
At this point, if you click the product-controller link, Swagger-UI will display the documentation of our operation endpoints, like this.
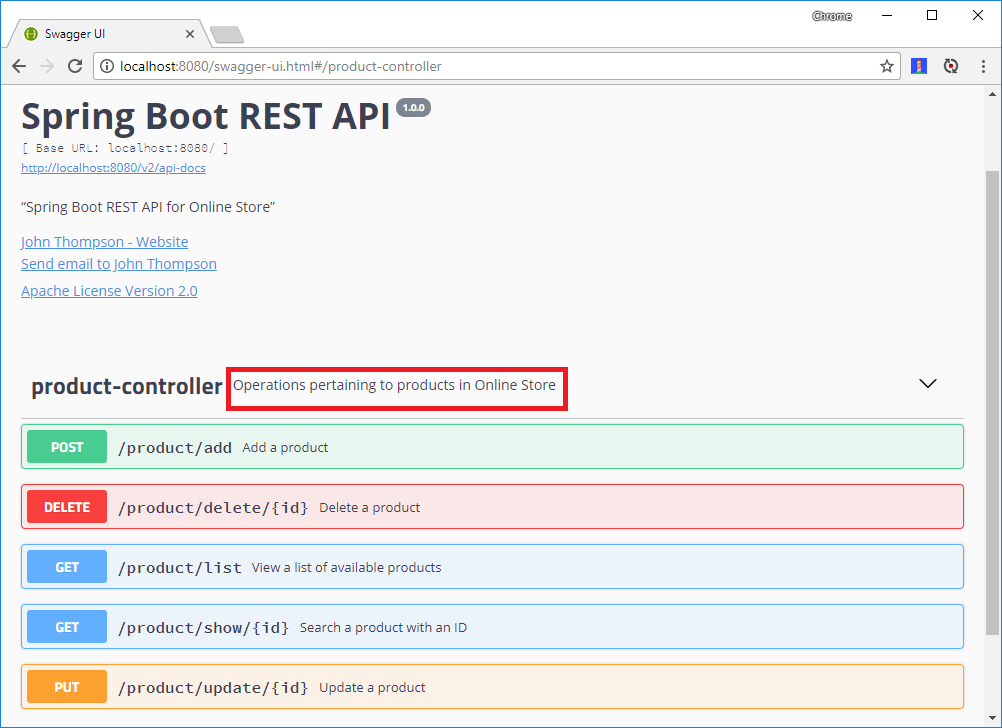
We can use the @Api annotation on our ProductController class to describe our API.
RestController
@RequestMapping("/product")
@Api(value="onlinestore", description="Operations pertaining to products in Online Store")
public class ProductController {
.  . . .
}
The Swagger-UI generated documentation will reflect the description, and now looks like this.
For each of our operation endpoint, we can use the @ApiOperation annotation to describe the endpoint and its response type, like this:
 . .
@ApiOperation(value = "View a list of available products", response = Iterable.class)

@RequestMapping(value = "/list", method= RequestMethod.GET,produces = "application/json")
public Iterable list(Model model){
    Iterable productList = productService.listAllProducts();
    return productList;
}
. . .
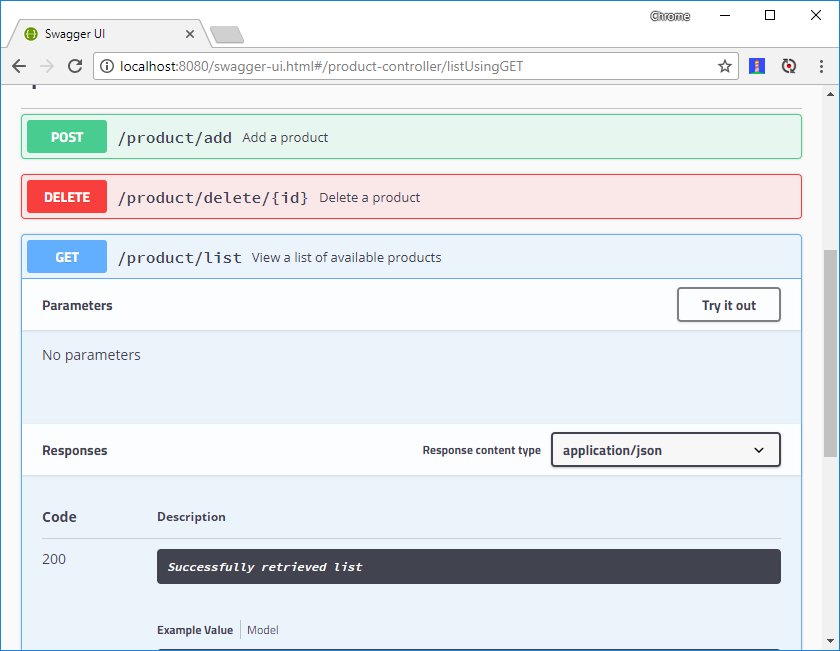
Swagger 2 also allows overriding the default response messages of HTTP methods. You can use the @ApiResponse annotation to document other responses, in addition to the regular HTTP 200 OK, like this.
. . .
@ApiOperation(value = "View a list of available products", response = Iterable.class)
@ApiResponses(value = {
        @ApiResponse(code = 200, message = "Successfully retrieved list"),
        @ApiResponse(code = 401, message = "You are not authorized to view the resource"),
        @ApiResponse(code = 403, message = "Accessing the resource you were trying to reach is forbidden"),
        @ApiResponse(code = 404, message = "The resource you were trying to reach is not found")
}
)
@RequestMapping(value = "/list", method= RequestMethod.GET, produces = "application/json")
public Iterable list(Model model){
    Iterable productList = productService.listAllProducts();
    return productList;
}
. . .
One undocumented thing that took quite some of my time was related to the value of Response Content Type. Swagger 2 generated "*/*", while I was expecting "application/json" for Response Content Type. It was only after updating the @RequestMapping annotation with produces = "application/json" that the desired value got generated. The annotated ProductController is this.
ProductController.java
   //package guru.springframework.controllers;

import guru.springframework.domain.Product;
import guru.springframework.services.ProductService;
import io.swagger.annotations.Api;
import io.swagger.annotations.ApiOperation;
import io.swagger.annotations.ApiResponse;
import io.swagger.annotations.ApiResponses;
import org.springframework.beans.factory.annotation.Autowired;
import org.springframework.http.HttpStatus;
import org.springframework.http.ResponseEntity;
import org.springframework.ui.Model;
import org.springframework.web.bind.annotation.*;

@RestController
@RequestMapping("/product")
@Api(value="onlinestore", description="Operations pertaining to products in Online Store")
public class ProductController {

    private ProductService productService;

    @Autowired
    public void setProductService(ProductService productService) {
        this.productService = productService;
    }

    @ApiOperation(value = "View a list of available products",response = Iterable.class)
    @ApiResponses(value = {
            @ApiResponse(code = 200, message = "Successfully retrieved list"),
            @ApiResponse(code = 401, message = "You are not authorized to view the resource"),
            @ApiResponse(code = 403, message = "Accessing the resource you were trying to reach is forbidden"),
            @ApiResponse(code = 404, message = "The resource you were trying to reach is not found")
    }
    )
    @RequestMapping(value = "/list", method= RequestMethod.GET, produces = "application/json")
    public Iterable list(Model model){
        Iterable productList = productService.listAllProducts();
        return productList;
    }
    @ApiOperation(value = "Search a product with an ID",response = Product.class)
    @RequestMapping(value = "/show/{id}", method= RequestMethod.GET, produces = "application/json")
    public Product showProduct(@PathVariable Integer id, Model model){
       Product product = productService.getProductById(id);
        return product;
    }

    @ApiOperation(value = "Add a product")
    @RequestMapping(value = "/add", method = RequestMethod.POST, produces = "application/json")
    public ResponseEntity saveProduct(@RequestBody Product product){
        productService.saveProduct(product);
        return new ResponseEntity("Product saved successfully", HttpStatus.OK);
    }

    @ApiOperation(value = "Update a product")
    @RequestMapping(value = "/update/{id}", method = RequestMethod.PUT, produces = "application/json")
    public ResponseEntity updateProduct(@PathVariable Integer id, @RequestBody Product product){
        Product storedProduct = productService.getProductById(id);
        storedProduct.setDescription(product.getDescription());
        storedProduct.setImageUrl(product.getImageUrl());
        storedProduct.setPrice(product.getPrice());
        productService.saveProduct(storedProduct);
        return new ResponseEntity("Product updated successfully", HttpStatus.OK);
    }

    @ApiOperation(value = "Delete a product")
    @RequestMapping(value="/delete/{id}", method = RequestMethod.DELETE, produces = "application/json")
    public ResponseEntity delete(@PathVariable Integer id){
        productService.deleteProduct(id);
        return new ResponseEntity("Product deleted successfully", HttpStatus.OK);

    }

}
The output of the operation endpoints on the browser is this.
If you have noticed, the current documentation is missing one thing – documentation of the Product JPA entity. We will generate documentation for our model next.
Swagger 2 Annotations for Model
You can use the @ApiModelProperty annotation to describe the properties of the Product model. With @ApiModelProperty, you can also document a property as required.
The code of our Product class is this.
Product.java
   //package guru.springframework.domain;

import io.swagger.annotations.ApiModelProperty;

import javax.persistence.*;
import java.math.BigDecimal;

@Entity
public class Product {
    @Id
    @GeneratedValue(strategy = GenerationType.AUTO)
    @ApiModelProperty(notes = "The database generated product ID")
    private Integer id;
    @Version
    @ApiModelProperty(notes = "The auto-generated version of the product")
    private Integer version;
    @ApiModelProperty(notes = "The application-specific product ID")
    private String productId;
    @ApiModelProperty(notes = "The product description")
    private String description;
    @ApiModelProperty(notes = "The image URL of the product")
    private String imageUrl;
    @ApiModelProperty(notes = "The price of the product", required = true)
    private BigDecimal price;

    public String getDescription() {
        return description;
    }

    public void setDescription(String description) {
        this.description = description;
    }

    public Integer getVersion() {
        return version;
    }

    public void setVersion(Integer version) {
        this.version = version;
    }

    public Integer getId() {
        return id;
    }

    public void setId(Integer id) {
        this.id = id;
    }

    public String getProductId() {
        return productId;
    }

    public void setProductId(String productId) {
        this.productId = productId;
    }

    public String getImageUrl() {
        return imageUrl;
    }

    public void setImageUrl(String imageUrl) {
        this.imageUrl = imageUrl;
    }

    public BigDecimal getPrice() {
        return price;
    }

    public void setPrice(BigDecimal price) {
        this.price = price;
    }
}
The Swagger 2 generated documentation for Product is this.

Summary
Swagger 2 has a lot of other uses beyond the scope of this post. This is beside REST API documentation and presentation with Swagger Core and Swagger UI. One of my favorite is Swagger Editor, a tool to design new APIs or edit existing ones. The editor visually renders your Swagger definition and provides real time error-feedback. Another one is Swagger Codegen – a code generation framework for building Client SDKs, servers, and documentation from Swagger definitions.
Swagger 2 also supports Swagger definition through JSON and YAML files. It is something you should try if you want to avoid implementation-specific code in your codebase by externalising them in JSON and YAML files – something that I will cover in a future post.
The code for this post is available for download here.


Clement
Nice tutorial I really learn a lot. Please can you do a tutorial that has an Oauth2 setup with swagger?
Ron Katz
Hello John,
Thank you very much for this post.
However, I do need some help in order to understand how to operate this.
First of all, in the SwggerConfig class:
1) what value do I put in apis (RequestHandlerSelectors.basePackage) ? The package where my controllers are?
2) what should be the value in paths?
Does the method addResourceHandlers is mandatory?
And finally, how do I actually run this?
I don’t know if those details suppose to be clear… so I’m sorry if I ask something which is obvious…
Thank you so much.
Gladis Vladlen
Thanks for this tutorial it was very useful for me. GL
Borja
Nice tutorial! Has anyone managed to run the example?
Sidaty
Very Nice and clear tutorial. Thanx
Theodoros Ntakouris
These are the required webjars by the way: https://mvnrepository.com/artifact/org.webjars/swagger-ui
Senzo
Thank you, this is a very useful tutorial, I used this to implement documentation on my API. Kudos!
Cyril
HI !
Your tutorial is very nice!
There seems to be an issue with “@Api”, which look like more or less deprecated
@Api(value=”onlinestore”, description=”Operations pertaining to products in Online Store”)
They seem to recommend using @SwaggerDefinition instead, but I couldn’t have it work with a Spring boot @RepositoryRestResource 🙁
Any idea?
Thanks!
Cyril
sandipkbhaumik
I am able to get the ui and previously it was showing the documentation. But Right now, it stopped accessing the controllers from the swagger documentation. Any idea why my controller definnition has not been picked up which was picking up before few days. I can assure that there were no changes on my controller side. BTW I am using sprint boot with RestController.
sandipkbhaumik
Also, when I hit /v2/api-docs, I don’t see json containing my application specific data except some common data like apache license and application context.
sandipkbhaumik
Sometimes, you need to answer when someone is asking for help.
jt
Sorry, I don’t see every blog comment. Share your project with me on GitHub and I’ll take a look.
sandipkbhaumik
No problem JT, I have figured out. BTW do we have any java api documentation for swagger2?
jt
The Java doc is here: http://springfox.github.io/springfox/javadoc/current/
Vishal
Very Informative 🙂
shivangi
HI thanks for this tutorial. I have one doubt if i want to add more paths can I do that as my controllers are starting from diffrent paths
Simanta SarmaX
Couldn’t get you. Do you mean documentation of multiple controllers? If so, Yes! Use @RequestMapping at controller class level. For example, I’ll use this for a new controller handling recommendations
@RestController
@RequestMapping(“/recommendation”)
@Api(value=”onlinestore”, description=”Operations pertaining to product recommendation in Online Store”)
public class RecommendationController{ … }
Swagger will list both controllers.
RAWAD RIFAI
I love this tutorial, and we’re using it here at the NFL.
Unfortunately, some of our microservices are not accepting this. Most likely due to some conflict with @IntegrationTest.
I started an issue on their github page. If anyone can help, we would greatly appreciate it.
https://github.com/springfox/springfox/issues/1894
ashiif
good one tom!!
Leandro Capuano
Sounds PERFECT, here at Brazil when we say “você é o cara”, it means you are the man, thank you very much. Aloha brother from 0s and 1s!
Pujan Shah
Nice tutorial..
Can you help me to configure authentication part too?
My application first generate token with the authentication Rest API then I want to pass that token in the header while calling all other API’s.
sundar
After successfully importing the project i’m not able to see the swagger-ui.html i.e its not list all the api’s. But i’m able to see the json format..anyhting im missing over here
Chetan
if Swagger is behind any auth, you need to do following in SpringBoot Security
http.authorizeRequests().antMatchers(“/swagger-resources/**”).permitAll().anyRequest().fullyAuthenticated();
Abhishek Singhal
Hi there ,
I am doing exactly the same but in the expression of regex , its giving me complie time error of “cannot access Predicate” .
Can you help where and what i am doing wrong .
public Docket docket(){
return new Docket(DocumentationType.SWAGGER_2)
.select()
.apis(RequestHandlerSelectors.basePackage(“com.r4cloud.controller”))
.paths(regex(“/cerberus.*”))
.build()
.apiInfo(metaData());
}
tes17
update your code like this….
public Docket docket(){
return new Docket(DocumentationType.SWAGGER_2)
.select()
.apis(RequestHandlerSelectors.basePackage(“com.r4cloud.controller”))
.paths(pathbuilders.regex(“/cerberus.*”))
.build()
.apiInfo(metaData());
}
RR
Hi,
I am using swagger2 and spring boot application. I configured swagger exactly the way you showed..but when i try to hit that endpoint it says
“No mapping found for HTTP request with URI [/example/api/swagger-ui.html] in DispatcherServlet with name ‘dispatcherServlet’
Here is my controller:
@SuppressWarnings(“unchecked”)
@PostMapping(value = “/example”, produces = MediaType.APPLICATION_JSON_VALUE, consumes = MediaType.APPLICATION_JSON_VALUE)
public ResponseEntity postMatchedMembers(
@ApiParam(value = “Request body “, required = true, allowMultiple = true) @Valid @RequestBody Request DataRequest,
BindingResult result) throws Exception{
StopWatch stopWatch = new StopWatch();
stopWatch.start();
List exampleList;
SwaggerConfig.java:
@Configuration
@EnableSwagger2
public class SwaggerConfig {
@Bean
public Docket matchingPersistenceApi() {
return new Docket(DocumentationType.SWAGGER_2).select().apis(RequestHandlerSelectors.basePackage(“com.hms.matching.postmatch.controller”))
.paths(PathSelectors.ant(“/**”)).build().apiInfo(metaData());
}
My Boot.java
@SpringBootApplication
@ComponentScan(“com.example”)
@EnableJpaRepositories(“com.example.dao”)
@EntityScan(“com.example.domain”)
@EnableAsync
@EnableTransactionManagement
public class ExampleApiApplication {
public static void main(String[] args) {
SpringApplication.run(Example.class, args);
}
It used to work earlier..i dont know what went wrong suddenly it stopped working. Please help me find what the issue could be? TIA
jt
Did you change something? Try doing a clean & rebuilding.
jeri
This is great Jason, Not Yaml? are there easy change to output Yaml?
Chetan
Fantastic Tutorial. As always Guru is Guru. Perfect for any newbie. Thanks
someone
Tried running your tutorial. Had problems with Springfox dependencies 2.6.1…works after changing the Springfox dependencies to 2.8.
Simanta Sarma
The post has been updated to Spring Boot 2.0.0.0 RELEASE
Ganeshram Subramanian
Can you create a post on Swagger definition through JSON and YAML files.
festner
With Spring Boot 2.0.1.RELEASE I had the problem, that some of my configuration in my application.properties ware not taken (for example spring.jackson.serialization.write-dates-as-timestamps=false )
Sollution is:
SwaggerConfig should NOT extend from WebMvcConfigurationSupport. Also you don’t need to add the overridden method addResourceHandlers()
AJAY KUMAR MOHANTY
Very helpful post.I like your post.Thanks!!!
https://www.ai1tutorial.com/spring-restwithswagger/
Ben
You should very much consider creating a proper RESTful uri structure that is resource (noun) oriented. There is no reason to have /products[/add/show/update/delete]. The http verb (hwich you’re using properly) defines what the operation on the resource is, including it in the URI is unnecessary and definitely not a best practice.
jhrabows
I agree. Many client libraries expect CRUD API with a single URL and HTTP Verbs for different methods.
Nikhil
Nice Tutorial
Rick
Hello, Guru John. I really enjoyed and benefited from the article. Now I can make sense of this Spring Boot 2 code I’m looking at. (Although it doesn’t define productApi inside a class derived from WebMvcConfigurationSupport.)
Now I’d like to read about Swagger Editor and Swagger Codegen. Did you never get around to writing blog posts on those items? Do you have any ideas where a nice, readable article might be?
Regards, Rick
Miguel Salinas Gancedo
Great tutorial!!, But I have a problem: I devel a simple Spring Boot Domain with only one object, everything is Ok in localhost when deploy my App: http://localhost:3000/swagger-ui.html
But now I deploy the same App in Pivotal WebService (Paas), my model runs Ok, but when I go to: https://trainingcfservices.cfapps.io/swagger-ui.html I obtain a error at button of paig where I must see my controler with a red ERROR button, when click I obtain this message in my brower!. The App runs Ok of course, but the Swagger documentation not works oK in Pivotal and yes in my local computer
{“messages”:[“attribute paths is missing”],”schemaValidationMessages”:[{“level”:”error”,”domain”:”validation”,”keyword”:”required”,”message”:”object has missing required properties ([\”paths\”])”,”schema”:{“loadingURI”:”#”,”pointer”:””},”instance”:{“pointer”:””}}]}
What is the possible error?
Regards
Miguel Salinas Gancedo
Resolve the problem desable the swagger validation with this bean inside Swagger configuration
@Bean
UiConfiguration uiConfig() {
return UiConfigurationBuilder.builder()
.displayRequestDuration(true)
.validatorUrl(“”)
.build();
}
F.
Great Tutorial and thanks a lot for that. But is there also one for a document drive approach, where you’ve the openAPI Spec first and generate your server artifacts using spring/spring boot?
Thanks and Regards,
jhrabows
Instead of literal produces = “application/json” one could use produces = MediaType.APPLICATION_JSON_VALUE
Venkata satya sai prithvi Monangi
Hi Guru,
Thanks for the tutorial. I’ve followed the tutorial and deployed the spring-boot application on docker. The swagger end points (UI and json) work perfectly fine when the docker runs on localhost. But, when I run the same docker image on a remote container registry, the swagger links throw an error where as my product apis work fine. Please help me with this issue.
ashutosh0188
Hi If I wanna integrate swagger-ui directly into my springboot rest api without using springfox. How can I do that? Is there any documentation on swagger website or somewhere else? I need your help. I am not getting my answers. Can you please do reply me?
S Simm
I have a REST service, no at web site, and I had the JSON-is-visible-but-the-web-page-had-an-empty-set problem mentioned above. If you are in a similar situation check this out: https://stackoverflow.com/questions/48567900/swagger-ui-empty-and-gives-403
krishna
How can we add oauth 2 for swagger?
Mass
Want to Restrict my swagger access in Production
I Tried
@EnableSwagger2
@Profile({“LOCAL”,”tst”,”qa”})
But its not working
Can any one help me with this
Keith
Thanks for the tutorial. It seems like sptingfox is not actively maintained. All the tags shown in this tutorial work but when I start using more detailed tags like format, and range in the @apiparam annotation, they don’t show up on the ui page.
k k chandan
Let me know how to filter model data using swagger annotation
Soha Zain
Amazingly Great job. These two points are well covered; “The Spring Boot RESTful Application” and “Swagger 2 Annotations for REST Endpoints”. Thanks for sharing this topic “Spring Boot RESTful API Documentation with Swagger 2”. The best part is the article has all the practical detailing! Keep sharing
Dinesh A Angne
Thanks for step by step article.
I struggled to find why swagger-ui.html is not working, and this article saved my day.
jaaanu
How to write two dockets in a same configuration class for example, in swagger-UI. I need to get product controller and also the implementation of another controller.
Lutosław
Hi, thanks for the tutorial. I have a Spring Boot App and followed the tutorial thoroughly (twice), but I get 404 on urls, both http://localhost:8080/api/v2/api-docs and http://localhost:8080/swagger-ui(.html)… I had 401 previously but I’ve disabled authentication and now it’s 404.