

How to Use Multiple Data Sources With Spring Boot
29 CommentsLast Updated on October 21, 2024 by jt
Introduction
Often, you will need to connect to more than one data source. Sometimes, this is for security reasons.
An example of this is the storage of credit card information. You may wish to store the data elements in multiple data sources. If one of the data sources is compromised the data retrieved is useless without the data from other data sources.
In this article, we will configure multiple data sources in Spring Boot and JPA.
Project Setup
Databases
We will use MySQL for our database server.
The credit card scenario described above, will use the following three databases:
- Member database(memberdb): Stores personal details of cardholders which include their full name and member id.
- Cardholder database(cardholderdb): Stores cardholder details which include the member id and credit card number.
- Card database(carddb): Stores the credit card information which includes the owner’s full name and the credit card expiration date.
Since we are spreading the credit card data across three databases, all three would need to be compromised for a security risk.
NOTE: This scenario is for an example of using multiple data sources with Spring Boot. This article is not a security recommendation.
Dependencies
To support MySQL, our classpath must include the MySQL database connector dependency.
Here is the list of Maven dependencies.
<dependencies>
    <dependency>
        <groupId>org.springframework.boot</groupId>
        <artifactId>spring-boot-starter-data-jpa</artifactId>
    </dependency>
    <dependency>
        <groupId>mysql</groupId>
        <artifactId>mysql-connector-java</artifactId>
        <scope>runtime</scope>
    </dependency>
    <dependency>
        <groupId>org.projectlombok</groupId>
        <artifactId>lombok</artifactId>
        <optional>true</optional>
    </dependency>
    <dependency>
        <groupId>org.springframework.boot</groupId>
        <artifactId>spring-boot-starter-test</artifactId>
        <scope>test</scope>
    </dependency>
    <dependency>
        <groupId>commons-dbcp</groupId>
        <artifactId>commons-dbcp</artifactId>
        <version>${commons.dbcp.version}</version>
    </dependency>
</dependencies>
Packaging
The project packaging structure is very important when dealing with multiple data sources.
The data models or entities belonging to a certain datastore must be placed in their unique packages.
This packaging strategy also applies to the JPA repositories.
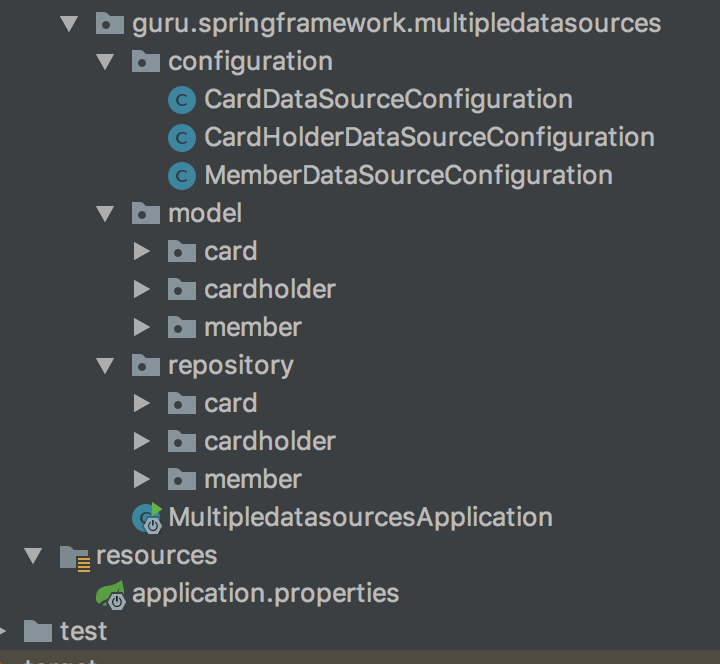
As you can see above, we have defined a unique package for each of the models and repositories.
We have also created Java configuration files for each of our data sources:
guru.springframework.multipledatasources.configuration.CardDataSourceConfigurationguru.springframework.multipledatasources.configuration.CardHolderDataSourceConfigurationguru.springframework.multipledatasources.configuration.MemberDataSourceConfiguration
Each data source configuration file will contain its data source bean definition including the entity manager and transaction manager bean definitions.
Database Connection Settings
Since we are configuring three data sources we need three sets of configurations in the application.propertiesfile.
Here is the code of the application.properties file.
#Store card holder personal details
app.datasource.member.url=jdbc:mysql://localhost:3306/memberdb?createDatabaseIfNotExist=true
app.datasource.member.username=root
app.datasource.member.password=P@ssw0rd#
app.datasource.member.driverClassName=com.mysql.cj.jdbc.Driver

#card number  (cardholder id, cardnumber)
app.datasource.cardholder.url=jdbc:mysql://localhost:3306/cardholderdb?createDatabaseIfNotExist=true
app.datasource.cardholder.username=root
app.datasource.cardholder.password=P@ssw0rd#
app.datasource.cardholder.driverClassName=com.mysql.cj.jdbc.Driver

#expiration date (card id, expiration month, expiration year)
app.datasource.card.url=jdbc:mysql://localhost:3306/carddb?createDatabaseIfNotExist=true
app.datasource.card.username=root
app.datasource.card.password=P@ssw0rd#
app.datasource.card.driverClassName=com.mysql.cj.jdbc.Driver

spring.jpa.hibernate.ddl-auto=update
spring.jpa.generate-ddl=true
spring.jpa.show-sql=true
spring.jpa.database=mysql
Data Source Configuration
It is important to note that during the configuration of multiple data sources, one data source instance must be marked as the primary data source.
Else the application will fail to start-up because Spring will detect more than one data source of the same type.
Steps
In this example, we will mark the member data source as our primary data source.
Here are the data source configuration steps.
- Data source bean definition
- Entities
- Entity Manager Factory bean definition
- Transaction Management
- Spring Data JPA Repository custom settings
Data Source Bean Definition
To create a data source bean we need to instantiate the org.springframework.boot.autoconfigure.jdbc.DataSourceProperties class using the data source key specified in the application.properties file. We are going to use this DataSourceProperties object to get a data source builder object.
The data source builder object uses the database properties found in the application.properties file to create a data source object.
The following code shows the bean definitions of our data sources.
Primary Data Source
@Bean
@Primary
@ConfigurationProperties("app.datasource.member")
public DataSourceProperties memberDataSourceProperties() {
    return new DataSourceProperties();
}

@Bean
@Primary
@ConfigurationProperties("app.datasource.member.configuration")
public DataSource memberDataSource() {
    return memberDataSourceProperties().initializeDataSourceBuilder()
            .type(HikariDataSource.class).build();
}
Secondary Data Sources
/*cardholder data source */
@Bean
@ConfigurationProperties("app.datasource.cardholder")
public DataSourceProperties cardHolderDataSourceProperties() {
    return new DataSourceProperties();
}

@Bean
@ConfigurationProperties("app.datasource.cardholder.configuration")
public DataSource cardholderDataSource() {
    return cardHolderDataSourceProperties().initializeDataSourceBuilder()
            .type(BasicDataSource.class).build();
}

/*card data source*/
@Bean
@ConfigurationProperties("app.datasource.card")
public DataSourceProperties cardDataSourceProperties() {
    return new DataSourceProperties();
}

@Bean
@ConfigurationProperties("app.datasource.card.configuration")
public DataSource cardDataSource() {
    return cardDataSourceProperties().initializeDataSourceBuilder()
            .type(BasicDataSource.class).build();
}
Entities
Since we are going to store Member, Card, and Cardholder objects we must declare them as JPA entities using @Entity annotation. These entities will be mapped to relational database tables by JPA.
We must tell Spring which tables belong to a certain data source. There are two ways of achieving this. You can use the ‘schema‘ field of the @Table annotation as indicated in the code snippet below at line 2.
@Entity
@Table(name = "member", schema = "memberdb")
@Data
public class Member {

    @Id
    @GeneratedValue(strategy = GenerationType.AUTO)
    private Long id;
    private String name;
    private String memberId;
}
Or you may link the entities to their data source is via the org.springframework.boot.orm.jpa.EntityManagerFactoryBuilder class method packages(). We can pass the packages or classes to be scanned for @Entity annotations in this method.
Spring will use this setting to map these entities to tables which will be created in the data source set through the datasource() method of this EMF builder class.
See code snippet in the next section.
Entity Manager Factory Bean Definition
Our application will be using Spring Data JPA for data access through its repository interfaces that abstract us from the EM(Entity Manager). We use the EMF bean to obtain instances of EMs which interact with the JPA entities.
Since, we have three data sources we need to create an EM for each data source.
This is done by providing the EMF builder class with reference to the data source and location of entities.
In our example, we will define this EMF using the org.springframework.orm.jpa.LocalContainerEntityManagerFactoryBean class like this.
   /*Primary Entity manager*/
   @Primary
   @Bean(name = "memberEntityManagerFactory")
   public LocalContainerEntityManagerFactoryBean memberEntityManagerFactory(EntityManagerFactoryBuilder builder) {
       return builder
               .dataSource(memberDataSource())
               .packages(Member.class)
               .build();
   }

   /*Secondary Entity Managers*/
   @Bean(name = "cardHolderEntityManagerFactory")
   public LocalContainerEntityManagerFactoryBean cardHolderEntityManagerFactory(
           EntityManagerFactoryBuilder builder) {
       return builder
               .dataSource(cardholderDataSource())
               .packages(CardHolder.class)
               .build();
   }

   @Bean(name = "cardEntityManagerFactory")
   public LocalContainerEntityManagerFactoryBean cardEntityManagerFactory(
           EntityManagerFactoryBuilder builder) {
       return builder
               .dataSource(cardDataSource())
               .packages(Card.class)
               .build();
   }
Transaction Management
The bean definition of a transaction manager requires a reference to the entity manager factory bean. We will to use the @Qualifier annotation to auto-wire the entity manager specific to the data source’ s transaction manager.
A transaction manager is needed for each data source.
The following is a snippet of code showing the member data source transaction manager bean definition.
@Primary
@Bean
public PlatformTransactionManager memberTransactionManager(
        final @Qualifier("memberEntityManagerFactory") LocalContainerEntityManagerFactoryBean memberEntityManagerFactory) {
    return new JpaTransactionManager(memberEntityManagerFactory.getObject());
}
JPA Repository Configuration
Since we are going to have multiple data sources we must provide the specific information for each data source repository using Spring’ s @EnableJpaRepositoriesannotation. In this annotation, we are going to set the reference to an entity manager, the repositories location and the reference to the transaction manager.
Below is the ‘member’ data source’s JPA repository settings.
@Configuration
@EnableTransactionManagement
@EnableJpaRepositories(basePackages = "guru.springframework.multipledatasources.repository.member",
        entityManagerFactoryRef = "memberEntityManagerFactory",
        transactionManagerRef= "memberTransactionManager"
)
public class MemberDataSourceConfiguration { .... }
Line number 3:
basePackages: We use this field to set the base package of our repositories. For instance, for the member data source, it must point to the package guru.springframework.multipledatasources.repository.member
Line number 4:
entityManagerFactoryRef: We use this field to reference the entity manager factory bean defined in the data source configuration file. It is important to take note of the fact that the entityManagerFactoryRef value must match the bean name (if specified via the name field of the @Bean annotation else will default to method name) of the entity manager factory defined in the configuration file.
Line number 5:
transactionManagerRef: This field references the transaction manager defined in the data source configuration file. Again it is important to ensure that the transactionManagerRef value matches with the bean name of the transaction manager factory.
Complete Data Source Configuration File
Below is the complete data source configuration for our primary data source(member database). The complete card and cardholder configuration files are available on GitHub. They are similar to this one except that they are secondary data sources.
@Configuration
@EnableTransactionManagement
@EnableJpaRepositories(basePackages = "guru.springframework.multipledatasources.repository.member",
        entityManagerFactoryRef = "memberEntityManagerFactory",
        transactionManagerRef= "memberTransactionManager"
)
public class MemberDataSourceConfiguration {

    @Bean
    @Primary
    @ConfigurationProperties("app.datasource.member")
    public DataSourceProperties memberDataSourceProperties() {
        return new DataSourceProperties();
    }

    @Bean
    @Primary
    @ConfigurationProperties("app.datasource.member.configuration")
    public DataSource memberDataSource() {
        return memberDataSourceProperties().initializeDataSourceBuilder()
                .type(HikariDataSource.class).build();
    }

    @Primary
    @Bean(name = "memberEntityManagerFactory")
    public LocalContainerEntityManagerFactoryBean memberEntityManagerFactory(EntityManagerFactoryBuilder builder) {
        return builder
                .dataSource(memberDataSource())
                .packages(Member.class)
                .build();
    }

    @Primary
    @Bean
    public PlatformTransactionManager memberTransactionManager(
            final @Qualifier("memberEntityManagerFactory") LocalContainerEntityManagerFactoryBean memberEntityManagerFactory) {
        return new JpaTransactionManager(memberEntityManagerFactory.getObject());
    }

}
Important Points to note:
entity manager factory bean: Please make sure that you are referencing the correct data source when creating the entity manager factory bean otherwise you will get unexpected results.
transaction manager bean: To ensure that you have provided the correct entity manager factory reference for the transaction manager, you may use the @Qualifier annotation.
For example, the transaction manager of the ‘member’ data source will be using the entity manager factory bean with the name “memberEntityManagerFactory”.
Testing our application
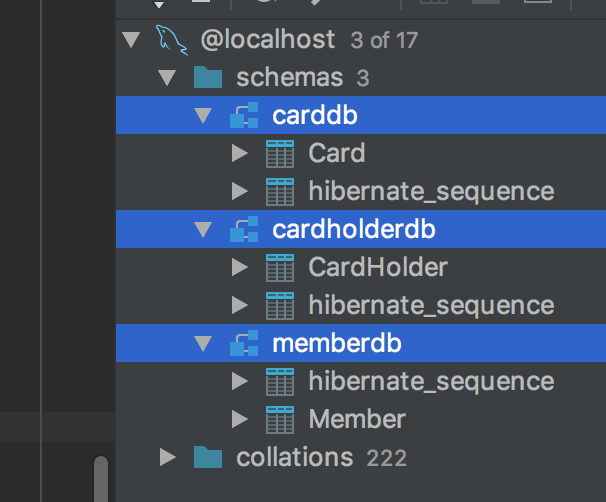
After running the application, the schemas will be updated.
In this example, only one table for each datasource is created.
Spring Boot Test Class
The test class in the code snippet below contains test methods for each data source.
In each method, we are creating an object and persisting it to the database using the Spring Data JPA repository.
To verify, we check if that data is present in the database.
@RunWith(SpringRunner.class)
@SpringBootTest
public class MultipledatasourcesApplicationTests {

    /*
    * We will be using mysql databases we configured in our properties file for our tests
    * Make sure your datasource connections are correct otherwise the test will fail
    * */

    @Autowired
    private MemberRepository memberRepository;

    @Autowired
    private CardHolderRepository cardHolderRepository;

    @Autowired
    private CardRepository cardRepository;

    private Member member;
    private Card card;
    private CardHolder cardHolder;

    @Before
    public void initializeDataObjects(){

        member = new Member();
        member.setMemberId("M001");
        member.setName("Maureen Mpofu");

        cardHolder = new CardHolder();
        cardHolder.setCardNumber("4111111111111111");
        cardHolder.setMemberId(member.getMemberId());

        card = new Card();
        card.setExpirationMonth(01);
        card.setExpirationYear(2020);
        card.setName(member.getName());

    }

    @Test
    public void shouldSaveMemberToMemberDB() {
        Member savedMember =memberRepository.save(member);
        Optional<Member> memberFromDb= memberRepository.findById(savedMember.getId());
        assertTrue(memberFromDb.isPresent());
    }

    @Test
    public void shouldSaveCardHolderToCardHolderDB() {
        CardHolder savedCardHolder =cardHolderRepository.save(cardHolder);
        Optional<CardHolder> cardHolderFromDb= cardHolderRepository.findById(savedCardHolder.getId());
        assertTrue(cardHolderFromDb.isPresent());
    }

    @Test
    public void shouldSaveCardToCardDB() {
        Card savedCard = cardRepository.save(card);
        Optional<Card> cardFromDb= cardRepository.findById(savedCard.getId());
        assertTrue(cardFromDb.isPresent());
    }
}
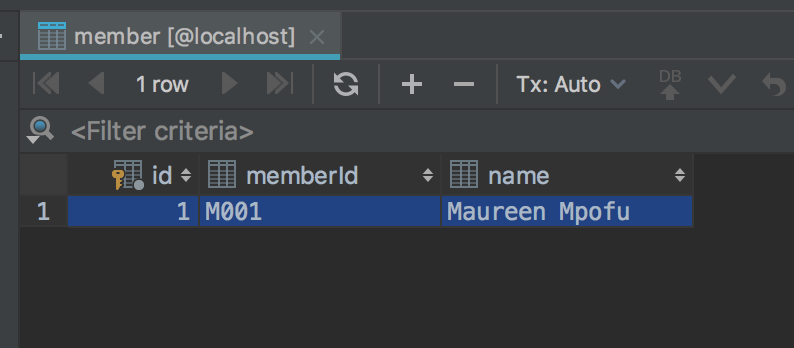
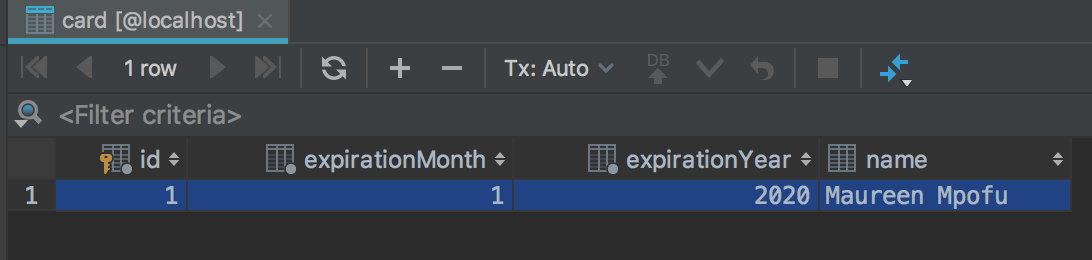
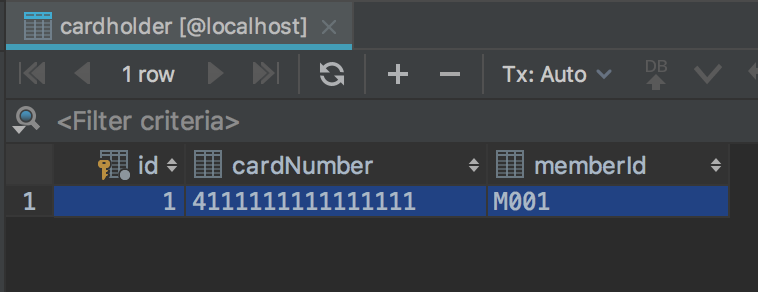
Our test cases passed and the database tables recorded the data persisted via the application(indicated by the screenshots below).
Member Database
Card Database
CardHolder Database
Conclusion
When dealing with just one datasource and Spring Boot, data source configuration is simple. Spring Boot can provide a lot of auto configuration.
However, if you need to connect to multiple datasources with Spring Boot, additional configuration is needed.
You need to provide configuration data to Spring Boot, customized for each data source.
The source code of our sample application is available on GitHub. Please update the datasource to your own needs.


Amir Choubani
Hi. I liked the blog but I didn’t get how this import ` @ConfigurationProperties(“app.datasource.member.configuration”)
` works althought It is not defined in `application.properties` file. Any idea please ?
Borja Paz Rodríguez
I have the same question but I think the *.configuration.* part is for more advanced settings, such as the connection pool.
Please, correct me if I’m wrong.
Naveen
@ConfigurationProperties map the properties from application.properties file. In this example, it map all props start with “app.datasource.member.configuration” like user pad driverClass and spring automatically use these properties while data source creation
Naveen
@ConfigurationProperties map the properties from application.properties file. In this example, it map all props start with “app.datasource.member.configuration” like user pad driverClass and spring automatically use these properties while data source creation
Neo
Most probably it is a mistake, you can try removing it and re running to check if it works.
Bharath Palaksha
EntityManagerFactoryBuilder bean is not defined
Bharath Palaksha
Entities are not getting scanned
java.lang.IllegalArgumentException: Not a managed type: is the error
Rod Madden
Excellent tutorial and explanations …well done !
jack sparrow
org.springframework.beans.factory.BeanCreationException: Error creating bean with name ‘cardEntityManagerFactory’ defined in class path resource [guru/springframework/multipledatasources/configuration/CardDataSourceConfiguration.class]: Invocation of init method failed; nested exception is javax.persistence.PersistenceException: [PersistenceUnit: default] Unable to build Hibernate SessionFactory; nested exception is org.hibernate.exception.GenericJDBCException: Unable to open JDBC Connection for DDL execution
I am getting the above error. I wonder if I got the same error as me?
willem
Thanks, a great example!
But here is my point.
After going over several others I found that that none of them implements more than one
table and repo per DB.
So what happens in that case?
Does one need a configuration/ @EnableJpaRepositories for each table (declaring the same datasource )……..
Kind of confussing this issue.
I Got it working inside a SpringBatch, but when I added some tables and repos I got this:
Caused by: org.springframework.beans.factory.BeanCreationException: Error creating bean with name ‘socioActiveWriter’ defined in file [C:\Users\artsgard\Documents\workspacejava\sociodbbatch\target\classes\com\artsgard\sociodbbatch\writers\SocioActiveWriter.class]: Invocation of init method failed; nested exception is java.lang.IllegalArgumentException: An EntityManagerFactory is required
Of course each entity/ repo needs its entitymanager, right? Who will take care of this?
You’ll find the code here:
https://github.com/thollem/sociodbbatch
willem
It is hard to fall in love with Spring
willem
Concerning my previous post, I have to apologize!
The problem is not the dual/multi DB connection but the Spring-Batch part (transactions and entitymanager)
But anyway, any comment is welcome
willem
Sandeep shelar
How to get session from session factory for each datasource as we have 3 different entity manager and through out application we have only one session factory.
Robert
Great explanation!! Saved me a lot of time!
Renan
Hi. From where did you get “BasicDataSource.class”? I’m following your tutorial with two Oracle databases and I couldn’t understand this part. Thank you
spanky
Hi, Is it possible to join two entities from different Datasource?
Sudan Shrestha
How can we use a json file instead of application.properties to extract configurations?
Dominik
Thanks for the article.
Just a question: What happens when a transaction for one datasource fails – will a rollback happen for the transactions of the other datasources?
I. e. suppose we have the following class:
@Service
public class FooService {
@Autowired
private MemberRepository memberRepository;
@Autowired
private CardHolderRepository cardHolderRepository;
@Autowired
private CardRepository cardRepository;
@Transactional
public void createMemberWithCard(…) {
memberRepository.save(…);
cardHolderRepository.save(…);
cardRepository.save(…);
}
}
Then, FooService.createMemberWithCard() is called but cardRepository.save() fails (e.g. because of a connection issue) and the _cardTransactionManager_ will rollback the transaction for _cardDataSource_.
**Will the transactions for _memberDataSource_ and _cardHolderDataSource_ also be rolled back?**
shajahan
How to connect to multiple databases dynamically as connection string is dynamic which is available on runtime (not static). (With one permanent connection) ?
Bender
Thank you and very nice Tutorial, but do you have a repo for that (the repo you linked is STUFFED with so much else) ?
Would be nice if one could just clone any of your examples (kind of hard to do if they are all in 1 Repo).
mahdi
My Exceptionin project two db eche db two table:
org.hibernate.AnnotationException: @OneToOne or @ManyToOne on ir.fava.citybank.models.tbluser.TblUser.tblRoleType references an unknown entity: ir.fava.citybank.models.tblroletype.TblRoleType
Alex82
i have the same problem. Did you solve?
Gnanasekaran
Thank you so much. This is very nice and useful tutorials.
Vicki
Thank you for the great post! It helped me a lot.
If you use in-memory databases for testing you would need to declare DataSourceInitializer for each db config to create and populate from the given sql files.
I have also added Qualifier to the second dataSource as I pass it to some other beans.
@Bean
@Profile(“test”)
public DataSourceInitializer secondDBDataSourceInitializer(@Qualifier(“secondDBDataSource”) DataSource datasource) {
ResourceDatabasePopulator resourceDatabasePopulator = new ResourceDatabasePopulator();
resourceDatabasePopulator.addScript(new ClassPathResource(“schema2-h2.sql”));
resourceDatabasePopulator.addScript(new ClassPathResource(“data2-h2.sql”));
DataSourceInitializer dataSourceInitializer = new DataSourceInitializer();
dataSourceInitializer.setDataSource(datasource);
dataSourceInitializer.setDatabasePopulator(resourceDatabasePopulator);
return dataSourceInitializer;
}
Gurjit
Not working. Give exception when using the datasource to initializing the proc bean
Skipa
Do you have one with multiple datasources but one datasource writes data to another database? for example, Cardholder is the datasource and we writting the contents of the cardholder DB to Member DB?
J.Arunkumar
After running the application with custom Data source, I am getting “ORA-00904: {TABLENAME}.{FIELDNAME}: invalid identifier” error
On analysis, I found that the Hibernate query that getting generated is different.
With the Spring in-built data source properties setting, Hibernate query generated points to the COLUMN NAME in the database table
Whereas, with the custom data source properties configurations, the Hibernate query that getting generated has the OBJECT FIELD NAME
This is causing the Invalid identifier error.
Please let me know if there is something else that I am missing out.
Mohammad Hassonah
Hi,
Thank you for the article.
Our application follows the implementation described and works perfectly under normal conditions. It connects to over 15 different data sources. The issue arises during deployments, which often occur on off-days when database shutdowns and maintenance are common. If even one database is down, the application fails to start after deployment.
We have tried various solutions, including lazy initializations, ‘sql.init.continue-on-error=true’, and other experiments, but none have resolved the issue.
Could you please suggest any other possible solutions?
Mp3downloader
This post is incredibly helpful! I’ve been struggling to integrate multiple data sources in my Spring Boot application, and your detailed explanation made it so much clearer. The code snippets were particularly useful. Thank you for breaking it down so well!