

Consul Miniseries: Spring Boot Application and Consul Integration Part 2
1 CommentLast Updated on October 21, 2024 by jt
Series Introduction
In this short series, we will look at how we can integrate the Spring Boot application with HashiCorp Consul.
Consul is a service that allows us to connect and secure services across platforms and clouds. It has many usages, such as service discovery, service mesh, or key-value store.
Introduction
In the first part of the series, we have prepared two services as docker containers and also consul server container. We will use all of them as a base for this part. You can find the first part here.
This tutorial is a second part of the series and we will focus on enabling our services to use consul as service discovery. Thanks to that, we will be able to use a service name to call other applications, instead of hard-coding url and port. We will also have a chance to see how load balancing works with several instances of the same service and dynamic ports. The last thing we will do will be to register a health check, so we can see if our service is healthy.
Setup
As IDE for this tutorial, we will use is the IntelliJ IDEA version 2020.1.
We will also use Java 14, Gradle in version 6.3, Lombok, and Spring Boot 2.2.6.
For containerization, we will use Docker version 19.03.8 and docker-compose version 1.25.0.
Code
User service
Dependencies
To use consul as service discovery, we have to add an additional dependency to our service. So, in our gradle.build file in the dependencies section we have to add:
implementation 'org.springframework.cloud:spring-cloud-starter-consul-discovery:2.2.2.RELEASE'
This is an official spring cloud dependency for service discovery using Consul. You can check it here: Spring Cloud Consul.
For health checks to work we will use actuator (Health Check):
implementation 'org.springframework.boot:spring-boot-starter-actuator'
Spring Boot actuator is an official library for monitoring, metrics, and audit. We will use it exclusively for health check purposes, and we are fine with a default configuration.
Configuration
The next step will be to add some configuration of our service. Let us proceed with changing the application.properties file, to application.yml. This is a matter of preference, but it may be a bit more readable to have the configuration as a YAML file. Our configuration should look like this:
server:
  port: 0
spring:
  application:
    name: users-service
  cloud:
    consul:
      host: 172.17.0.1
      discovery:
        prefer-ip-address: true
        instanceId: ${spring.application.name}:${spring.application.instance_id:${random.value}}
The first thing that stands out is the port. In the previous part of the tutorial, port was set to 8081, to allow us to check what service endpoint returns when we called it using the browser. This time, we want to check how load balancing works with Consul, and to do that, we need a dynamically assigned port. To assign it dynamically, we have to set server port value to 0.
The following property is a service name, it stays the same as in the first part of the tutorial.
Finally, we have consul group properties. The host property is a consul server address. As our service works in a container, and our Consul server as another container, but with host networking, we need to have some way to reach from the service container to the host. 172.17.0.1 is the default bridge network interface IP address and we can use it to reach Consul, which is available on port 8500 (default).
WARNING: The IP address of the docker bridge network is not constant, and docker does not guarantee that this will be the default in each case. There are some alternatives, as setting this IP manually, or by creating a custom bridge network. Docker networking details are out of the scope of this tutorial though, so we will not describe those in detail. If you need help with that, please refer to official docker documentation https://docs.docker.com/network/bridge/.
After the host, we have a discovery properties group. Here we picked to prefer IP address when we register a service in consul, instead of hostname.
The last property is instanceId, where we can set custom id for registered service. This will come in handy for load balancing.
Hello service
In Hello service, we do mostly the same configuration as in the Users service, with small differences.
Dependencies
Single additional dependency, that has to be added along with the dependencies we already described in Users service, is Ribbon.
implementation 'org.springframework.cloud:spring-cloud-starter-netflix-ribbon:2.2.2.RELEASE'
As we use Feign for making HTTP calls to external services, we have to use Ribbon to be able to use service discovery and load balancing. Ribbon is another library developed by Netflix and is used for client-side load balancing.
Configuration
The configuration is almost the same as in case of Users service:
spring:
  application:
    name: hello-service
  cloud:
    consul:
      host: 172.17.0.1
      discovery:
        prefer-ip-address: true
Here we do not set up a random port and it will be the same as in the previous part of the tutorial. We will use a default port Spring Boot applications start with, which is 8080. This is simply because we want to make a call to the service using our browser, and it will be simpler for us to know the port. We are also fine with showing load balancing on an example of Users service.
We also do not need a custom instance id, as we will not create more than one hello service.
The rest of the properties (besides the name of course) is the same as in the Users service.
Code
In Hello service, we have to change code that is used to call Users service also, so we can benefit from service discovery and load balancing. The only change we have to make is in the UsersServiceClient interface:
@FeignClient(name = "users-service")
public interface UsersServiceClient {

    @RequestMapping("/user")
    User getUser();
}
The change is simply to remove the static url, so now we can call external service by name, rather than host and IP address. Thanks to Consul, Feign, and Ribbon, this name will be used to find the correct “route” to the endpoint we want to call.
Containers
We have described necessary changes for our services, let us now move to the containers, as there are some changes also.
version: '3'
services:
  hello-service:
    image: openjdk:14-alpine
    volumes:
      - "./hello-service/build/libs/hello-service-0.0.1-SNAPSHOT.jar:/app.jar"
    ports:
      - 8080:8080
    command: "java -jar app.jar"
  users-service:
    image: openjdk:14-alpine
    volumes:
      - "./users-service/build/libs/users-service-0.0.1-SNAPSHOT.jar:/app.jar"
    command: "java -jar app.jar"
  users-service-2:
    image: openjdk:14-alpine
    volumes:
      - "./users-service/build/libs/users-service-0.0.1-SNAPSHOT.jar:/app.jar"
    command: "java -jar app.jar"
  consul:
    image: consul:1.7
    network_mode: host
To be sincere, the only change in configuration is removing port mapping in Users service. We do not need it, as it will get dynamically assigned port, so there is really no knowledge for us before running the container which port will be assigned to our service.
The second Users service is here just to show load balancing in action.
Running containers
Having all the pieces in place, we can now run our example.
Prepare jar archives
The first thing we should do is to import Gradle dependencies and build jar archives using ./gradlew clean build command. Remember to do that at the root of the app and for both services.
Docker
When ready, run the docker-compose up command in the folder where the docker-compose.yml file resides (you may need to run docker-compose down before, if there are any leftovers from running docker-compose earlier).
Consul
After some time, for each service we should have similar log present:
users-service_1 | 2020-05-10 20:25:00.990 INFO 1 --- [ main] o.s.c.c.s.ConsulServiceRegistry : Registering service with consul: NewService{id='users-service-de2e31611d2b612e04b9546637f9f68c', name='users-service', tags=[secure=false], address='192.168.128.2', meta=null, port=43355, enableTagOverride=null, check=Check{script='null', interval='10s', ttl='null', http='http://192.168.128.2:43355/actuator/health', method='null', header={}, tcp='null', timeout='null', deregisterCriticalServiceAfter='null', tlsSkipVerify=null, status='null'}, checks=null}
In the log, we can see some information that may be interesting for us. For example:
id='users-service-de2e31611d2b612e04b9546637f9f68c'– an instance id, the one we have configured inapplication.ymlfileport=43355– a port that was dynamically assigned to our servicehttp='http://192.168.128.2:43355/actuator/health'– a health check endpoint, that will be used by Consul
Let us go now to http://localhost:8500, to check our consul server.

There are three rows here. One is for the Consul server itself. The next two are our services. They are called according to spring.application.name property in the configuration file.
We can also notice, that we have some green health checks for our services. Each service has a single health check for node and our services have a second one, the one that checks if /actuator/health endpoint call is successful. That is why we have 2 green for Hello service (node and actuator checks) and 4 for Users service (2 instances, node and actuator check for each).
If we go to Users service, by clicking on the corresponding entry, we get this screen:
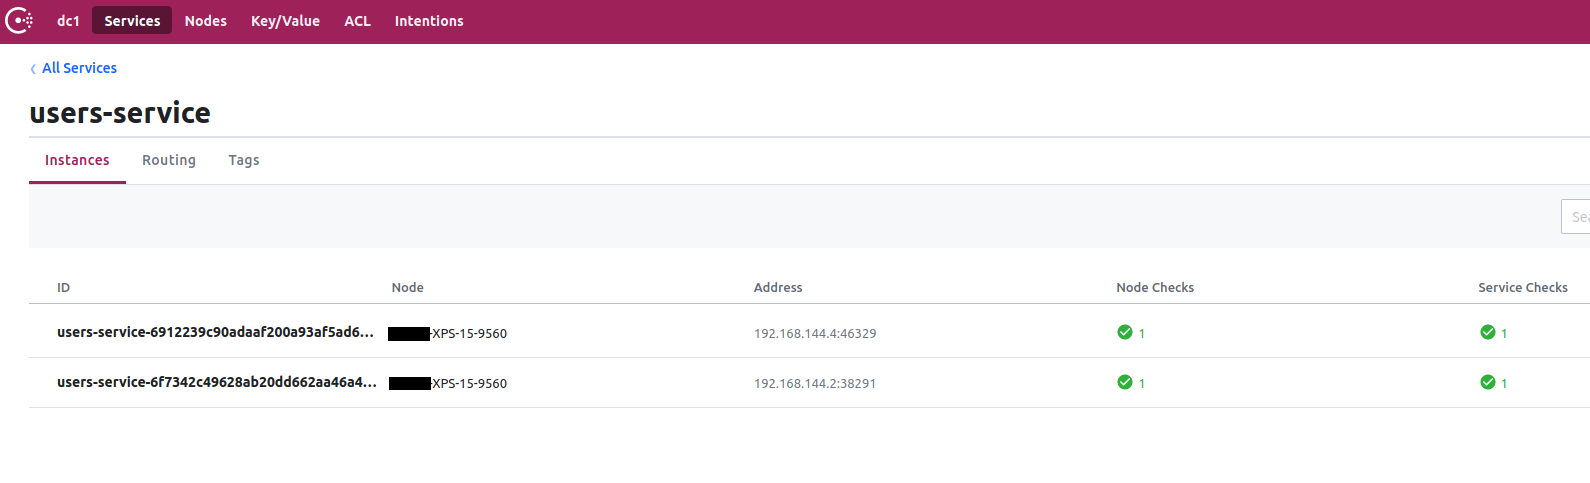
There are two instances of Users service here. Each one has a different instance id, address, and port, although node (containers host) is the same. If we go further into the instance entry:
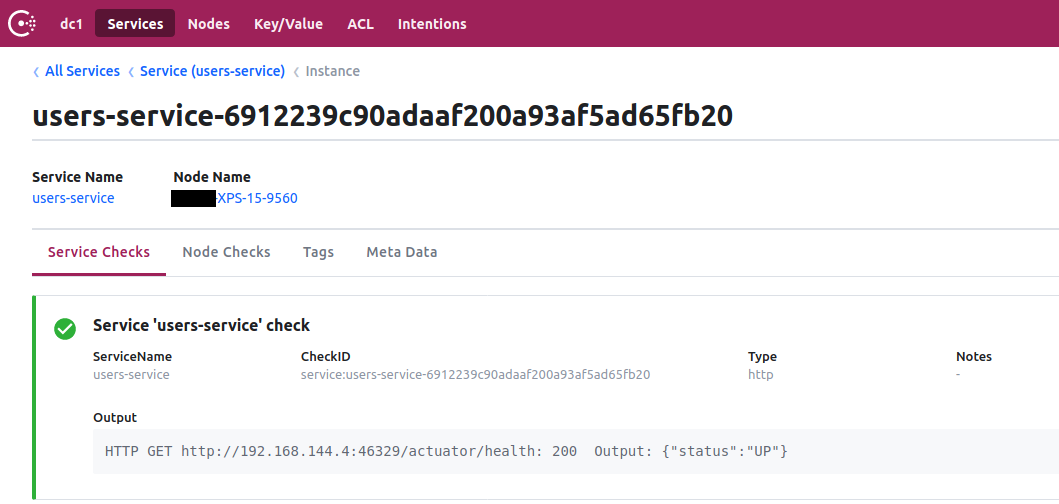
Here we can see a whole bunch of information about a particular service instance. Note full information about service check, the one that calls actuator endpoint.
Services
All of this looks great, but we should check if our services work as they should. Let us call the Hello service http://localhost:8080/hello endpoint in our browser:

Voila, it works! A quick look into application logs:
hello-service_1 | 2020-05-10 21:00:04.466 INFO 1 --- [nio-8080-exec-6] c.n.l.DynamicServerListLoadBalancer : DynamicServerListLoadBalancer for client users-service initialized: DynamicServerListLoadBalancer:{NFLoadBalancer:name=users-service,current list of Servers=[192.168.144.4:46329, 192.168.144.2:38291],Load balancer stats=Zone stats: {unknown=[Zone:unknown; Instance count:2; Active connections count: 0; Circuit breaker tripped count: 0; Active connections per server: 0.0;]
We can see that we have a list of two instances of Users service we can connect to:
Servers=[192.168.144.4:46329, 192.168.144.2:38291]
Now we will stop the second instance of Users service using docker stop <containerId> (you can find container id by running docker ps command), and create a jar for Users service without actuator dependency. After preparing such a “flawed” service, we can run it using docker-compose up users-service-2. In consul, we will have:

We have a failed service check, as we removed the endpoint that we use for this purpose.
Anyway, this service should work just fine, because we removed only monitoring endpoint. We can check if we will be able to use such service, by removing the “green” instance.
After stopping first instance, the same way we did before and calling our hello endpoint in the browser, we get:
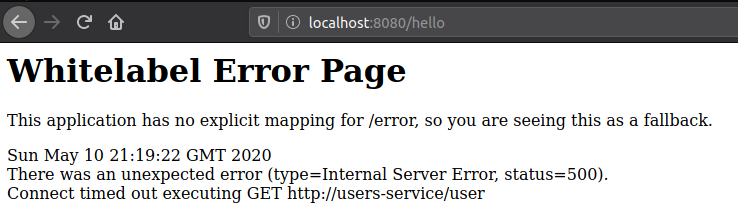
But calling the users service directly, using IP and port from Consul:
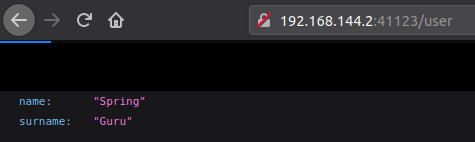
As we can see, service works perfectly well, but we are not allowed to call service with failed health checks anyway, because we get a connection timeout error.
Summary
In this tutorial, we have learned some very important aspects of distributed systems: service discovery and load balancing. We have used Consul as our service discovery server, and it did its job perfectly.
We have seen how Consul deals with failed services, how we can scale services and call them by name, instead of hardcoded url. In the modern world of microservices, these are very important things to know about.
In the next part of the series, we will learn about using Consul as a distributed key-value store, where we can keep our configuration, for example.


One comment