

Manage Docker Containers with Docker Compose
1 CommentLast Updated on October 21, 2024 by jt
Docker Compose defines and runs multi-container Docker applications. It lets you create and start all services from a configuration file with a single docker-compose command.
In the previous posts on the Docker series, I discussed how to run Spring Boot on Docker,
In this post, I will discuss how to dockerize multiple containers that depend on each other. You’ll also see how these containers can be managed together with single commands.
Docker Compose Installation
We will start by installing Docker Compose on Ubuntu.
1. Run this command to download the current stable release of Docker Compose:
$ sudo curl -L "https://github.com/docker/compose/releases/download/1.26.0/docker-compose-$(uname -s)-$(uname -m)" -o /usr/local/bin/docker-compose
2. Apply executable permissions to the binary:
$ sudo chmod +x /usr/local/bin/docker-compose
3. Test the installation.
$ docker-compose --version
The figure shows the docker-compose version
 To install Docker-Compose on Windows/Mac click here.
Docker Compose
I’ll create two containers:
- A simple
user-serviceapplication that will expose one REST endpoint to manage user information. - The second one is a
MongoDBcontainer that will store the information of users.
The Application
Add the
spring-boot-starter-data-mongodbdependency in yourpom.xml.The pom.xml file is this.
<?xml version="1.0" encoding="UTF-8"?>
<project xmlns="http://maven.apache.org/POM/4.0.0"
         xmlns:xsi="http://www.w3.org/2001/XMLSchema-instance"
         xsi:schemaLocation="http://maven.apache.org/POM/4.0.0 http://maven.apache.org/xsd/maven-4.0.0.xsd">
    <parent>
        <groupId>org.springframework.boot</groupId>
        <artifactId>spring-boot-starter-parent</artifactId>
        <version>2.2.6.RELEASE</version>
        <relativePath/> <!-- lookup parent from repository -->
    </parent>
    <packaging>pom</packaging>
    <modelVersion>4.0.0</modelVersion>

    <artifactId>spring-boot-docker-compose</artifactId>
    <groupId>guru.springframework.dockercompose</groupId>
    <version>0.0.1-SNAPSHOT</version>

    <modules>
        <module>user-service</module>
    </modules>

    <properties>
        <java.version>11</java.version>
        <project.build.sourceEncoding>UTF-8</project.build.sourceEncoding>
        <maven.compiler.source>11</maven.compiler.source>
        <maven.compiler.target>11</maven.compiler.target>
    </properties>

    <dependencies>
        <dependency>
            <groupId>org.springframework.boot</groupId>
            <artifactId>spring-boot-starter-web</artifactId>
        </dependency>
        <dependency>
            <groupId>org.springframework.boot</groupId>
            <artifactId>spring-boot-starter-data-mongodb</artifactId>
        </dependency>
        <dependency>
            <groupId>org.projectlombok</groupId>
            <artifactId>lombok</artifactId>
            <scope>provided</scope>
        </dependency>

        <dependency>
            <groupId>javax.xml.bind</groupId>
            <artifactId>jaxb-api</artifactId>
            <version>2.3.1</version>
        </dependency>
        <dependency>
            <groupId>com.sun.xml.bind</groupId>
            <artifactId>jaxb-core</artifactId>
            <version>2.3.0</version>
        </dependency>
        <dependency>
            <groupId>com.sun.xml.bind</groupId>
            <artifactId>jaxb-impl</artifactId>
            <version>2.3.2</version>
        </dependency>
        <dependency>
            <groupId>javax.activation</groupId>
            <artifactId>activation</artifactId>
            <version>1.1.1</version>
        </dependency>
    </dependencies>

    <build>
        <plugins>
            <plugin>
                <groupId>org.springframework.boot</groupId>
                <artifactId>spring-boot-maven-plugin</artifactId>
            </plugin>
        </plugins>
    </build>

</project>
The example REST service has a POST method in the controller. The code of the controller is this.
UserController.java:
package guru.springframework.dockercompose.controller;

import guru.springframework.dockercompose.domain.User;
import guru.springframework.dockercompose.exception.UserAlreadyExistsException;
import guru.springframework.dockercompose.service.UserService;
import org.springframework.beans.factory.annotation.Autowired;
import org.springframework.http.HttpStatus;
import org.springframework.http.ResponseEntity;
import org.springframework.web.bind.annotation.*;

/**
* RestController annotation is used to create
* Restful web services using Spring MVC
*/
@RestController

/**
* RequestMapping annotation maps
* HTTP requests to handler methods
*/
@RequestMapping(value = "/api/v1/")
public class UserController {
  private UserService userService;
  ResponseEntity responseEntity;

  @Autowired
  public UserController(UserService userService) {
    this.userService = userService;
  }

  /**
  * PostMapping Annotation for mapping HTTP POST requests onto
  * specific handler methods.
  */
  @PostMapping("user")
  public ResponseEntity<?> saveUser(@RequestBody User user) throws UserAlreadyExistsException, Exception {
    User savedUser = userService.saveUser(user);
    responseEntity = new ResponseEntity(savedUser, HttpStatus.CREATED);
    return responseEntity;
  }
}
The preceding code has one method to save user details. It calls the
saveUser()method ofUserService.The Dockerfile
The
Dockerfilefor the user-service is this.FROM openjdk:11 ADD ./target/user-service-0.0.1-SNAPSHOT.jar /usr/src/user-service-0.0.1-SNAPSHOT.jar WORKDIR usr/src ENTRYPOINT ["java","-jar", "user-service-0.0.1-SNAPSHOT.jar"]
The docker-compose File
With Docker Compose, you use a YAML file,
docker-compose.ymlfile to configure your application’s services.Create a
docker-compose.ymlto manage theMongoDBanduser-servicecontainers at the root of the project.docker-compose.yml
version: '3'
services:
  mongo:
    image: mongo:3.6.18-xenial
    container_name: mongo
    restart: always
    ports:
      - 27017:27017
    network_mode: host
    volumes:
      - $HOME/mongo:/data/db
    healthcheck:
      test: "exit 0"

  user-service:
    build: user-service/
    image: user-service
    depends_on:
      - mongo
    network_mode: "host"
    hostname: localhost
    restart: always
    ports:
      - 8082:8082
    healthcheck:
      test: "exit 0"
In the preceding
docker-compose.ymlfile:- Line 01 sets the version of the
docker-composesyntax. In this example, the version is 3. - In order to run Mongo in a Docker container, we need a Mongo image.
mongoservice is used to create Mongo image. Line 04 uses themongo:3.6.18-xenialimage for mongo. - In Line 05,
container_namespecifies a custom container name. restart: alwaysin Line 06 configures for how to restart containers when they exit.- Line – Line 08 maps the host port to the container’s port. Mongo listens to the port
27017of the Docker network that is different from the network of your computer, also known as the host network. On the other hand, the mongo client will try to connect with the port27017of the host network. So to map both the networks, ports is used. - Line 09 specifies the host network mode. In this mode, the container shares the host’s networking namespace.
volumesin Line 16 – Line 17 maps a directory of our local filesystem to the directory in docker where mongo writes data. It means that our host/local folder$HOME/mongowill be mounted as/data/dbinside our running container.healthcheckin Line 12 – Line 13 determines whether or not the containers for this service are health”.- In Line 16
buildinstructs Docker COmpose to build the Spring Boot image from theDockerfilepresent in the current folder. - Finally
depends-onin Line 18 – Line 19 specifies that theuser-servicecontainer depends on themongocontainer. As a result, Docker Compose will start theuser-servicecontainer after the mongo container starts.
Passing Environment Variable
At times, you will need to pass environment variables to containers.
One use case for Mongo is to create additional users, initialize collections, and indexes at build time.
The trick is to use the
MONGO_INITDB_DATABASEvariable that allows you to specify the name of a database to be used for creating scripts in/docker-entrypoint-initdb.d/*.js.What this means is, if you supply the image with init scripts, it will run them against the
$MONGO_INITDB_DATABASEdatabase.The
docker-composecode is this.version: '3' services: mongodb: image: mongo:latest container_name: mongodb restart: always environment: MONGO_INITDB_ROOT_USERNAME: <admin-user> MONGO_INITDB_ROOT_PASSWORD: <admin-password> MONGO_INITDB_DATABASE: <database to create> ports: - 27017:27017 volumes: - ./mongo-init.js:/docker-entrypoint-initdb.d/mongo-init.js:roThe code of
mongo-init.jsis thisdb.createUser( { user: "<user for database which shall be created>", pwd: "<password of user>", roles: [ { role: "readWrite", db: "<database to create>" } ] } );Managing Containers
Starting Containers
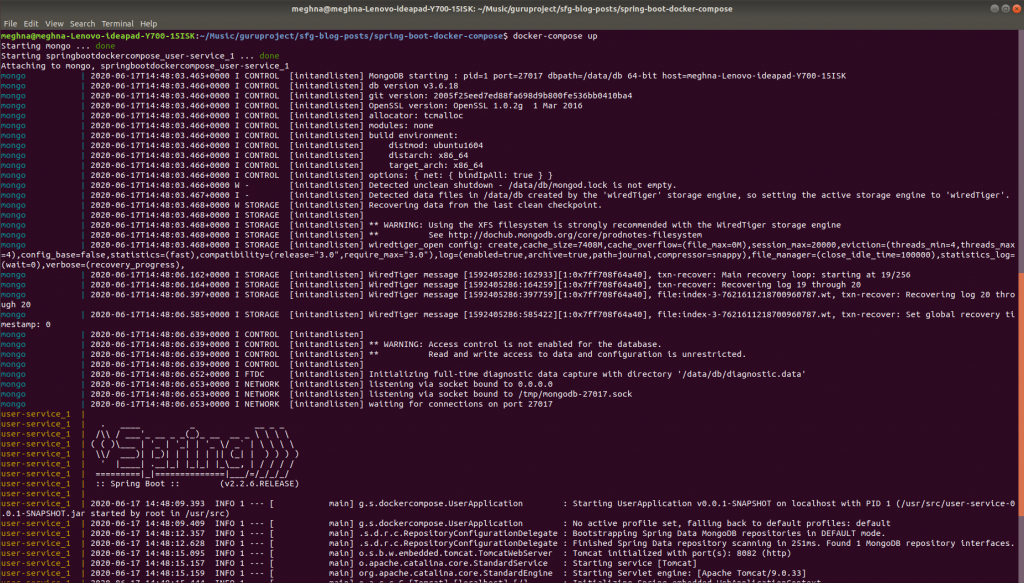
We’ll start the services using the
docker-compose upcommand.$ docker-compose up
The figure shows the output.
 List the containers and check the status with this command:
$ docker-compose ps
This figure shows the currently running Docker containers.


Beside
docker-compose up, there are two other commands that can confuse new developers: start and run.docker-compose upbuilds, (re)creates, starts, and attaches to containers for a service. Unless they are already running, this command also starts any linked services.On the other hand,
docker-compose startstarts the existing containers for a service. Therefore use start if you need to restart containers that were previously created, but were stopped. It never creates new containers.The
docker-compose runcommand is for running “one-off” or “adhoc” tasks. You pass the service name you want to run and Docker Compose will only start the containers for services that the running service depends on.- A simple
- Typically, you will use the run command to run tests or perform an administrative task such as removing or adding data to a data volume container. Also, note that the run command acts like
docker run -ti. It opens an interactive terminal to the container and returns an exit status matching the exit status of the process in the container.Viewing Logs
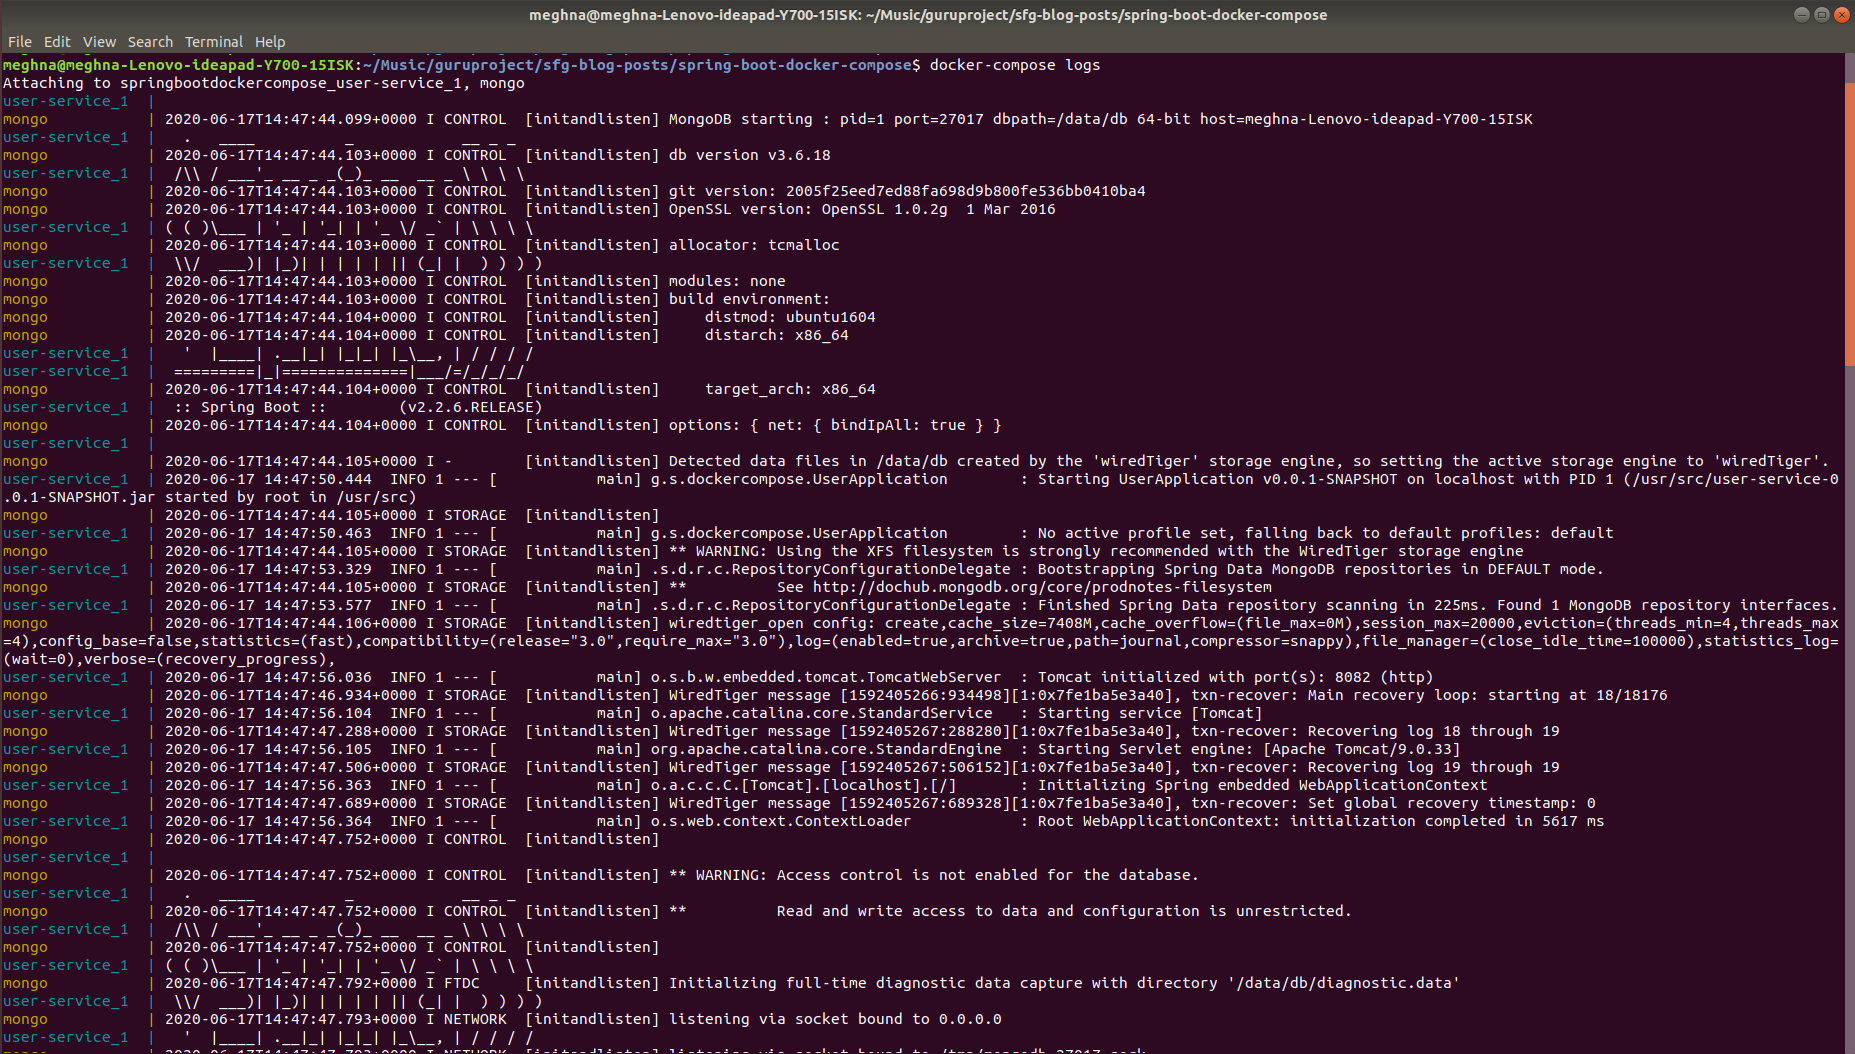
To view the container logs, run this command.
$ docker-compose logs
The log output is this.


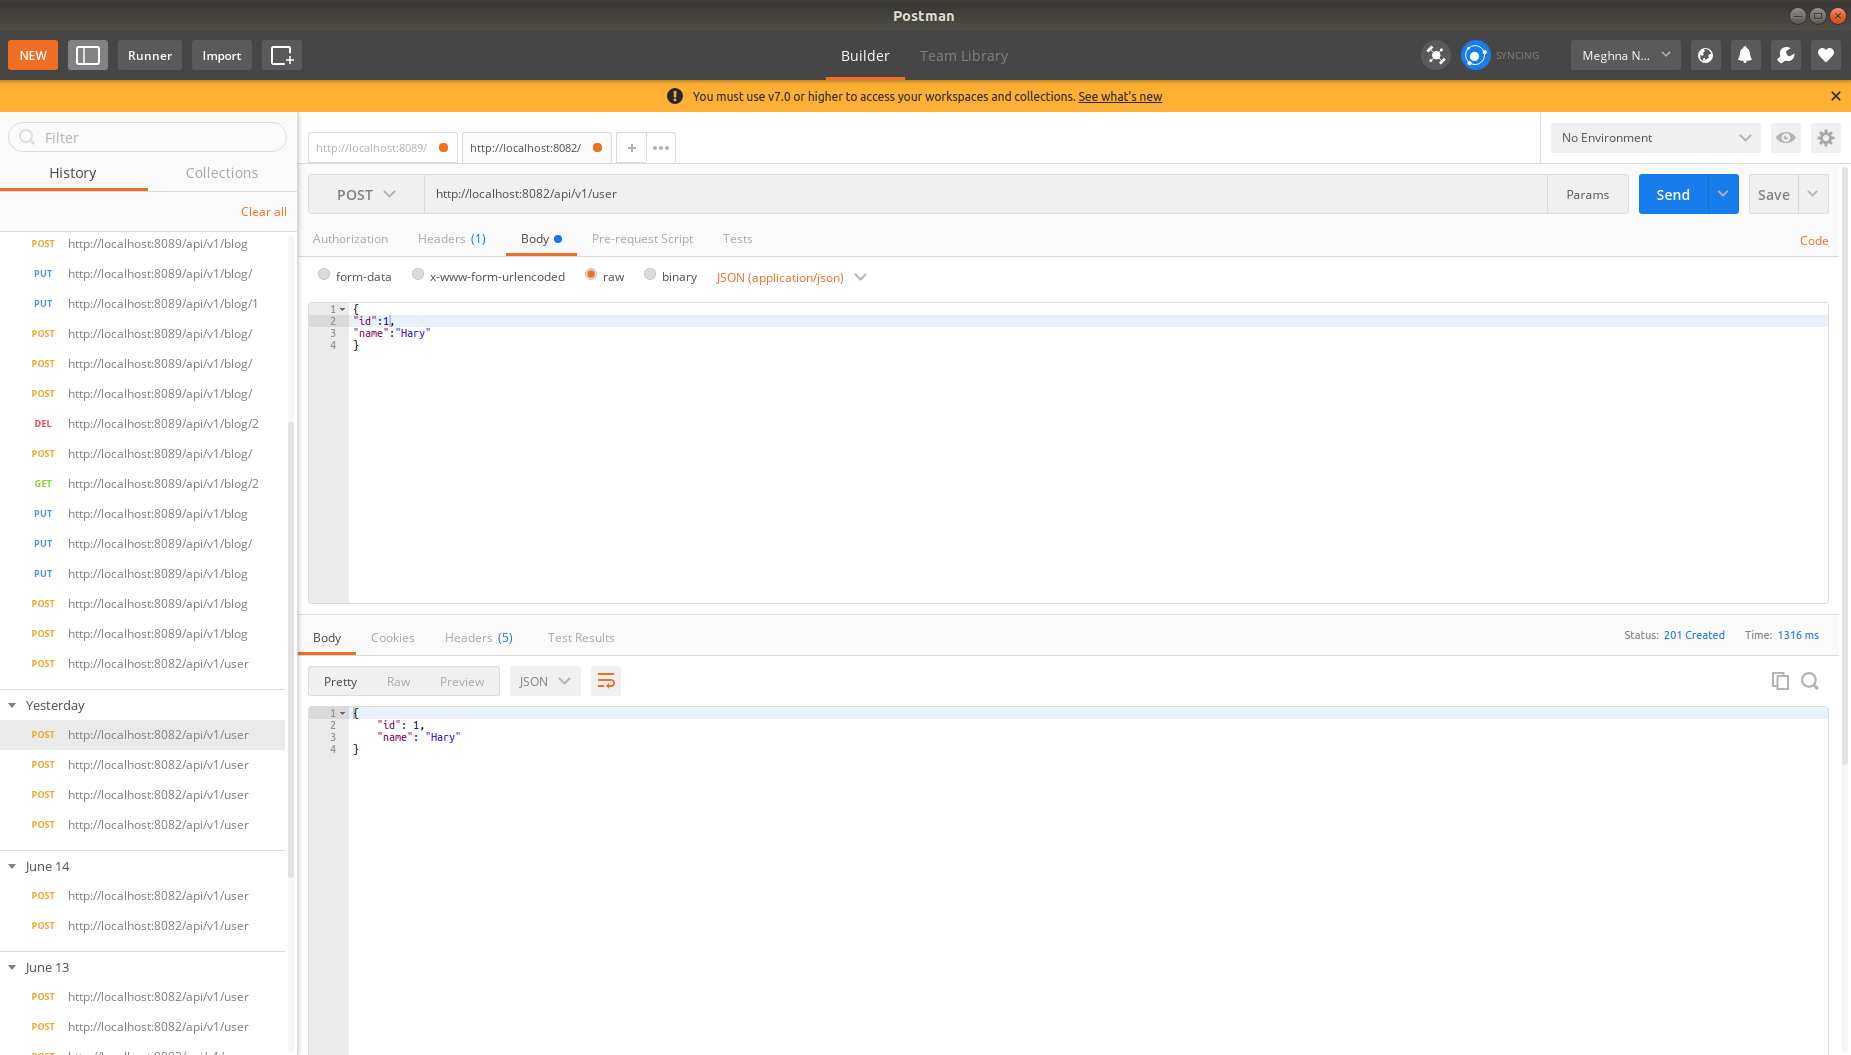
Now that the container is running, we’ll try accessing the RESTful service using Postman.
We’ll access the endpoint onhttp://localhost:<port>/api/v1/userand insert a user.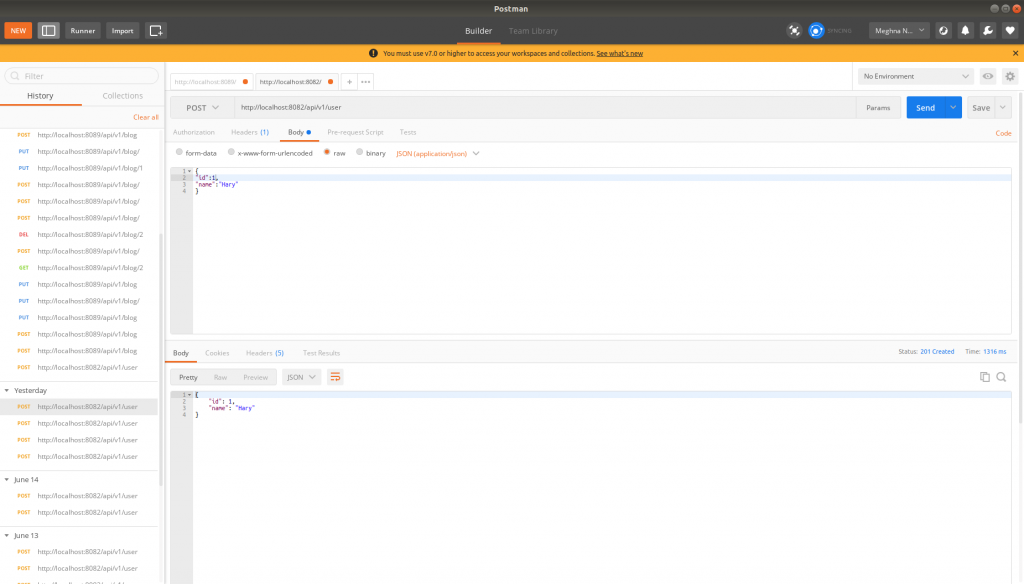

Testing the Application
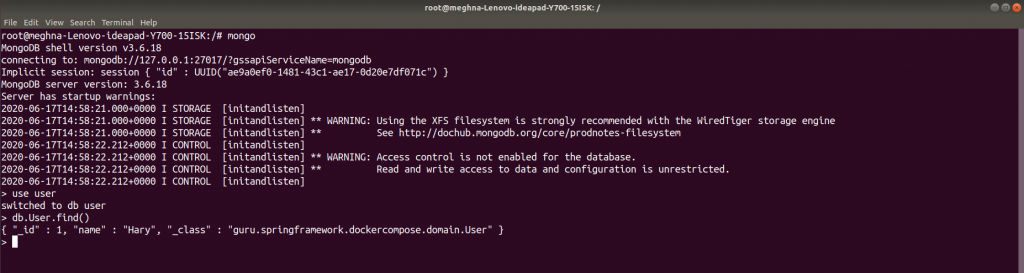
Next, I’ll verify if the user is saved in MongoDB. I’ll do this by entering the
mongocontainer by attaching a bash to it. - In my case the container name is
mongo. So I’ll run this.$ docker exec -it mongo bash


By running the above command, as you can see the terminal changes to something like
root@meghna-Lenovo-ideapad-Y700-15ISK:/#which means we’re inside the mongo docker container.After this, run the commands to enter the Mongo client prompt and query the inserted data.
$ mongo$
$ use user
$ db.User.find()
The output of the query is this.

Stopping Containers
You can use the stop or down commands of Docker Compose to stop your containers. Although both the commands stop containers, they are different.
The
docker-compose stopcommand stops running containers, but it won’t remove them. Whereas, thedocker-compose downcommand stops containers and also removes the stopped containers as well as any networks that were created.There is also a
docker-compose killcommand that you can use to force running containers to stop by sending a SIGKILL signal.Summary
Docker Compose is widely adopted by the industry to run automated test suite as part of Continuous Deployment or Continuous Integration process. Compose offers a convenient way to create and destroy isolated testing environments for test suites in just a few commands, by defining the full environment in a Compose file.
You will hear lots of comments about Docker Compose not being fit for production. But, this is only partially true.
If you have a distributed production environment across multiple machines. Also, if your containers should be distributed across those machines dynamically then Docker Compose is not the right tool for you.
You would need to use some orchestration tools, such as Docker Swarm and Kubernetes to achieve this.
But you can still have a perfectly fine production environment without dynamically distributing containers across multiple interconnected machines. This is where you should go for Docker Compose. It makes handling container configuration or multiple interconnected containers easier.
Overall, it’s a cool tool to run multiple isolated services on a single host.


The source code for this post can be found here on GitHub.


Dimitar
Thanks for the post John!
From what I understand from the docker docs and by simply running your example, I think the ports part in the docker compose file is not necessary when using network_mode: host. Seems it simply exposes the ports to the host network.