

Consul Miniseries: Spring Boot Application and Consul Integration Part 1
5 CommentsLast Updated on May 18, 2020 by jt
Series introduction
In this short series, we will look at how we can integrate the Spring Boot application with HashiCorp Consul.
Consul is a service that allows us to connect and secure services across platforms and clouds. It has many usages, such as service discovery, service mesh, or key-value store.
Introduction
In the first part of the series, we will focus on preparing two services and Consul docker containers. Later on in each part of the series, we will change the code to show more interesting applications of Consul.
Setup
As IDE for this tutorial, we will use is the IntelliJ IDEA version 2020.1.
We will also use Java 14, Gradle in version 6.3, Lombok, and Spring Boot 2.2.6.
For containerization, we will use Docker version 19.03.8 and docker-compose version 1.25.0.
Code
User service
The first service we will use will be responsible for storing user data. It will contain a small amount of information about the user, namely, his name and surname. It will also have a REST API, allowing other services to ask for that data (for simplification, we will only use one GET endpoint, and some static data).
The first part of the application is a very simple DTO object:
@Value
class User {
    String name;
    String surname;
}
We need only two fields, name and surname. We also use Lombok @Value annotation, just to keep things simple in this example (for more information on Lombok, see http://springframework.guru/spring-boot-with-lombok-part-1/).
The controller we will use for accessing static user data looks like this:
@RestController
class UserController {

    @GetMapping("/user")
    User getUser() {
        return new User("Spring", "Guru");
    }
}
There is only a single GET endpoint /user that allows us to fetch a hardcoded name and surname.
We will also change the default port the service starts with, from 8080 to 8081 in application.properties file:
server.port=8081
When we run this application and make a request to the endpoint above, we get:
{
  "name": "Spring",
  "surname": "Guru"
}
This is a trivial example, but it is enough for us to show what Consul has to offer.
Hello service
Hello service is another simple service, which purpose is to call User service and print a hello message, using data received from User service.
First, let us make a call to user service, to receive the data:
@FeignClient(name = "users-service", url = "http://localhost:8081")
public interface UsersServiceClient {

    @RequestMapping("/user")
    User getUser();
}
We use Open Feign from the spring cloud to make an external call. Feign client annotation requires us to pass a name, so for our case users-service is fine. Url is hardcoded now to the localhost, which may not work very well in a distributed world. We may have services on different servers and the localhost may not be the place on which the service exists. In the second part of this tutorial, we will change this to show how we can use Consul for service discovery.
The only request we will require is to get user data from user service. As we do not have any parameters to pass to the call, only such a simple path in request mapping annotation is sufficient.
We also have to use the same user DTO as in the previous example, to be able to parse received JSON into an object:
@Value
public class User {
    String name;
    String surname;
}
Next, we have a service class:
@Service
@RequiredArgsConstructor
public class HelloService {

    private final UsersServiceClient client;

    String getUserHello() {
        User user = client.getUser();

        return "Hello " + user.getName() + " " + user.getSurname() + "!!!";
    }
}
The single method here, getUserHello(), uses data received by calling an external service to prepare a hello message.
Last part of this service is a controller:
@RestController
@RequiredArgsConstructor
public class HelloController {

    private final HelloService service;

    @GetMapping("/hello")
    String getUserHello() {
        return service.getUserHello();
    }
}
Similar to the user service, we have only one GET call here, that returns user hello message:
Hello Spring Guru!!!
To achieve the result above, two services should be started simultaneously on the local machine and an HTTP call to GET http://localhost:8080/hello should be made. This is possible because we have used two different ports, and both of these services run on the same machine.
Containers
Let us now move to the containerization of those services, along with a Consul server, so we will be ready for the next part of the tutorial.
Building application jars
To run our services in containers, we would need an executable java file, which in our case will be a jar (Java archive) file. To create those, in the root directory of each application, run gradlew.sh or gradlew.bat file with clean build arguments, depending on which system you work on (for example, in case of Ubuntu Linux system, run ./gradlew clean build).
Thanks to that, the jar file will be generated in build/libs folder, under the root directory of the application.
Configuration file
To run all of the necessary services, we will use docker-compose. Compose is a tool that allows defining and running applications that are composed of several containers. We just have to write some configuration in the YAML file, and start all the containers with a single command.
Our docker-compose.yml configuration file looks like this:
version: '3'
services:
  hello-service:
    image: openjdk:14-alpine
    volumes:
      - "./hello-service/build/libs/hello-service-0.0.1-SNAPSHOT.jar:/app.jar"
    ports:
      - 8080:8080
    command: "java -jar app.jar"
  users-service:
    image: openjdk:14-alpine
    volumes:
      - "./users-service/build/libs/users-service-0.0.1-SNAPSHOT.jar:/app.jar"
    ports:
      - 8081:8081
    command: "java -jar app.jar"
  consul:
    image: consul:1.7
    network_mode: host
For version, we have picked 3, as this is the most recent one.
Next, we have a services block. In this block, we have 3 services configured:
- hello-service – contains our Hello application configuration
- users-service – contains Users application configuration
- consul – for starting Consul server
Hello and users services configuration
The configuration of both applications is similar.
We have a docker base image, for which we picked OpenJDK java 14 alpine version (you can read about particular java versions and images on docker hub – https://hub.docker.com/_/openjdk/).
Following is the volumes block. Volumes are mounts of host paths into the container. In our case, we copy created jar files from our host system into the container. In both cases, jar file will be available on container path /app.jar. If you run on any troubles with volumes, be sure to check the official docker-compose reference site – https://docs.docker.com/compose/compose-file/.
Ports part says which port in a container we would like to map to which host port. In our case, we map hello service 8080 container port to 8080 host port. Accordingly, in users service, we have set it to 8081. Thanks to that, we are able to start both services on the same machine, and we are able to access them using corresponding port numbers.
The last part of the configuration of our services is a command. A command is used to tell docker which instruction it should run after the container startup. In our case, we want to run provided jar archive, so we do that using java -jar operation.
Consul service configuration
Consul configuration is much simpler because we are fine with default values that the Consul image starts with.
For the Consul image, we have picked a 1.7 version, and we leave the default port, which is 8500.
We also set up a network here (network_mode parameter), to override a default bridge setting and we set its value to host. What that means is that docker will use host networking for this container, instead of separating container from the host as with default bridge network mode.
Setting network to host is recommended for Consul, as it has some protocols that are sensitive to delays and packet loss.
You can read more about network modes in docker reference, and information about why host mode is recommended for Consul you can find on the official docker hub page here https://hub.docker.com/_/consul?tab=description.
Running containers
With configuration finished, we can run all these containers simply by running docker-compose up command in a directory where we have placed our docker compose.yml file.
To check if every container works as it should, we can simply check if we can call them through our browser.
Let us try with Users service using http://localhost:8081/user:
{"name":"Spring","surname":"Guru"}For Hello service http://localhost:8080/hello, we will not get a nice hello JSON right now. Instead, we will get an error page saying that connection to users service was refused:
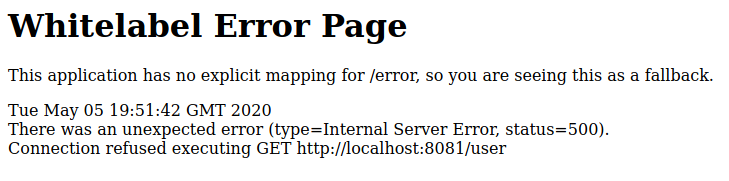
This happens because we have a hardcoded call to localhost as feign parameter, and running that in a container will fail, as we have no users service in the hello service container. Do not worry though, we will solve this issue in the second part of the series in which we will talk about service discovery.
We can also check if our consul service works, by going to http://localhost:8500:

Right now under the services tab, we can only see consul service itself. In the next part, we will add our applications here and allow them to communicate using Consul as service discovery.
Summary
In this tutorial, we have prepared a solid ground for future parts, in which we would introduce such concepts as service discovery or key/value datastore.
We created two containerized applications, that work well when used on a local computer, but they do not work well without service discovery in containers. This will be solved in the next part of the tutorial.
We have also prepared a container with a Consul server, that we can use to connect our applications, so they work well even in containers.
The second part will introduce service discovery using Consul, where we will make calls in services using a service name instead of hardcoded url.


Bunga
In the hello service, we cannot deserialize User when created with lombock @Value decorator.
Bunga
Thanks fo sharing 🙂
Arijit Chaudhury
Hi, I am getting a error connection refused when try to access “http://localhost:8500”. Do I need to set ports and host ip address in docker-compose file?
Anuj K
While running the docker compose command i am getting Invalid or corrupt jarfile app.jar for all my services.I believe the path in the volumes could be incorrect.I Have given the below path. Please let me know what is that i am missing
movie-info-service:
image: openjdk:14-alpine
volumes:
– “./movie-info-service/target/movie-info-service-0.0.1.jar:/app.jar”
command: “java -jar app.jar”