Spring Boot Web Application – Part 4 – Spring MVC
67 CommentsThis is the 4th part of my tutorial series on building a web application using Spring Boot. In the last part of the series, we looked at setting up Spring Data JPA for database persistence. In the second part of the series, we looked at using Thymeleaf for building the web pages. And we started off in the first part looking at using the Spring Initializr to start our Spring Boot project.
In this part of the series, we tie everything together to provide a working Spring Boot web application. An application which will display data from the database, and allow you to create new records, update existing records, and delete selected records too.
Spring MVC
In this part of my tutorial series for Spring Boot, we’re going to look at setting up a Spring MVC controller to support CRUD operations against the database.
MVC stands for Model, View, Controller. The MVC design pattern is probably the most popular design pattern used when writing code to generate dynamic web content. This design pattern is not limited to Java nor Spring. The MVC design pattern has been applied in Javascript, PHP, .NET, Python, and many other programming languages. The MVC pattern is popular because it does a great job of separating concerns, and leads you to a clean, maintainable, and easy to understand code base.
MVC Overview
Model
Model refers to a data model or some type of data structure. For example, a web page showing a list of products, the ‘model’ would contain a list of product data.
View
The view layer, in Java frequently a JSP. This will take data from the Model and render the view.
Controller
I like to describe the controller as a traffic cop. It will take an incoming request, decide what to do with it, then direct the resulting action. For example, the controller could get a view product request. It will direct service to get the product data, then direct to the product view and provide the ‘model’ (product data) to the view.
Single Responsibility Principle Applied to MVC
Frequently when dealing with legacy code, I see a lot of leakage between the layers. JSP pages making database calls. Controllers building database connection pools. On one legacy application, I recently worked with the JSP pages and controllers were littered with static method calls, which ultimately made a call to an Oracle database. Because of this, the application was impossible to run outside of the application server. The code was so tightly coupled, there were no unit tests in what is a very large code case. Why? You can’t run any of the code under JUnit because of all the embedded static method calls.
In an MVC application, each component has a specific function in life. You should be able to unit test your controllers. Using Mocks, you should be able to unit test that your controller returns the proper model, and makes the proper decisions.
CRUD Operations with Spring MVC
CRUD is a common acronym for Create, Read, Update, and Delete. In the last part of the series, we looked at creating a CRUD repository using Spring Data JPA. In this post, we’ll look at setting up the Spring MVC controller for the corresponding CRUD operations. We’ll continue using the Product class we previously used.
Create
The Create operation is a two-step operation. The first step needs to display the create form, the second needs to do the save of the form post.
Here is the controller code for displaying the create product form.
    @RequestMapping("product/new")
    public String newProduct(Model model){
        model.addAttribute("product", new Product());
        return "productform";
    }
The @RequestMapping annotation maps the url product/new to this controller action. Our controller method is taking in the model attribute. This is the ‘model’ being returned to the view layer.
You can see in the code, we are returning an empty product class to the view. This is more of a trick to re-use the view code for both the Create and Update form. By providing an empty Product object, we reduce the likelihood of null pointer errors when rendering the view. You can either provide an empty object to the model or do a lot of null checking in the view. From experience, I’ve found this simpler.
Our create view is going to have a form post. We need a controller action to handle this.
    @RequestMapping(value = "product", method = RequestMethod.POST)
    public String saveProduct(Product product){
        productService.saveProduct(product);
        return "redirect:/product/" + product.getId();
    }
In this controller method, we’re handing the form post. The @RequestMapping annotation says to take the ‘url’ product and the HTTP request method of POST to map it to this controller method. You can see how we’re asking for a Product object as input to the controller method. One of the cool things about Spring MVC is that it will take your form parameters and automatically bind them to a Product object. The object is automatically created and passed into your controller method. The Spring Framework saves you from the mundane work of parsing out HTTP request parameters.
You can see how we’re using a product service to handle the persistence. This is just a facade to the Spring Data JPA repository we created in the last post. I’m going to skip over the persistence code here. You’ll be able to find it in github. I want you to notice how I’m writing to an interface. The controller doesn’t know about persistence. It does not need to. Storing data is not the job of the controller. Maybe that method is using JDBC. Maybe it is calling a web service. Maybe it’s using JMS. Might be using AQMP. The controller does not care. The controller code does not need to care. This is a great example of decoupling code. Too often I see legacy code where the controllers are doing way too much.
On the last line of the saveProduct method, you can see I’m returning a string with redirect. This tells Spring after the save action to redirect to the view to show the created item. This example just shows the ‘happy path’ – where everything happens as it should. In a more robust controller you’d have logic not only for the happy path, but to redirect to the create form if validations were to fail.
Read
In Read operations, the client is going to tell you what it wants. In our case, the client will give us an Id value, and we’ll return the corresponding Product.
Read by Id
You can see in our controller method, the Request Mapping is using product with an id value in squigglies. This identifies that portion of the url path as an ‘id; value.
    @RequestMapping("product/{id}")
    public String showProduct(@PathVariable Integer id, Model model){
        model.addAttribute("product", productService.getProductById(id));
        return "productshow";
    }
Now, we’re using a new annotation @Pathvariable to inject the id value from the url path into our controller as the ID variable. Again, we’re accepting the model variable into our controller. We’re asking the product service to get the product, and the result is appended to the model object, which is returned to the view. The controller method returns a string to indicate which view to render.
List All
A common method is also to provide a list view. Normally, you’re going to want to add paging or some type of filter. However, in this example, we just want to show a simple example of listing products from the database.
    @RequestMapping(value = "/products", method = RequestMethod.GET)
    public String list(Model model){
        model.addAttribute("products", productService.listAllProducts());
        return "products";
    }
We’ve mapped this controller method to the url /products. We ask the product service for a list of all products and append it to the model attribute products. The controller method returns the string products to tell Spring MVC to render the products view.
Update
Updates are actions against existing entities. Updates are similar to create actions, where we have two controller actions involved. With a create, we’re showing a form for a new item, while an update is going to be populated with data from an existing item. While this is very similar to the create action, we typically will want a separate controller action to show the edit form to capture the data for the update.a
@RequestMapping("product/edit/{id}")
public String edit(@PathVariable Integer id, Model model){
    model.addAttribute("product", productService.getProductById(id));
    return "productform";
}
The good news, functionally the save and view of the saved item is the same as the create action.
Here is our save method once more:
@RequestMapping(value = "product", method = RequestMethod.POST)
public String saveProduct(Product product){

    productService.saveProduct(product);

    return "redirect:/product/" + product.getId();
}
You can see we’re using Spring to bind the form post parameters to a Product object, then calling the product service to save the item. Then just like in the save method of the create process, we want to view the saved product, so we redirect to the show product view.
Delete
There are a few different ways to implement a delete action. One of the easiest is to use a url with the ID for the delete action. This can then be implemented on the web forms as a simple URL to click on. Below is the controller action for the delete action.
@RequestMapping("product/delete/{id}")
public String delete(@PathVariable Integer id){
    productService.deleteProduct(id);
    return "redirect:/products";
}
This method will take in the id value from the URL and pass it to the delete method of the product service. Since we’re not creating or updating a product, a typical course of action is to return to the list view. In this example, we redirect to the products view to show the user a list of products.
Summary of CRUD Operations
At this point, we’ve covered the necessary controller actions to support CRUD operations on an entity. You can see these operations work in conjunction with the Spring Data JPA methods we looked at in the previous post on Spring Data JPA. I’m using a Facade Service to mask the Spring Data JPA implementation. We’ll take a look at the Facade in the next section.
Spring Facade Service
You can see in the controller methods above, there is no dependency on the persistence layer. The controller is completely unaware of how data is being persisted. This is exactly as it should be. Too often I see legacy code where the controller is interacting with the database directly. This is a very poor coding practice. It makes your code tightly coupled and hard to maintain.
Code to an Interface
When using Spring to develop applications it is always best to develop to an interface, especially when leveraging the benefits of dependency injection. To support our controller actions, I wrote the following interface.
ProductService.java
package guru.springframework.services;


import guru.springframework.domain.Product;

public interface ProductService {
    Iterable<Product> listAllProducts();

    Product getProductById(Integer id);

    Product saveProduct(Product product);
}
Notice how this interface is rather generic? Can you tell how data is being persisted? JDBC? Spring Data JPA? Web Service? JMS? This is what decoupling is about. At this point, the answer is all of the above. We just need to provide the appropriate implementation.
Spring Data JPA Product Service Implementation
In the last post of this series, we looked at using Spring Data JPA. Now we need an implementation of the Product Service which will use the Spring Data JPA repositories.
Spring Data JPA Repository
We’ll need to inject an instance of the Spring Data JPA repository into the implementation of our product service. You can do so by declaring a property for the repository and annotating the setter method with the @Autowired annotation.
private ProductRepository productRepository;

@Autowired
public void setProductRepository(ProductRepository productRepository) {
    this.productRepository = productRepository;
}
List Products
Using Spring Data JPA, it becomes trivial to list all the products for our application. While we did not actually create a findAll() method on the repository we defined, we inherited by extending the CrudRepository in Spring Data JPA. This is one of many handy features of Spring Data JPA. It’s going to provide us an implementation of the findAll() method, which we do not need to write code for.
@Override
public Iterable <Product> listAllProducts() {
    return productRepository.findAll();
}
Get Product (Read)
To fetch a product by its id value, again, we can leverage a method implemented for us by Spring Data JPA.
@Override
public Product getProductById(Integer id) {
    return productRepository.findOne(id);
}
Save Product (Create / Update)
Spring Data JPA also provides us an implementation of a save method for saving entities. We use this method in creating and updating products in our web application.
@Override
public Product saveProduct(Product product) {
    return productRepository.save(product);
}
Delete Product (Delete)
Finally, in our CRUD operations, Spring Data JPA provides us an implementation of a delete method. Spring Data JPA overloads the delete method, accepting just the ID value, or the entity itself. For our purposes, we are using the ID value to delete the desired entity.
@Override
public void deleteProduct(Integer id) {
    productRepository.delete(id);
}
Summary of Spring Data JPA Usage
In this example, we implemented the CRUD operations using a CrudRepository supplied by Spring Data JPA. If you look at the code you will see all we did was extend the Spring Data JPA CrudRepository to create our Product Repository. We did not define, nor implement additional methods. We’re not declaring transactions. We’re not writing any SQL. I hope you can see the simplicity and time saving using tools like Spring Data JPA can bring you.
Thymeleaf
Thymeleaf Fragments
Thymeleaf fragments are a very powerful feature of Thymeleaf. They allow you to define repeatable chunks of code for your website. Once you define a Thymeleaf fragment, you can reuse it in other Thymeleaf templates. This works great for components you wish to reuse across your web pages.
In developing the Spring Boot Web Application, I found two uses for Thymeleaf templates. The first was common includes of the CSS, Javascript. The second was for a common menu I wanted to display at the top of each web page.
Includes
Below is the Thymeleaf Fragment I’m using for the HTML header includes. You can see its a normal HTML document, using Thymeleaf tags to define the resources for a page.
headerinc.html
<!DOCTYPE html>
<html xmlns:th="http://www.thymeleaf.org">
<head lang="en" th:fragment="head">
    <meta http-equiv="Content-Type" content="text/html; charset=UTF-8"/>
    <link href="http://cdn.jsdelivr.net/webjars/bootstrap/3.3.4/css/bootstrap.min.css"
          th:href="@{/webjars/bootstrap/3.3.4/css/bootstrap.min.css}"
          rel="stylesheet" media="screen" />

    <script src="http://cdn.jsdelivr.net/webjars/jquery/2.1.4/jquery.min.js"
            th:src="@{/webjars/jquery/2.1.4/jquery.min.js}"></script>

    <link href="../static/css/guru.css"
          th:href="@{/css/guru.css}" rel="stylesheet" media="screen"/>
</head>
<body>

</body>
</html>
Menu
For our Spring Boot Web Application, I chose to use the Bootstrap CSS framework. I’m a big fan of Bootstrap. It’s easy to use, and its components look great. Bootstrap CSS has a menu component which I chose to use for the menu system.
In this Thymeleaf fragment, I’m providing the Bootstrap CSS menu I want to place at the top of all my pages. I also have a section to show my Spring Boot logo on each page.
header.html
<!DOCTYPE html>
<html xmlns:th="http://www.thymeleaf.org">
<head lang="en">
    <meta http-equiv="Content-Type" content="text/html; charset=UTF-8"/>
    <link href="http://cdn.jsdelivr.net/webjars/bootstrap/3.3.4/css/bootstrap.min.css"
          th:href="@{/webjars/bootstrap/3.3.4/css/bootstrap.min.css}"
          rel="stylesheet" media="screen"/>

    <script src="http://cdn.jsdelivr.net/webjars/jquery/2.1.4/jquery.min.js"
            th:src="@{/webjars/jquery/2.1.4/jquery.min.js}"></script>

    <link href="../../static/css/guru.css"
          th:href="@{css/guru.css}" rel="stylesheet" media="screen"/>
</head>
<body>

<div class="container">
    <div th:fragment="header">
        <nav class="navbar navbar-default">
            <div class="container-fluid">
                <div class="navbar-header">
                    <a class="navbar-brand" href="#" th:href="@{/}">Home</a>
                    <ul class="nav navbar-nav">
                        <li><a href="#" th:href="@{/products}">Products</a></li>
                        <li><a href="#" th:href="@{/product/new}">Create Product</a></li>
                    </ul>

                </div>
            </div>
        </nav>

        <div class="jumbotron">
            <div class="row text-center">
                <div class="">
                    <h2>Spring Framework Guru</h2>

                    <h3>Spring Boot Web App</h3>
                </div>
            </div>
            <div class="row text-center">
                <img src="../../static/images/NewBannerBOOTS_2.png" width="400"
                     th:src="@{/images/NewBannerBOOTS_2.png}"/>
            </div>
        </div>
    </div>
</div>
</body>
</html>
Including Thymeleaf Fragments
Example
Previously, we defined an index page for our Spring Boot web application. You can apply Thymeleaf templates through the use of HTML comments. By doing this, you preserve the ability of the document to be viewed in the browser. You will be able to see the document okay in your browser, but the fragment portions will be omitted. The fragments are only included when the Thymeleaf template is rendered by Spring.
Remember, Spring will be reading the Thymeleaf templates, then producing output based upon the Thymeleaf directives.
index.html
<!DOCTYPE html>
<html>
<head lang="en">

    <title>Spring Framework Guru</title>

    <!--/*/ <th:block th:include="fragments/headerinc :: head"></th:block> /*/-->
</head>
<body>

<div class="container">
    <!--/*/ <th:block th:include="fragments/header :: header"></th:block> /*/-->
</div>
</body>
</html>
You can see how our index page is very simple now. While this is a very lean HTML document when Spring renders it at run time, you will see HTML looking like this:
Actual HTML Rendered to Browser
<!DOCTYPE html>

<html>
<head lang="en">

    <title>Spring Framework Guru</title>


    <meta http-equiv="Content-Type" content="text/html; charset=UTF-8" />
    <link href="/webjars/bootstrap/3.3.4/css/bootstrap.min.css" rel="stylesheet" media="screen" />

    <script src="/webjars/jquery/2.1.4/jquery.min.js"></script>

    <link href="/css/guru.css" rel="stylesheet" media="screen" />

</head>
<body>

<div class="container">

        <nav class="navbar navbar-default">
            <div class="container-fluid">
                <div class="navbar-header">
                    <a class="navbar-brand" href="/">Home</a>
                    <ul class="nav navbar-nav">
                        <li><a href="/products">Products</a></li>
                        <li><a href="/product/new">Create Product</a></li>
                    </ul>

                </div>
            </div>
        </nav>

        <div class="jumbotron">
            <div class="row text-center">
                <div class="">
                    <h2>Spring Framework Guru</h2>

                    <h3>Spring Boot Web App</h3>
                </div>
            </div>
            <div class="row text-center">
                <img src="/images/NewBannerBOOTS_2.png" width="400" />
            </div>
        </div>

</div>
</body>
</html>
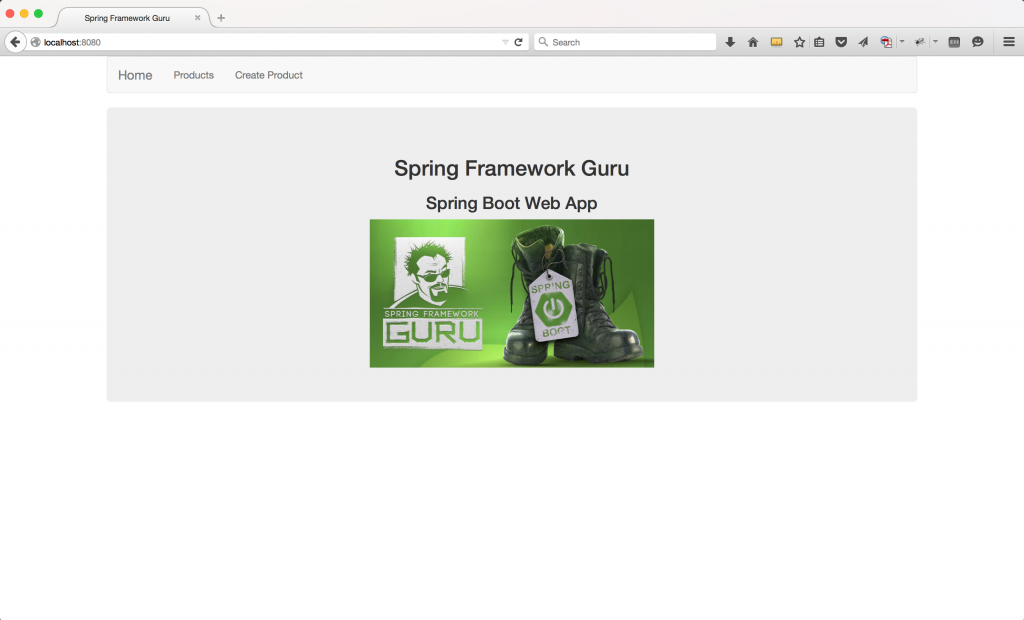
Notice how Thymeleaf and Spring have merged the contents of the index.html document and the two Thymeleaf fragment documents? Now you have pure HTML, and Thymeleaf tags are not rendered to the HTML content sent to the browser.
The index.html Thymeleaf template will show this page in your browser.
Thymeleaf Views for CRUD Application
Show Product
Showing a product is one of the simpler operations under Spring MVC and Thymeleaf. Our controller returned a product object to the model and bound it to the property product. Now we can use the typical name-dot-property syntax to access properties of the product object.
This Thymeleaf tag:
<p class="form-control-static" th:text="${product.id}">Product Id</p></div>Will get a text from the description property of the product object and replace the description text in the paragraph HTML tag.
Here is the full Thymeleaf template for showing a product:
productshow.html
<!DOCTYPE html>
<html xmlns:th="http://www.thymeleaf.org">
<head lang="en">

    <title>Spring Framework Guru</title>

    <!--/*/ <th:block th:include="fragments/headerinc :: head"></th:block> /*/-->
</head>
<body>
<div class="container">
    <!--/*/ <th:block th:include="fragments/header :: header"></th:block> /*/-->

    <h2>Product Details</h2>
        <div>
            <form class="form-horizontal">
                <div class="form-group">
                    <label class="col-sm-2 control-label">Product Id:</label>
                    <div class="col-sm-10">
                        <p class="form-control-static" th:text="${product.id}">Product Id</p></div>
                </div>
                <div class="form-group">
                    <label class="col-sm-2 control-label">Description:</label>
                    <div class="col-sm-10">
                        <p class="form-control-static" th:text="${product.description}">description</p>
                    </div>
                </div>
                <div class="form-group">
                    <label class="col-sm-2 control-label">Price:</label>
                    <div class="col-sm-10">
                        <p class="form-control-static" th:text="${product.price}">Priceaddd</p>
                    </div>
                </div>
                <div class="form-group">
                    <label class="col-sm-2 control-label">Image Url:</label>
                    <div class="col-sm-10">
                        <p class="form-control-static" th:text="${product.imageUrl}">url....</p>
                    </div>
                </div>
            </form>
    </div>
</div>

</body>
</html>
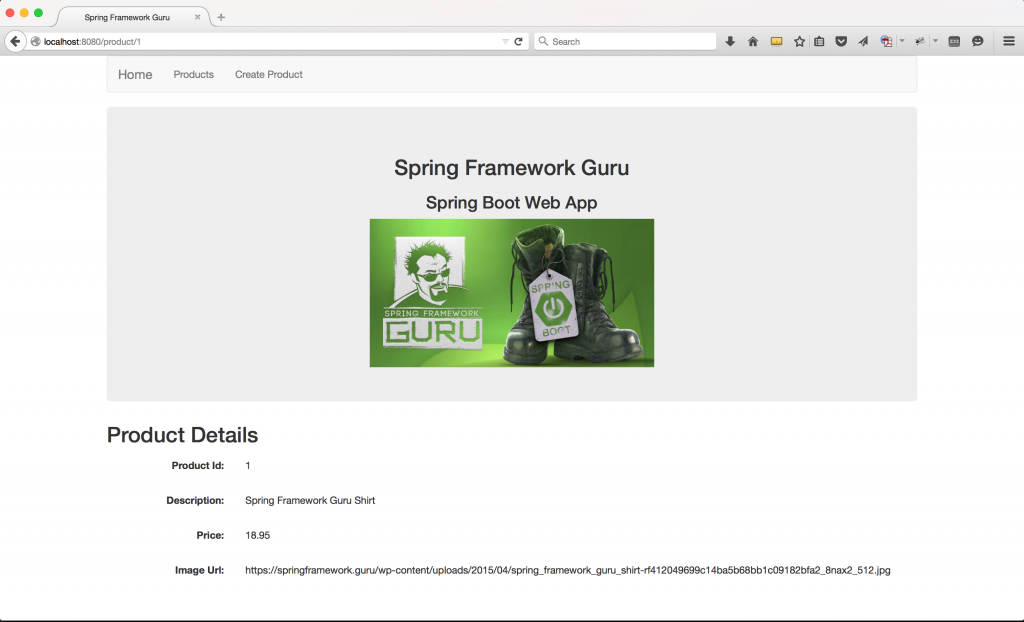
The shown product Thymeleaf template will show this page:
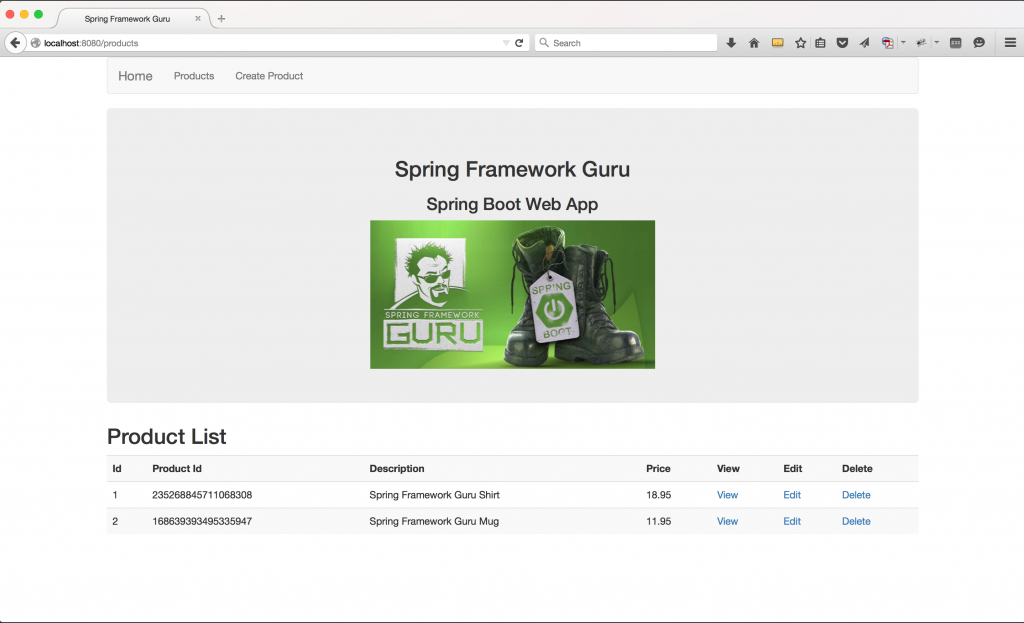
List Products
The list view is a little trickier because now we have a list of products to iterate over. Luckily, Thymeleaf makes this very easy to do.
Here is a snippet showing how to iterate over a list of products.
            <tr th:each="product : ${products}">
                <td th:text="${product.id}"><a href="/product/${product.id}">Id</a></td>
                <td th:text="${product.productId}">Product Id</td>
                <td th:text="${product.description}">descirption</td>
                <td th:text="${product.price}">price</td>
                <td><a th:href="${'/product/' + product.id}">View</a></td>
                <td><a th:href="${'/product/edit/' + product.id}">Edit</a></td>
                <td><a th:href="${'/product/delete/' + product.id}">Delete</a></td>
            </tr>
You can see the syntax of this Thymeleaf tag is similar to a for-each loop in Java.
<tr th:each="product : ${products}">Our controller added a list of products to the products property to the model, which we pass to the Thymeleaf tag. The variable name we are assigning to the iterator is product.
The body of each tag will be rendered once for each product in the list of products.
Here is the complete Thymeleaf template used for showing a list of products.
products.html
<!DOCTYPE html>
<html xmlns:th="http://www.thymeleaf.org">
<head lang="en">

    <title>Spring Framework Guru</title>

    <!--/*/ <th:block th:include="fragments/headerinc :: head"></th:block> /*/-->
</head>
<body>
<div class="container">
    <!--/*/ <th:block th:include="fragments/header :: header"></th:block> /*/-->
    <div th:if="${not #lists.isEmpty(products)}">
        <h2>Product List</h2>
        <table class="table table-striped">
            <tr>
                <th>Id</th>
                <th>Product Id</th>
                <th>Description</th>
                <th>Price</th>
                <th>View</th>
                <th>Edit</th>
            </tr>
            <tr th:each="product : ${products}">
                <td th:text="${product.id}"><a href="/product/${product.id}">Id</a></td>
                <td th:text="${product.productId}">Product Id</td>
                <td th:text="${product.description}">descirption</td>
                <td th:text="${product.price}">price</td>
                <td><a th:href="${ '/product/' + product.id}">View</a></td>
                <td><a th:href="${'/product/edit/' + product.id}">Edit</a></td>
            </tr>
        </table>

    </div>
</div>

</body>
</html>
Here is the Thymeleaf list products page:
Create / Update Product
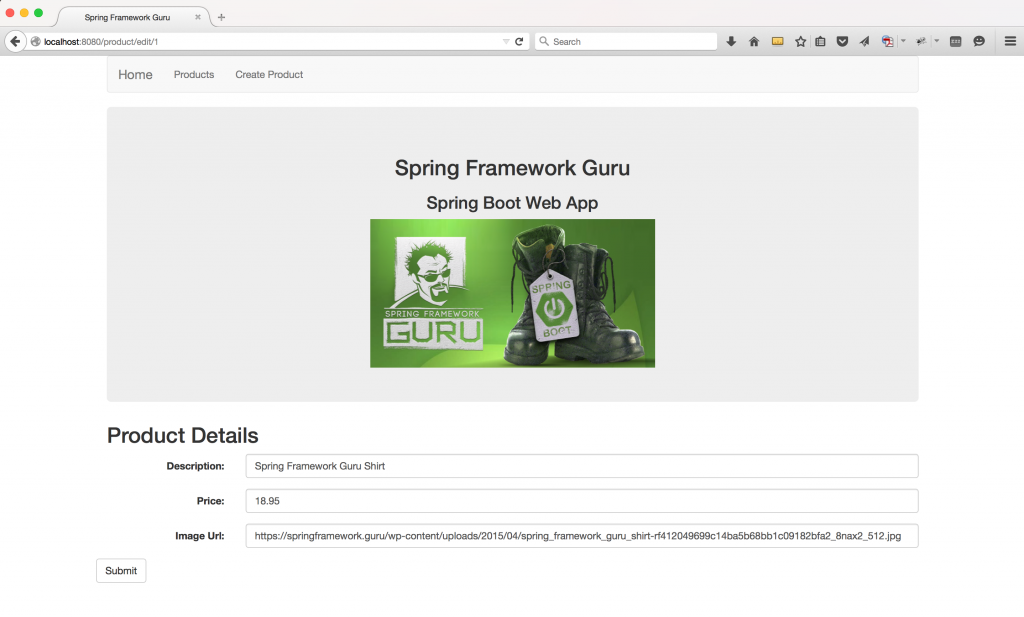
We can use the same HTML form for creating and updating products. A little trick is to have your controller method return an empty object to the view for the create option and the existing object for the update option. By doing this you don’t need to worry about null objects on the view layer. For a new object, the null properties show up blank. For existing objects, non-null properties will get populated into the form fields.
The following line sets up the form in Thymeleaf.
<form class="form-horizontal" th:object="${product}" th:action="@{/product}" method="post">The th:object tag binds the product object to the form. Thus, you only use the property names on the form fields. No need to qualify the object name too.
The th:action tag maps the form action to the /product url. And we specify to use the HTML post action for the form.
Here is the controller action this maps back to:
@RequestMapping(value = "product", method = RequestMethod.POST)
public String saveProduct(Product product){
    productService.saveProduct(product);
    return "redirect:/product/" + product.getId();
}
Notice how we’ve assigned the url product and method POST in the request mapping.
This next step is critical for your updates to work properly. All entities have an ID value. This is not accessible for the user to edit, but it still needs to be included to the post back to the server, so Spring / Hibernate can find the correct entity to update. If this is missing, there is no way to distinguish between an update and a create. If the ID property is missing from the form post, Spring Data JPA will think it’s a new item and create a new entity.
The way to handle this is through the use of hidden form fields. In this snippet, we’re assigning hidden fields for the Id and version values. (A best practice in Hibernate is to use a version property to detect conflicting updates.)
<input type="hidden" th:field="*{id}"/>
<input type="hidden" th:field="*{version}"/>
Here is the complete product form.
productform.html
<!DOCTYPE html>
<html xmlns:th="http://www.thymeleaf.org">
<head lang="en">

    <title>Spring Framework Guru</title>

    <!--/*/ <th:block th:include="fragments/headerinc :: head"></th:block> /*/-->
</head>
<body>
<div class="container">
    <!--/*/ <th:block th:include="fragments/header :: header"></th:block> /*/-->

    <h2>Product Details</h2>
    <div>
        <form class="form-horizontal" th:object="${product}" th:action="@{/product}" method="post">
            <input type="hidden" th:field="*{id}"/>
            <input type="hidden" th:field="*{version}"/>
            <div class="form-group">
                <label class="col-sm-2 control-label">Product Id:</label>
                <div class="col-sm-10">
                    <input type="text" class="form-control" th:field="*{productId}"/>
                </div>
            </div>
            <div class="form-group">
                <label class="col-sm-2 control-label">Description:</label>
                <div class="col-sm-10">
                    <input type="text" class="form-control" th:field="*{description}"/>
                </div>
            </div>
            <div class="form-group">
                <label class="col-sm-2 control-label">Price:</label>
                <div class="col-sm-10">
                    <input type="text" class="form-control" th:field="*{price}"/>
                </div>
            </div>
            <div class="form-group">
                <label class="col-sm-2 control-label">Image Url:</label>
                <div class="col-sm-10">
                    <input type="text" class="form-control" th:field="*{imageUrl}"/>
                </div>
            </div>
            <div class="row">
                <button type="submit" class="btn btn-default">Submit</button>
            </div>
        </form>
    </div>
</div>

</body>
</html>
Here is the Thymeleaf product form.

Conclusion
In this post, we built upon the previous posts in this series on building a web application using Spring Boot to have a functional web application which performs CRUD operations against a single entity. At this point, you can check out the project from Github and build it using Maven. Spring Boot will create an executable JAR, which you can run to demo the application. Spring Boot will run the application in an embedded Apache Tomcat instance and you will be able to see the application running at http://localhost:8080.
In the next part of this series, I’ll show you how to secure content using Spring Security.
Get The Source!
Like all of my tutorials, the source code for this post is available on GitHub here.









Sushil GC
Hello,Springframework Guru,Really thank you for the wonderful tutorials.
I was searching for such a tutorials with tutor having real world programming experience and i guess you are here.
Thanks alot.
jt
Thanks!!
Sushil GC
Are There any Tutorials along with Spring Security with jpa for examples Simple Login using mysql with multiple user roles coming up in near future..
Hoping for it.. 🙂
jt
Yes – I’m planning to do something with Spring Security next in this series.
Sushil GC
cool.You surely gonna rock it
Aivar Mägi
Big thanks for another good tutorial! Keep on going 🙂
I have one question too – why are fragments commented out from code, and how they work like that?
For example, in index.html the commented out fragments work, and just plain
will work too.
Intellij will only show errors though, because it wont understand tags when fragment without xmlns declaration.
Thanks alot
jt
The fragments are referenced as html comments so browsers will ignore them when viewing the HTML directly. But are picked up by Thymeleaf when rendered.
Aivar Mägi
(th:block th:include=”fragments/headerinc :: head”)(/th:block)
replaced < with simple parenthesis 🙂
fdirlikli
Nice one!
DevLouis
Do you have a good guide to make it works with Angular JS ?
i got my Front-end in Angular JS consuming the Web Service RestFUL (Spring Boot / MVC / Hibernate).
From this, i would be glad to make my CRUD works.
DevLouis
Using @RestController instead of @Controller. I guess it’s not that simple to make something as generic as you previous example.
jt
No I don’t. I’m using Angular JS and Grails for client project. Setting up the rest stuff under Spring MVC instead of Grails would be fairly trivial. Maybe I’ll do a post on that in the future.
dennis
I think you are a angel
Meziano
Really awesome!
Especially the trick with the H2 Console: magic. It’s really helpful.
Thank you so much and keep on going.
Meziano
Meziane Kettou
Hello jt,
just a little remark: in productform.html I miss
Without this, when editing a product, we lose the value of productId.
In the ProductServiceImpl we may set the productId before saving the “new” product:
@Override
public Product saveProduct(final Product product) {
if (product.getProductId() == null || product.getProductId().trim().isEmpty()) {
product.setProductId(…);
}
return productRepository.save(product);
}
Thank you again!
Meziane
Alan
Meziane, I think the real problem was a section missing in the productform.html:
Product Id:
Charles Michael
Meziane, what value are you sending to the product.setProductId()
jose
Hello nice tutorial!!! It helps me a lot. Could you write about spring boot and restull api? Thanks
LP
Are There any Tutorials along with Spring Security with jpa for examples Simple Login using mongodb with multiple user roles coming up in near future..
Hoping so..thanks
Arthur
Tremendous post, I’m from Peru and I was looking for a post that uses Spring MVC and Thymeleaf.
I found a problem in your products.html, you write this:
View
But for to have a relative path, you need to use:
View
Sorry for my bad english :p
Arthur
Sorry …the html code that I attached wasn’t posted.
th:href=”${‘/product/’ + product.id}”>View
Relative path:
th:href=”@{‘/product/’ + ${product.id}}”>View
Charles Michael
Arthur, could you please post the whole section? Thanks.
Orlando Palencia
Muchas gracias, excelente tutorial sobre spring!
jt
Thanks!!
Sandro Agboka
Really excellent tutorial. I have a question though. While everything is working fine and the pages are displaying properly, I am getting the following message in my console window in Eclipse Tool Suite :
2015-11-28 16:44:28.741 ERROR 10221 — [nio-8080-exec-3] o.a.c.c.C.[.[.[/].[dispatcherServlet] : Servlet.service() for servlet [dispatcherServlet] in context with path [] threw exception [Request processing failed; nested exception is java.lang.NullPointerException] with root cause
java.lang.NullPointerException: null
at java.io.FilterInputStream.read(FilterInputStream.java:133)
at java.io.FilterInputStream.read(FilterInputStream.java:107)
at org.springframework.util.StreamUtils.copy(StreamUtils.java:123)
…
jt
Not sure what the cause is. I can’t recreate with my code.
Sandro Agboka
Also, on the productshow.html is it necessary to have the tag ?
Sandro Agboka
the from tag i mean
jt
sorry, I don’t understand the question
Corrado
Great tutorial!
I have a question regarding the update functionality. When I edit a product and click the Submit Button a new product will be created, instead of the old one being replaced. How can I change this? What should I do?
jt
Thanks! Verify you have the id and version as hidden properties in the form for the submit. Sounds like Hibernate can’t find the existing object.
Corrado
Thanks for the reply.
But with the tutorial code the update functionality isn’t implemented, is it? You would have to set the attributes of the product and then save it. Or am I missing something?
Where in the code is it written that by clicking “Create” (after clicking on edit and changing some text), the entity should be replaced and not a new one created?
jt
HIbernate uses the ID property to determine if the entity is new or already persisted. A new entity will have a null id.
Mike Zang
Thanks for this great guide! I have a question about the menu, I got menu as below, can you tell me how to solve it?
http://www.brickshelf.com/gallery/mikezang/java/screen_shot_2015-12-27_at_20.15.08.jpg
jt
Thanks – looks like your CSS isn’t resolving.
Mike Zang
I found reason because I import the newest jar in pom.xml so that they are not the same version as in header.html.
By the way, I found another problem when I try to use MySQL, I checked with your source, they don’t have difference, especially for files pom.xml, application.properties and so on, but my project show warning as below, though I can run project without problems, do you know why?
WARN: Establishing SSL connection without server’s identity verification is not recommended. According to MySQL 5.5.45+, 5.6.26+ and 5.7.6+ requirements SSL connection must be established by default if explicit option isn’t set. For compliance with existing applications not using SSL the verifyServerCertificate property is set to ‘false’. You need either to explicitly disable SSL by setting useSSL=false, or set useSSL=true and provide truststore for server certificate verification.
aspsharma87
I am writing a web application using thymeleaf, springboot using your demo. I have one model class with id, name, address, state and district field, state and district are list of string data. I have 3 tables user table, state table with id, state_name, state_code, and district table with id, district_code, district_name, state_code.
Q1. When I load my newrecord view it should fatch all record from state table and populate in select element?.
Q2. When I select state from select fatch all dstrict list of that state?.
Q3. When I open same record in edit mode state and district list show its default value?.
Daryl Handley
Great series of articles. Got a stubbed out web app running in about an hour. One thing I would mention is that you didn’t specify where to put the fragments html files. You need to create a directory called fragments under the templates directory and put them in there. Took mea fe minutes to figure that one out
Lefteris Kororos
Excellent tutorial- thank you!
One minor correction (of a typo): In the “Show Product” paragraph, although the text is talking about the product description, the code sample is for product.id.
Thank you again.
aspsharma87
Great tutorial thanks.
I got lot knowledge using this.
Is there any thing on Spring Security with mysql or any DB for examples Simple Login role base application using mysql with multiple user roles like admin or user.
jt
I don’t have there here (yet, at least), but I did add Spring Security with DB authentication to my Spring Core course. I just recorded the module yesterday, and will be publishing it to the course in the next day or so.
aspsharma87
Thanks for your great effort.
How can I get this video?.
jt
Enroll in my Spring Core course – http://courses.springframework.guru/courses/spring-core
faisal arkan
thanks,, it’s really helpful,,!
Vikram Hegde
Where can i get the css stylesheet?
Black Gekikara
Hi,
Is it possible to get a good tutorial (like yours) on Spring boot sessions using custom entities instead of the default User to login?
Thank you very much for the useful tutorials.
jt
Yes, I hope to publish that in the near future.
Charles Michael
John,
The id gets lost in the update
abeardyman
Very good tutorial, thanks for sharing!
Jesse
How much we have to alter if we are not using JPA or h2db, instead we are using Mongdb? I followed your tutorial, My update and delete functions does not work.
Hao
thanks for your insightful material!
I am confused by the syntax of:
<!–/*/ /*/–>
what is the differences with
?
Cheers.
jt
That’s a Thymeleaf comment syntax to get the fragment included when rendered, but to have it ignored when viewed directly in the browser.
Mike
Great tutorial, honestly I learned a lot from your blog
One question regarding controllers above – is it some “convention over configuration” that you don’t specify http methods (for delete method = RequestMethod.DELETE / also for edit (PUT or POST) ???
jt
No – If you don’t specify a request method, then the controller will pickup any method.
Mike
does it mean that we (or someone else with some despicable intentions …) can simply paste the url link ../product/delete/{and id number} to delete the record (sort of sql injection…). Should’t be made with http delete method where request and id are separated? Please advise
jt
Well of course… But the HTTP method isn’t going to change any of that. This isn’t SQL injection at all. Its a simple API call. The ID value is a parameter of the API call. Securing the API call is a whole different subject & the realm of Spring Security.
Dustin W
A very helpful tutorial! I was wondering about JPA and extension… If Hibernate automatically makes these entities, how would you handle if you wanted to make: “class Group” (has id/title/description) and “class SubGroup extends Group” (with its own id/title/description)?
Basically there can be many SubGroups for every one Group. Is there a way to easily accomplish this?
Lokesh Mawale
Very helpful .Thanks for Posting . Keep it up and all the very best 🙂
Boanerges
Thanks Guru for your tutorial, it’s a good help.
But, I have one question :
When I try to add some product by my form, system signal me this error :
“There was an unexpected error (type=Method Not Allowed, status=405).
Request method ‘GET’ not supported”.
Can you help to resolve this problem ? Thanks !
jt
Check the post method in your HTML
olasamuelOlalekan Samuel
Thank you so much Guru for this tutorial. However, after following all the four series in this tutorial diligently and ran the code, the only thing that the browser presented me with is just a white website that displays index. I also copied and pasted the code to strat again and to my amazement, the result was the same.
Is there anything am doing wrong or that I need to do to tomcat so that it site is displayed.
Regards
jt
Hi Samuel,
Yes, you have something wrong. Hard to say what from what you’ve shared. Check the console for error messages. I suspect you’re getting an exception.
olasamuelOlalekan Samuel
Thank you so much JT for your response. Yes I got the system working. But somehow, the ProductLoader is not getting called. Hence the system is not inserting the data and only the H2 Console is getting displayed. Others are not. Besides there are some configuration that I need to do before the system could work. For instance the security configuration does not work out of the box. I can do a short video and sent it to you, although, I am moving on
Riley
Update ProductServiceImpl:
@Override
public Product getProductById(Integer id) {
Optional product = productRepository.findById(id);
if (product.isPresent()) {
return product.get() ;
}
return null ;
}
…
@Override
public void deleteProduct(Integer id) {
productRepository.deleteById(id);
}
Marco
Thanks for that!!