
Spring Boot Messaging with RabbitMQ
2 CommentsLast Updated on January 5, 2021 by jt
RabbitMQ is a common messaging broker which allows applications to connect and communicate. It’s common for services in microservices-based systems to communicate asynchronously through messaging.
In order to create such a message-based system, you need a message broker, aka messaging server.
A message broker can support several messaging patterns. Typically, a message sender sends a message to the message broker. The broker stores the message until a message receiver application connects and consumes the message. The receiving application then further processes the message, as per business requirements.
To exchange messages between different applications, we can use RabbitMQ as a message broker.
In this post, I will discuss how to perform messaging with RabbitMQ.
I will take you through the steps to produce and consume messages with RabbitMQ in Spring Boot microservices.
Overview
RabbitMQ is an open-source message broker that allows communication between different services of enterprise applications. It is typically used in microservices to send and receive messages for inter-service communication.
Messaging In RabbitMQ involves:
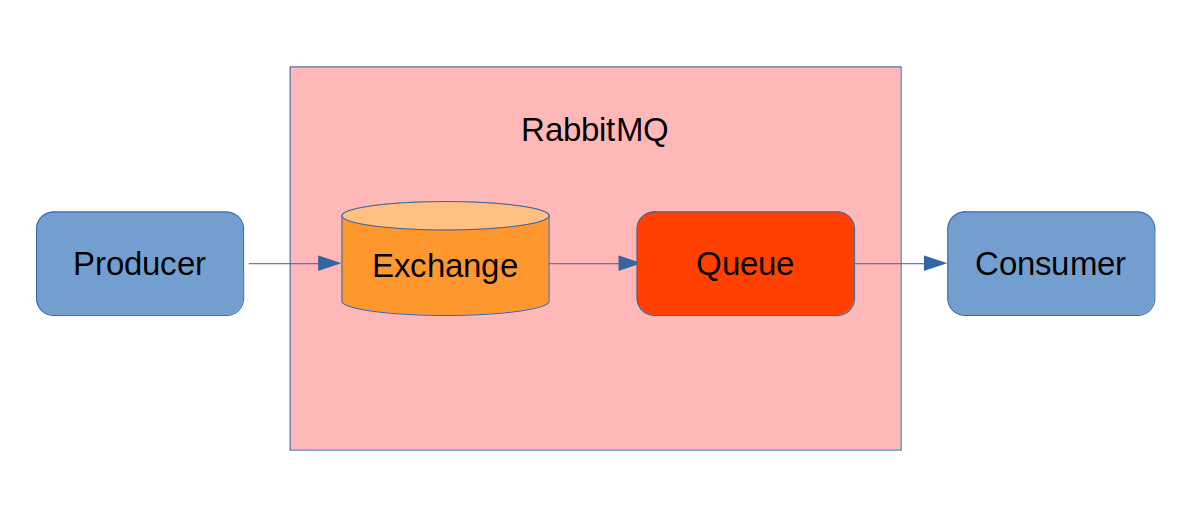
- A producer is a user application that sends messages to a RabbitMQ message broker. Messages are not directly sent to a queue. Here, the producer sends messages to an exchange. Exchanges are message routing agents that are responsible for routing the message to different queues.
- A queue is a buffer that resides inside RabbitMQ to store messages that a producer sends and a receiver receives.
- A consumer is a user application that receives messages from the RabbitMQ message broker and then processes them further.
This image shows how messages are communicated in RabbitMQ.
The Application
We will create a Spring Boot multi-module project in order to perform messaging with RabbitMQ.
The application consists of two services:
- Producer Service that produces messages to RabbitMQ.
- Consumer Service that consumes messages from RabbitMQ.
You can find the accompanying source code of this post here at Github.
Maven Dependencies
To use RabbitMQ in your application, you first need to add the dependency of RabbitMQ in your parent pom.xml file.
The code to add the RabbitMQ dependency is this:
<dependency>
  <groupId>org.springframework.boot</groupId>
  <artifactId>spring-boot-starter-amqp</artifactId>
</dependency>
The application that I will create will contain two Spring Boot services: Producer Service and Consumer Service.
The Producer Service
The Producer Service is a Spring Boot RESTFul service that produces messages to RabbitMQ. In the Producer Service, we will create:
- A domain object
- The
application.ymlfile - A service
- A controller
The Domain Object
In the Producer Service application, let’s start by writing a User domain class whose objects we will exchange as messages.
The code of the User class is this.
User.java
@Component
@JsonIdentityInfo(generator = ObjectIdGenerators.IntSequenceGenerator.class, property = "@id", scope = User.class)
public class User implements Serializable {

    private String userId;
    private String userName;

    public User(String userId, String userName) {
        this.userId = userId;
        this.userName = userName;
    }

    public User() {

    }

    public String getUserId() {
        return userId;
    }

    public void setUserId(String userId) {
        this.userId = userId;
    }

    public String getUserName() {
        return userName;
    }

    public void setUserName(String userName) {
        this.userName = userName;
    }

    @Override
    public String toString() {
        return "User{" +
                "userId='" + userId + '\'' +
                ", userName='" + userName + '\'' +
                '}';
    }
}
The User class implements the Serializable interface as it will be transmitted over a messaging system. It is also annotated with the @Component annotation so that Spring treats it as a Spring-managed object.
The @JsonIdentityInfo annotation indicates the object identity during the serialization and deserialization process. This class also contains two properties userId and userName, an empty constructor, getter and setter methods, and an overridden toString() method.
The application.yml File
Next, we will write the application.yml file for the Producer Service. Here we will specify the configurations required by an application to connect with RabbitMQ.
I have installed RabbitMQ on my system and using it with the default configurations. You can download and install RabbitMQ from here.
Refer here to download and install RabbitMQ on your system,
If you are familiar with Docker, I suggest using this DockerHub image.
The code of the application.yml file with the default configuration is this.
application.yml
app:
  message: Message has been sent Successfully..
spring:
  rabbitmq:
    host: localhost
    password: guest
    port: 15672
    username: guest
    exchange: user.exchange
    queue: user.queue
    routingkey: user.routingkey
server:
  port: 9091
The Service Class
We will create a service class named RabbitMQSender to send messages to RabbitMQ.
The code of the RabbitMQSender class is this.
RabbitMQSender.java
@Service
public class RabbitMqSender {
    private RabbitTemplate rabbitTemplate;

    @Autowired
    public RabbitMqSender(RabbitTemplate rabbitTemplate) {
        this.rabbitTemplate = rabbitTemplate;
    }

    @Value("${spring.rabbitmq.exchange}")
    private String exchange;

    @Value("${spring.rabbitmq.routingkey}")
    private String routingkey;

    public void send(User user){
        rabbitTemplate.convertAndSend(exchange,routingkey, user);

    }

}
This class defines two properties: exchange and routingkey. The exchange property defines the RabbitMQ exchange that is responsible for routing the messages to different queues. Then the routingkey property defines how to route the messages to the queue depending on the exchange type.
Next, line 5-7 autowires an rabbitTemplate object of the RabbitTemplate class. The RabbitTemplate class allows sending and receiving messages with RabbitMQ.
Then, line 10-14 sets the exchange and routingkey fields with the values from the application.yml file.
Finally, line 16-17 defines the send() method that calls the convertAndSend() method of the RabbitTemplate class and sets exchange routing user to it. This convertAndSend() method then pushes the message to exchange with the specified routingkey.
The Controller
Next, we will write the controller named ProducerController.
The code of the ProducerController class is this.
ProducerController.java
@RestController
@RequestMapping(value = "/api/v1/")
public class ProducerController {


    private RabbitMqSender rabbitMqSender;
    @Autowired
    public ProducerController(RabbitMqSender rabbitMqSender) {
        this.rabbitMqSender = rabbitMqSender;
    }

    @Value("${app.message}")
    private String message;

    @PostMapping(value = "user")
    public String publishUserDetails(@RequestBody User user) {
        rabbitMqSender.send(user);
        return message;
    }
}
As you can see that this code uses the uses the @RestController annotation that makes this class a RESTful web service.
In this code, line 2 adds the @RequestMapping annotation to map the HTTP requests to handler methods.
Then, line 6-9 autowires a RabbitMqSender object to send a message to RabbitMQ.
Next, line 12-13 creates a property named message and then annotated with the @Value annotation to get the values defined in our application.yml file.
Next, line 15-16 creates a publishUserDetails() method annotated with the @PostMapping annotation to map this handler method to a URL named user with the HTTP POST method.
Finally, line 17 calls the send() method of the RabbitMqSender class accepts a User object to send it to RabbitMQ.
Refactoring the ProducerServiceApplication Class
Finally, we will refactor the ProducerServiceApplication class that contains the main() method of the application.
The code of the ProducerServiceApplication class after refactoring is this.
ProducerServiceApplication.java
@SpringBootApplication
public class ProducerServiceApplication {

    @Value("${spring.rabbitmq.host}")
    String host;

    @Value("${spring.rabbitmq.username}")
    String username;

    @Value("${spring.rabbitmq.password}")
    String password;

    public static void main(String[] args) {
        SpringApplication.run(ProducerServiceApplication.class, args);
    }

    @Bean
    CachingConnectionFactory connectionFactory() {
        CachingConnectionFactory cachingConnectionFactory = new CachingConnectionFactory(host);
        cachingConnectionFactory.setUsername(username);
        cachingConnectionFactory.setPassword(password);
        return cachingConnectionFactory;
    }

    @Bean
    public MessageConverter jsonMessageConverter() {
        return new Jackson2JsonMessageConverter();
    }

    @Bean
    public RabbitTemplate rabbitTemplate(ConnectionFactory connectionFactory) {
        final RabbitTemplate rabbitTemplate = new RabbitTemplate(connectionFactory);
        rabbitTemplate.setMessageConverter(jsonMessageConverter());
        return rabbitTemplate;
    }
}
This class defines three properties : host, username and passwordand annotated with the @Value annotation to read the values defined in the application.yml file.
In this code, you can see that line 17-22 creates a CashingConnectionFactory bean initialized with localhost, username, and password.
Next, line 25-27 creates a Jackson2JsonMessageConverter bean of type MeaasgeConverter to send the message in the JSON format.
Finally, line 30-34 finally creates a RabbitTemplate bean initialized with ConnectionFactory. It then calls the setMessageConverter() method and sets JsonMessageConverter() to set the MessageConverter.
The Consumer Service
The Consumer Service is a Spring Boot RESTful service that receives messages from RabbitMQ. Here, in the Consumer Service we will create:
- A configuration class
- The
application.ymlfile - A message receiver class
The Configuration Class
In the Consumer Service application, let’s start by writing a configuration class that retrieves values set in the application.yml file and then configures a message listener, declare the queue, exchange, and then binds them together.
The code of the configuration class named RabbitMQConfig is this.
RabbitMQConfig.java
@Configuration
public class RabbitMQConfig {

    @Value("${spring.rabbitmq.queue}")
    private String queue;

    @Value("${spring.rabbitmq.exchange}")
    private String exchange;

    @Value("${spring.rabbitmq.routingkey}")
    private String routingKey;

    @Value("${spring.rabbitmq.username}")
    private String username;

    @Value("${spring.rabbitmq.password}")
    private String password;

    @Value("${spring.rabbitmq.host}")
    private String host;

    @Bean
    Queue queue() {
        return new Queue(queue, true);
    }

    @Bean
    Exchange myExchange() {
        return ExchangeBuilder.directExchange(exchange).durable(true).build();
    }

    @Bean
    Binding binding() {
        return BindingBuilder
                .bind(queue())
                .to(myExchange())
                .with(routingKey)
                .noargs();
    }

    @Bean
    public ConnectionFactory connectionFactory() {
        CachingConnectionFactory cachingConnectionFactory = new CachingConnectionFactory(host);
        cachingConnectionFactory.setUsername(username);
        cachingConnectionFactory.setPassword(password);
        return cachingConnectionFactory;
    }

    @Bean
    public MessageConverter jsonMessageConverter() {
        return new Jackson2JsonMessageConverter();
    }

    @Bean
    public RabbitTemplate rabbitTemplate(ConnectionFactory connectionFactory) {
        final RabbitTemplate rabbitTemplate = new RabbitTemplate(connectionFactory);
        rabbitTemplate.setMessageConverter(jsonMessageConverter());
        return rabbitTemplate;
    }
}
This code defines six properties: queue, exchange routingKey, username, password and host. It also uses the @Value annotation to read the values from the application.yml file.
This code also creates a Queue bean that is durable.
In this code, line 27-29 creates an ExchangeBuilder bean to send a message to the queue whose binding key matches the routing key of the message.
Line 32-38 then creates a Binding bean by binding the queue, exchange and routingkey.
Next, line 41-46 creates a CashingConnectionFactory bean of type ConnectionFactory initialized with localhost, username, and password.
Then line 49-51 creates a Jackson2JsonMessageConverter bean of type MeaasgeConverter to send the message in the JSON format.
Finally, line 54-58 creates a RabbitTemplate bean initialized with ConnectionFactory. It then calls the setMessageConverter() method and sets JsonMessageConverter() to set the MessageConverter.
The application.yml File
Next, I will write the application.yml file for the Consumer Service.
The code of the application.yml file is this.
application.yml
server:
  port: 8080
spring:
  rabbitmq:
    host: localhost
    password: guest
    port: 15672
    username: guest
    exchange: user.exchange
    queue: user.queue
    routingkey: user.routingkey
The Message Receiver Class
Let’s now write the RabbitMqService class to receive messages as a Spring component.
The code of the RabbitMqService class is this.
RabbitMqService.java
@Component
public class RabbitMqReceiver implements RabbitListenerConfigurer {

    private static final Logger logger = LoggerFactory.getLogger(RabbitMqReceiver.class);

    @Override
    public void configureRabbitListeners(RabbitListenerEndpointRegistrar rabbitListenerEndpointRegistrar) {

    }

    @RabbitListener(queues = "${spring.rabbitmq.queue}")
    public void receivedMessage(User user) {

        logger.info("User Details Received is.. " + user);
    }

}
This class implements the RabbitListenerConfigurer interface that allows defining how listener endpoints are configured. This class also overrides the configureRabbitListeners() method but without any implementation.
Then creates a receivedMessage() method that receives a User object from RabbitMQ. This method is annotated with the @RabbitListener annotation that defines the queue to consume messages.
Testing Messaging with RabbitMQ
Now, before you run the Producer Service and Consumer Service microservices, you need to start the RabbitMQ server.
To start the RabbitMQ server, in the terminal window type:
service rabbitmq-server start
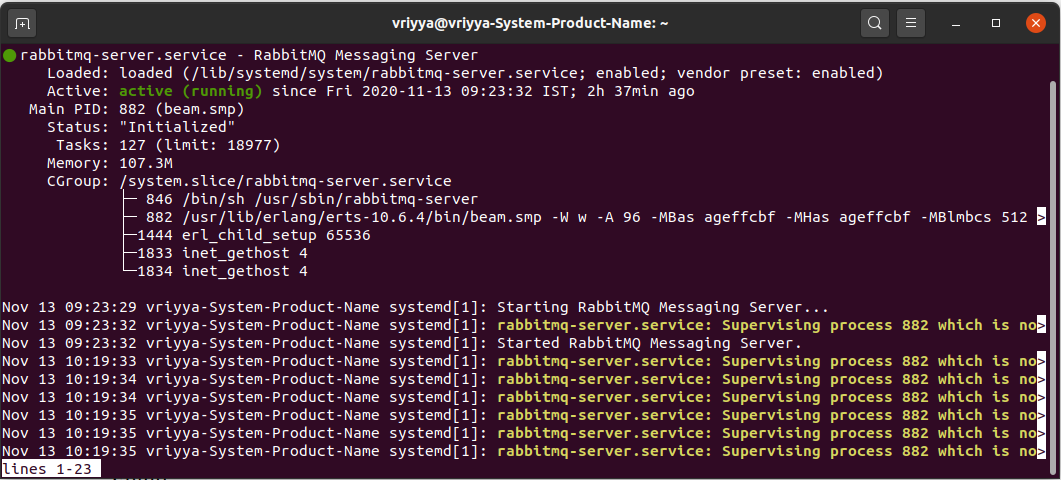
This command starts the RabbitMQ server and you can also check the status of the server with the following command:
service rabbitmq-server status
The terminal window displays that the RabbitMQ server is already running, as you can see.
Let’s go back to the microservices and run the Producer Service and Consumer Service respectively.
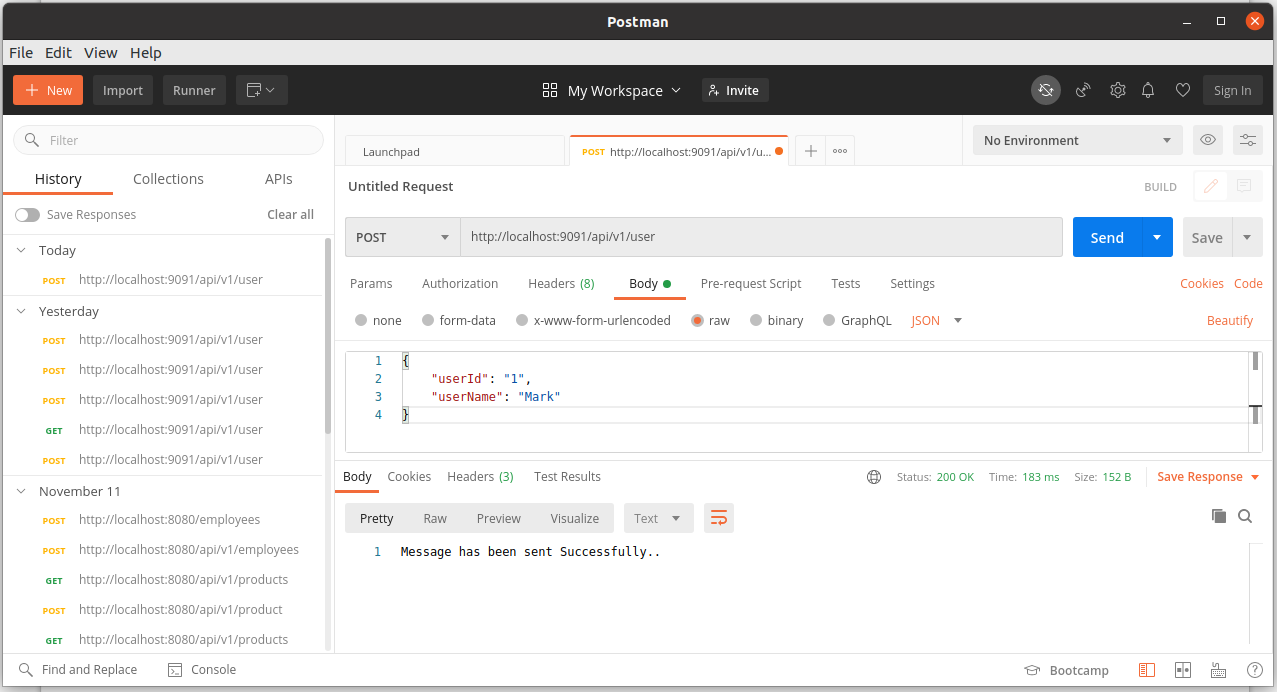
To test the flow of messaging with RabbitMQ, you can use Postman.
- In Postman, select POST from the drop-down list.
- Then type the
localhost:9091/api/v1/userURL. - Click the Body tab.
- Select the raw radio button and then select JSON from the drop-down list.
- Type
{ "userId": "1","userName": "Mark" }to pass a JSON object. - Click the Send button.
Postman displays a message indicating that the message has been successfully sent, as you can see in the figure.
Now, you can check the Console of the Consumer Service. 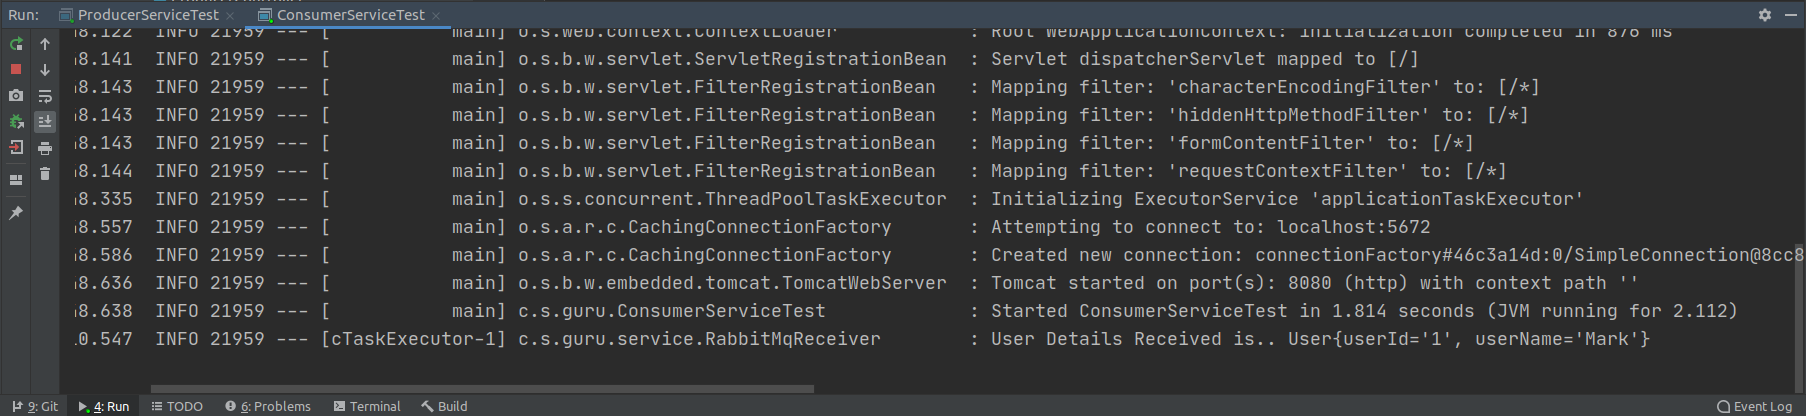
In the Console window, you can see the user details that have been received by the Consumer Service.
Summary
In traditional applications, the common assumption is of users performing actions that would be fulfilled by executing a transaction on a database. But today, many actions are not user-initiated. Instead, they are application-initiated. The best way to solve this class of problems is with messaging.
There are several uses of messaging. Few common ones are integration, event handling, routing, task sharing, data delivery, and so on.
When you enable applications to initiate or react to events, then it is much easier to scale because your architecture can be based on loosely coupled components. It is also much easier to integrate those components if your messaging is based on open standard APIs and protocols.
The Spring Framework provides extensive support for integrating with messaging systems. In Spring, you can go for simplified use of the JMS API using JmsTemplate to a complete infrastructure to receive messages asynchronously. The Spring Framework comes with Spring AMQP to support the Advanced Message Queuing Protocol (AMQP) so that you can start using messaging systems like RabbitMQ and Kafka the Spring way with minimal effort.
You can find the source code of this post on Github.
To learn how RabbitMQ is used in real-world Spring microservices, check my Udemy Best Seller Course Spring Boot Microservices with Spring Cloud Beginner to Guru.


andre myszko
FENOMENAL!
Zwakele
where do I create the routing.key and exchange? Would’ve been nice to get the details on that.