

How to Run Spring Boot in A Docker Container
26 CommentsLast Updated on October 21, 2024 by jt
Containers based deployments are rapidly gaining popularity in the enterprise. One of the more popular container solutions is Docker.
Many view containers as virtual machines. They’re not. Well, kind of not. A container is a virtual walled environment for your application. It’s literally a ‘container’ inside the host OS. Thus your application works like it is in its own self contained environment, but it’s actually sharing operating system resources of the host computer. Because of this, containers are more resource efficient than full-blown virtual machines. You get more bang for your buck running a bare metal machine with a bunch of containers that you do running a bare metal machine with a bunch of VMs. This is why massive cloud computing companies running 10’s of thousands of servers are running containers. Google, Facebook, Netflix, Amazon are all big advocates of containers.
Introducing Docker Containers
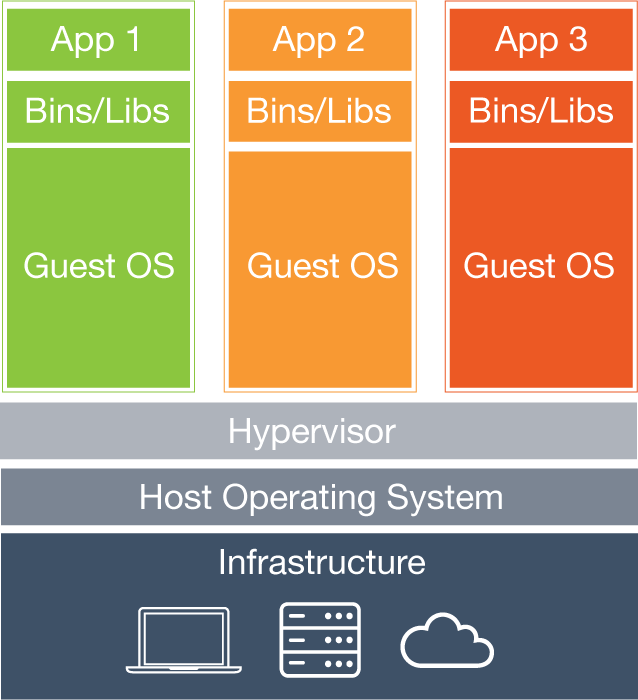
To help you visualize the difference, here are a couple of images provided by Docker. Here is the bloated architecture of a traditional virtual machine environment. A popular solution you can try is Oracle’s Virtual Box which allows you to run a variety of operating systems on your personal machine. I personally use VMWare Fusion to run Windows on my MBP (and I still feel a little dirty every time I do). If you’ve never used either these, I recommend you give them a try.
In this graphic, note how each stack has its own Guest OS.
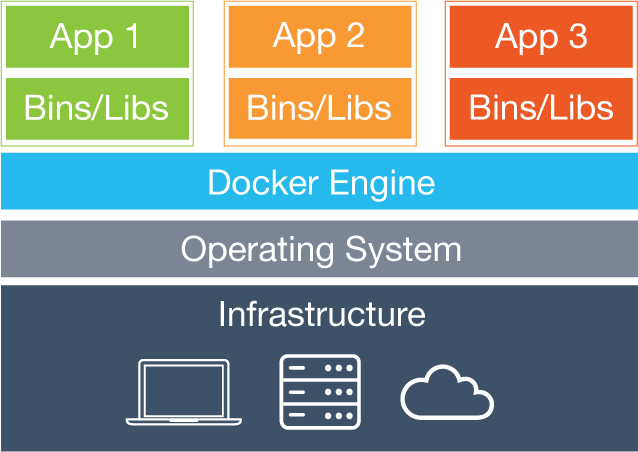
Now for comparison, here is the same stack containerized by Docker. Here you can see how each application does not get its own operating system. This is key to why Docker containers are so efficient. You’re not providing a virtual layer mimic the hardware, for the guest OS to use. And you’re not running n+1 guest hosts either.
Clearly, this is more efficient computing. I’ve seen estimates in the 10-25% range of improved performance. But like with everything else when it comes to computing performance – your mileage may vary. I’d expect lightweight Linux VMs to be closer to the 10% side of the scale, and Windows VMs probably closer to the 25% end of the scale – just because the Windows OS is so bloated in comparison.
This leads me to an important distinction about Docker – Linux only. Yes, you can “run” Docker on Windows and OSX – but at this time, you can only do so using a VM running in Virtual Box to run – a Linux VM.
Running Spring Boot in a Docker Container
Introduction
When I first heard about running Spring Boot in a Docker container, I personally thought – “now why would you want to run a JVM in a VM, on a VM?” At first glance, it just seemed like an absolutely terrible idea from a performance standpoint. I doubt if any of these solutions will ever match the performance of a JVM running on a bare metal installation of Linux. But, I’ve shown above, running a Spring Boot application in a Docker container should have a minimal performance impact. Certainly less of an impact than running in a VM. Which is exactly what you’re doing running applications in any cloud provider (see image one above).
Installing Docker
I’m not going to get into installing Docker on your OS. There is ample documentation about installing Docker on the internet. Going forward, I’m going to assume you have Docker installed. Since Docker is Linux based, my focus will be on Linux (RHEL / CentOS).
Spring Boot Example Application
For the purposes of this tutorial, let’s start with a simple Spring Boot Application. I’m going to use the completed application from my Mastering Thymeleaf course. This is a simple Spring Boot web application which is perfect for our needs.
If you want to follow this tutorial along step by step, head over to GitHub and check out this Spring Boot project. Be sure to change to the branch spring-boot-docker-start</code.
Building a Spring Boot Docker Image
For us to run Spring Boot in a Docker container, we need to define a Docker image for it. Building Docker images is done through the use of “Dockerfiles”. Dockerfiles are basically a manifest of commands we will use to build and configure our docker container. To configure our Docker image to run our Spring Boot application, we will want to:
- Start with the latest CentOS image from Docker Hub.
- Install and configure Oracle Java.
- Install the Spring Boot artifact – our executable JAR file.
- Run the Spring Boot application.
I’m using CentOS for its compatibility with RHEL, which is probably the most popular Linux distribution used by enterprises. And Oracle’s Java, mainly for the same reason.
Create Our Dockerfile
In our Maven project, we need to create our Dockerfile. In /src/main/docker create the file Dockerfile .
NOTE: As a Java developer you may be tempted to create the file as DockerFile. Don’t do this. The Maven Plugin we cover later won’t see your file if it’s CamelCase. I learned this lesson the hard way.
CentOS
We’ll start our Docker image off by using the CentOS image from Docker hub.
Dockerfile
FROM centos
Installing Oracle Java
The following lines in our dockerfile will install wget into the image using the yum package installer, download the Oracle Java JDK from Oracle using wget, then configure Java on the machine.
Dockerfile
ENV JAVA_VERSION 8u31
ENV BUILD_VERSION b13

# Upgrading system
RUN yum -y upgrade
RUN yum -y install wget

# Downloading & Config Java 8
RUN wget --no-cookies --no-check-certificate --header "Cookie: oraclelicense=accept-securebackup-cookie" "http://download.oracle.com/otn-pub/java/jdk/$JAVA_VERSION-$BUILD_VERSION/jdk-$JAVA_VERSION-linux-x64.rpm" -O /tmp/jdk-8-linux-x64.rpm
RUN yum -y install /tmp/jdk-8-linux-x64.rpm
RUN alternatives --install /usr/bin/java jar /usr/java/latest/bin/java 200000
RUN alternatives --install /usr/bin/javaws javaws /usr/java/latest/bin/javaws 200000
RUN alternatives --install /usr/bin/javac javac /usr/java/latest/bin/javac 200000
Installing the Spring Boot Executable Jar
In this section of the Dockerfile, we are:
- Adding a
/tmpvolume. Docker will map this to/var/lib/dockeron the host system. This is the directory Spring Boot will configure Tomcat to use as its working directory. - The
ADDcommand adds the Spring Boot executable Jar into our Docker image. - The
RUNcommand is to ‘touch’ the JAR and give it a modified date. - The
ENTRYpoint is what will run the jar file when the container is started.
I learned about these configuration settings from a post from the Pivotal team here.
Dockerfile
VOLUME /tmp
ADD /maven/myapp-0.0.1-SNAPSHOT.jar myapp.jar
RUN sh -c 'touch /myapp.jar'
ENTRYPOINT ["java","-Djava.security.egd=file:/dev/./urandom","-jar","/myapp.jar"]
Complete Dockerfile
Here is the complete Dockerfile.
Dockerfile
FROM centos

ENV JAVA_VERSION 8u31
ENV BUILD_VERSION b13

# Upgrading system
RUN yum -y upgrade
RUN yum -y install wget

# Downloading & Config Java 8
RUN wget --no-cookies --no-check-certificate --header "Cookie: oraclelicense=accept-securebackup-cookie" "http://download.oracle.com/otn-pub/java/jdk/$JAVA_VERSION-$BUILD_VERSION/jdk-$JAVA_VERSION-linux-x64.rpm" -O /tmp/jdk-8-linux-x64.rpm
RUN yum -y install /tmp/jdk-8-linux-x64.rpm
RUN alternatives --install /usr/bin/java jar /usr/java/latest/bin/java 200000
RUN alternatives --install /usr/bin/javaws javaws /usr/java/latest/bin/javaws 200000
RUN alternatives --install /usr/bin/javac javac /usr/java/latest/bin/javac 200000

EXPOSE 8080

#install Spring Boot artifact
VOLUME /tmp
ADD /maven/sfg-thymeleaf-course-0.0.1-SNAPSHOT.jar sfg-thymeleaf-course.jar
RUN sh -c 'touch /sfg-thymeleaf-course.jar'
ENTRYPOINT ["java","-Djava.security.egd=file:/dev/./urandom","-jar","/sfg-thymeleaf-course.jar"]
Building the Docker Image Using Maven
Naturally, we could build our Docker image using docker itself. But this is not a typical use case for Spring developers. A typical use case for us would be to use Jenkins to generate the Docker image as part of a CI build. For this use case, we can use Maven to package the Spring Boot executable JAR, then have that build artifact copied into the Docker image.
There’s actually several competing Maven plugins for Docker support. The guys at Spotify have a nice Maven / Docker plugin. In this example, I’m going to show you how to use the Fabric8 Docker plugin for Maven.
Fabric8
Of the Maven plugins for Docker, at the time of writing, Fabric8 seems to be the most robust. For this post, I’m only interested in building a Docker Image for our Spring Boot artifact. This is just scratching the surface of the capabilities of the Fabric8 Maven plugin. This plugin can be used to spool up Docker Images to use for your integration tests for CI builds. How cool is that!?!? But let’s learn to walk before we run!
Here is a typical configuration for the Fabric8 Maven plugin for Docker.
Fabric8 Maven Docker Plugin Configuration
<plugin>
	<groupId>io.fabric8</groupId>
	<artifactId>docker-maven-plugin</artifactId>
	<version>0.15.3</version>
	<configuration>
		<dockerHost>http://127.0.0.1:2375</dockerHost>
		<verbose>true</verbose>
		<images>
			<image>
				<name>springframeworkguru/masteringthymeleaf</name>
				<build>
					<dockerFile>Dockerfile</dockerFile>
					<assembly>
						<descriptorRef>artifact</descriptorRef>
					</assembly>
				</build>
			</image>
		</images>
	</configuration>
</plugin>
If you’re following along in tutorial, the complete Maven POM now is:
pom.xml
<?xml version="1.0" encoding="UTF-8"?>
<project xmlns="http://maven.apache.org/POM/4.0.0" xmlns:xsi="http://www.w3.org/2001/XMLSchema-instance"
         xsi:schemaLocation="http://maven.apache.org/POM/4.0.0 http://maven.apache.org/xsd/maven-4.0.0.xsd">
    <modelVersion>4.0.0</modelVersion>

    <groupId>guru.springframework</groupId>
    <artifactId>sfg-thymeleaf-course</artifactId>
    <version>0.0.1-SNAPSHOT</version>
    <packaging>jar</packaging>

    <name>sfg-thymeleaf-course</name>
    <description>Thymeleaf Course</description>

    <parent>
        <groupId>org.springframework.boot</groupId>
        <artifactId>spring-boot-starter-parent</artifactId>
        <version>1.3.1.RELEASE</version>
        <relativePath/> <!-- lookup parent from repository -->
    </parent>

    <properties>
        <project.build.sourceEncoding>UTF-8</project.build.sourceEncoding>
        <java.version>1.8</java.version>
    </properties>

    <dependencies>
        <dependency>
            <groupId>org.springframework.boot</groupId>
            <artifactId>spring-boot-starter-thymeleaf</artifactId>
        </dependency>
        <dependency>
            <groupId>org.springframework.boot</groupId>
            <artifactId>spring-boot-starter-web</artifactId>
        </dependency>

        <dependency>
            <groupId>org.springframework.boot</groupId>
            <artifactId>spring-boot-devtools</artifactId>
        </dependency>

        <dependency>
            <groupId>org.springframework.boot</groupId>
            <artifactId>spring-boot-starter-security</artifactId>
        </dependency>

        <dependency>
            <groupId>org.thymeleaf.extras</groupId>
            <artifactId>thymeleaf-extras-springsecurity4</artifactId>
            <version>2.1.2.RELEASE</version>
        </dependency>

        <!--testing deps-->
        <dependency>
            <groupId>org.springframework.boot</groupId>
            <artifactId>spring-boot-starter-test</artifactId>
            <scope>test</scope>
        </dependency>
    </dependencies>

    <build>
        <plugins>
            <plugin>
                <groupId>org.springframework.boot</groupId>
                <artifactId>spring-boot-maven-plugin</artifactId>
            </plugin>
            <plugin>
                <groupId>io.fabric8</groupId>
                <artifactId>docker-maven-plugin</artifactId>
                <version>0.15.3</version>
                <configuration>
                    <dockerHost>http://127.0.0.1:2375</dockerHost>
                    <verbose>true</verbose>
                    <images>
                        <image>
                            <name>springframeworkguru/masteringthymeleaf</name>
                            <build>
                                <dockerFile>Dockerfile</dockerFile>
                                <assembly>
                                    <descriptorRef>artifact</descriptorRef>
                                </assembly>
                            </build>
                        </image>
                    </images>
                </configuration>
            </plugin>
        </plugins>
    </build>
</project>
Building the Docker Image
To build the Docker image with our Spring Boot artifact run this command:
mvn clean package docker:build
The clean tells Maven to delete the target directory. While this step is technically optional, if you don’t use it, sooner or later you’re going to get bit in the ass by some weird issue. Maven will always compile your classes with the package command. If you’ve done some refactoring and changed class names or packages, without the ‘clean’ the old class files are left on the disk. And in the words of IBM – “Unpredictable results may occur”.
It is very important to run the package command with the docker:build command. You’ll encounter errors if you try to run these in two separate steps.
While the Docker image is building, you will see the following output in the console:
 [INFO] --- docker-maven-plugin:0.15.3:build (default-cli) @ sfg-thymeleaf-course ---
[INFO] Copying files to /home/john.thompson/src/springframework.guru/sfg-thymeleaf-course/target/docker/springframeworkguru/masteringthymeleaf/build/maven
[INFO] Building tar: /home/john.thompson/src/springframework.guru/sfg-thymeleaf-course/target/docker/springframeworkguru/masteringthymeleaf/tmp/docker-build.tar
[INFO] DOCKER> docker-build.tar: Created [springframeworkguru/masteringthymeleaf]  in 686 milliseconds
[INFO] DOCKER> Step 1 : FROM centos
[INFO] DOCKER> ---> 904d6c400333
[INFO] DOCKER> Step 2 : ENV JAVA_VERSION 8u31
[INFO] DOCKER> ---> Using cache
[INFO] DOCKER> ---> 4eecb49f2d65
[INFO] DOCKER> Step 3 : ENV BUILD_VERSION b13
[INFO] DOCKER> ---> Using cache
[INFO] DOCKER> ---> 86732207b3a7
[INFO] DOCKER> Step 4 : RUN yum -y upgrade
[INFO] DOCKER> ---> Using cache
[INFO] DOCKER> ---> 3dc9f5aaaab9
[INFO] DOCKER> Step 5 : RUN yum -y install wget
[INFO] DOCKER> ---> Using cache
[INFO] DOCKER> ---> 7c6ea7db011d
[INFO] DOCKER> Step 6 : RUN wget --no-cookies --no-check-certificate --header "Cookie: oraclelicense=accept-securebackup-cookie" "http://download.oracle.com/otn-pub/java/jdk/$JAVA_VERSION-$BUILD_VERSION/jdk-$JAVA_VERSION-linux-x64.rpm" -O /tmp/jdk-8-linux-x64.rpm
[INFO] DOCKER> ---> Using cache
[INFO] DOCKER> ---> 46049829b569
[INFO] DOCKER> Step 7 : RUN yum -y install /tmp/jdk-8-linux-x64.rpm
[INFO] DOCKER> ---> Using cache
[INFO] DOCKER> ---> e41473085a2a
[INFO] DOCKER> Step 8 : RUN alternatives --install /usr/bin/java jar /usr/java/latest/bin/java 200000
[INFO] DOCKER> ---> Using cache
[INFO] DOCKER> ---> 0ea94f139d46
[INFO] DOCKER> Step 9 : RUN alternatives --install /usr/bin/javaws javaws /usr/java/latest/bin/javaws 200000
[INFO] DOCKER> ---> Using cache
[INFO] DOCKER> ---> d7297a64face
[INFO] DOCKER> Step 10 : RUN alternatives --install /usr/bin/javac javac /usr/java/latest/bin/javac 200000
[INFO] DOCKER> ---> Using cache
[INFO] DOCKER> ---> b8b1dbac3831
[INFO] DOCKER> Step 11 : EXPOSE 8080
[INFO] DOCKER> ---> Using cache
[INFO] DOCKER> ---> acbdc5e0cb38
[INFO] DOCKER> Step 12 : VOLUME /tmp
[INFO] DOCKER> ---> Using cache
[INFO] DOCKER> ---> 451ca0bd1715
[INFO] DOCKER> Step 13 : ADD /maven/sfg-thymeleaf-course-0.0.1-SNAPSHOT.jar sfg-thymeleaf-course.jar
[INFO] DOCKER> ---> 78fa04335365
[INFO] DOCKER> Removing intermediate container ee1881a8a140
[INFO] DOCKER> Step 14 : RUN sh -c 'touch /sfg-thymeleaf-course.jar'
[INFO] DOCKER> ---> Running in 1aabdb264d54
[INFO] DOCKER> ---> f8ac883ccd8c
[INFO] DOCKER> Removing intermediate container 1aabdb264d54
[INFO] DOCKER> Step 15 : ENTRYPOINT java -Djava.security.egd=file:/dev/./urandom -jar /sfg-thymeleaf-course.jar
[INFO] DOCKER> ---> Running in 6fc902be3c66
[INFO] DOCKER> ---> 03cc39512193
[INFO] DOCKER> Removing intermediate container 6fc902be3c66
[INFO] DOCKER> Successfully built 03cc39512193
[INFO] DOCKER> [springframeworkguru/masteringthymeleaf] : Built image sha256:03cc3
[INFO] ------------------------------------------------------------------------
[INFO] BUILD SUCCESS
[INFO] ------------------------------------------------------------------------
[INFO] Total time: 30.214s
[INFO] Finished at: Mon Jun 06 13:35:12 CDT 2016
[INFO] Final Memory: 34M/322M
[INFO] ------------------------------------------------------------------------
Docker images are built in layers. The CentOS image from Docker Hub is our first layer. Each command in our Dockfile is another ‘layer’. Docker works by ‘caching’ these layers locally. I think of it as being somewhat like your local Maven repository under ~/.m2. Where Maven will bring down Java artifacts once then cache them for future use.
The first time you build this Docker image will take longer since all the layers are being downloaded / built. The next time we build this, the only layers that change are the one which adds the new Spring Boot artifact, all commands after this. The layers before the Spring Boot artifact aren’t changing, so the cached version will be used in the Docker build.
Running the Spring Boot Docker Image
Docker Run Command
So far, we have not said anything about port mapping. This is actually done at run time. When we start the Docker container, in the run command, we will tell Docker how to map the ports. In our example, we want to map port 8080 of the host machine to port 8080 of the container. This is done with the -p parameter, followed with <host port>:<container port>. We also want to use the -d' parameter. This tells Docker to start the container in the background.
Here is the complete command to run our docker container:
docker run -p 8080:8080 -d springframeworkguru/masteringthymeleaf
This command will start the Docker container and echo the id of the started container.
Congratulations, your Spring Boot application is up and running!
You should now be able to access the application on port 8080 of your machine.
Working with Running Docker Containers
Viewing Running Docker Containers
To see all the containers running on your machine, use the following command:
docker ps
View Log Output
Our running Docker containers are far from little black boxes. There’s a lot we can do with them. One common thing we want to do is see the log output. Easy enough. Use this command:
docker logs springframeworkguru/masteringthymeleaf
Access a Running Docker Container
Need to ssh into a Docker container? Okay, technically this really isn’t SSH, but this command will give you a bash:
sudo docker exec -it springframeworkguru/masteringthymeleaf bash
Stopping the Docker Container
Shutting down our Docker container is easy. Just run this command:
docker stop springframeworkguru/masteringthymeleaf
Ending Source Code
Just in case you’ve run into trouble, like always, I have a branch in GitHub with the complete working example. You can get the ending source code for this tutorial here on GitHub.
Conclusion
The default executable Jar artifact of Spring Boot is ideal for deploying Spring Boot applications in Docker. As I’ve shown here launching a Spring Boot application in a Docker container is easy to do.
In terms of technology, Docker is still fairly young. At the time of writing, Docker is only about three years old. Yet, it is rapidly catching on. While Docker is widely used by the web giants, it is just starting to trickle down to Fortune 500 enterprises. At the time of writing, Docker is not available natively on OSX or Windows. Yet. Microsoft has committed to releasing a native version of Docker for Windows. Which is interesting. A lot of things going on around Docker at Red Hat and Pivotal too.
Docker is a fundamental paradigm shift in the way we do things as Spring developers. I assure you, if you’re developing applications in the enterprise using the Spring Framework and have not used Docker, it’s not a matter of if, it is a when.
As a developer, Docker brings up some very cool opportunities. Need a Mongo database to work against? No problem, spool up a local Docker container. Need a virtual environment for your Jenkins CI builds. No problem.
I personally have only been working with Docker for a short time. I am honestly excited about it. My thoughts on Docker – Now we’re cooking with gas!


chengkun
when i use website contact send message, she tell me Failed to send your message. Please try later or contact the administrator by another method.
chengkun
Why does Spring Boot web app close immediately after starting?
http://stackoverflow.com/questions/24214224/why-does-spring-boot-web-app-close-immediately-after-starting
I’ve operation according to the article solves the problem, but I want to know why?
please advise!
org.springframework.boot
spring-boot-starter-tomcat
<!–provided–>
jt
Provided says the dep will be provided in the runtime environment, meaning if its not there, the app will fail on startup. Commenting it out, requires it to be included.
noisyfat
Hi John, just want to say thank you for the nice article. I was struggling with building docker image with fabric 8 till i read important tip in this article: It is very important to run the package command with the docker:build command.
Great work!
jt
Glad it helped!!
Lincoln
Hi John, thanks for this excellent blog. It is certainly the clearest article about building and running Spring Boot app in Docker I have read so far.
Nick Turi
Everything builds and runs but I notice when i do a “docker ps” but container is not there.
jt
Sounds like the container terminated. Try docker ps -a and docker logs to see why
jianguoyang
I have deployed the app under docker, and it started, the only confused thing is the image can not show up, any ideas?
jt
No, not sure what could cause that.
devops online training
I hadn’t thought of using containers but that’s a great idea. Thanks so much for sharing!
Chris L.
Please consider extending this example to copy in a specific application.properties file. Would that be best done in the maven pom assembly section or somewhere else?
jt
You can also specify an external properties file. I usually just override env specfic properties via environment variables – which will override values of application.properties.
Matt Raffel
I would like some clarification on a couple lines:
1) java install. This URL no longer works. At this time, the only thing I can think of is “ADD” the java install from a previous download. Any thoughts on alternative solutions?
2) I do not understand why the RUN alternative … commands are needed. Can someone explain this step.
Thnx
Matt
Mikołaj Grząślewicz
That’s the Dockerfile I used to have a working spring boot app based on this article after some tuning:
FROM centos:latest
ENV JAVA_VERSION 8u144
ENV BUILD_VERSION b01
# Upgrading system
RUN yum -y upgrade
RUN yum -y install wget
# Downloading & Config Java 8
RUN wget –no-cookies –no-check-certificate –header “Cookie: oraclelicense=accept-securebackup-cookie” “http://download.oracle.com/otn-pub/java/jdk/$JAVA_VERSION-$BUILD_VERSION/090f390dda5b47b9b721c7dfaa008135/jdk-$JAVA_VERSION-linux-x64.rpm” -O /tmp/jdk-8-linux-x64.rpm
RUN yum -y install /tmp/jdk-8-linux-x64.rpm
RUN alternatives –install /usr/bin/java jar /usr/java/latest/bin/java 200000
RUN alternatives –install /usr/bin/javaws javaws /usr/java/latest/bin/javaws 200000
RUN alternatives –install /usr/bin/javac javac /usr/java/latest/bin/javac 200000
EXPOSE 8081
VOLUME /tmp
ENV JAVA_HOME /usr/java/latest
ENV PATH $PATH:$JAVA_HOME/bin
ADD /target/price-service.jar price-service.jar
ENTRYPOINT [“java”,”-jar”,”price-service.jar”]
comptricsblog
I think we can make this little simpler. We may not need the centOS and can create the docker image using openJDk.
justintilson
I love the post. Definitely the most straight forward tutorial around. I am having troubles getting Maven to build and run on my Mac. I’m new to docker so still pretty clumsy at present time.
When I run: mvn clean package docker:build
org.apache.maven.plugin.MojoExecutionException: Unable to check image [centos]
…
org.apache.http.conn.HttpHostConnectException: Connect to 127.0.0.1:2375 [/127.0.0.1] failed: Connection refused
I’m guessing it’s because Docker isn’t running at 127.0.0.1 but in a Virtual Linux env.
jt
yes – you’ll need to use the IP of the VM.
justintilson
I was able to get it working by following instructions from here: https://stackoverflow.com/questions/41267305/docker-for-mac-vm-ip
brew install socat
socat TCP-LISTEN:2375,reuseaddr,fork,bind=localhost UNIX-CONNECT:/var/run/docker.sock
But then I ran into this error:
The command ‘/bin/sh -c wget –no-cookies –no-check-certificate –header “Cookie: oraclelicense=accept-securebackup-cookie” “http://download.oracle.com/otn-pub/java/jdk/$JAVA_VERSION-$BUILD_VERSION/jdk-$JAVA_VERSION-linux-x64.rpm” -O /tmp/jdk-8-linux-x64.rpm’ returned a non-zero code: 8
justintilson
I tried openjdk and it built without errors:
FROM openjdk:8
EXPOSE 8080
#install Spring Boot artifact
VOLUME /tmp
ADD /maven/sfg-thymeleaf-course-0.0.1-SNAPSHOT.jar sfg-thymeleaf-course.jar
RUN sh -c ‘touch /sfg-thymeleaf-course.jar’
ENTRYPOINT [“java”,”-Djava.security.egd=file:/dev/./urandom”,”-jar”,”/sfg-thymeleaf-course.jar”]
peiwen
Thank you very much for the tutorial. It seems that the resource is no longer there on Oracle website.
I encountered the problem below.
Step 6/14 : RUN wget –no-cookies –no-check-certificate –header “Cookie: oraclelicense=accept-securebackup-cookie” “http://download.oracle.com/otn-pub/java/jdk/$JAVA_VERSION-$BUILD_VERSION/jdk-$JAVA_VERSION-linux-x64.rpm” -O /tmp/jdk-8-linux-x64.rpm
—> Running in 2d6a43824aeb
–2018-01-07 00:18:53– http://download.oracle.com/otn-pub/java/jdk/8u31-b13/jdk-8u31-linux-x64.rpm
Resolving download.oracle.com (download.oracle.com)… 23.215.104.105, 23.215.104.66
Connecting to download.oracle.com (download.oracle.com)|23.215.104.105|:80… connected.
HTTP request sent, awaiting response… 302 Moved Temporarily
Location: https://edelivery.oracle.com/otn-pub/java/jdk/8u31-b13/jdk-8u31-linux-x64.rpm [following]
–2018-01-07 00:18:53– https://edelivery.oracle.com/otn-pub/java/jdk/8u31-b13/jdk-8u31-linux-x64.rpm
Resolving edelivery.oracle.com (edelivery.oracle.com)… 104.89.90.135, 2600:1407:21:28e::2d3e, 2600:1407:21:2ae::2d3e
Connecting to edelivery.oracle.com (edelivery.oracle.com)|104.89.90.135|:443… connected.
HTTP request sent, awaiting response… 302 Moved Temporarily
Location: http://download.oracle.com/otn-pub/java/jdk/8u31-b13/jdk-8u31-linux-x64.rpm?AuthParam=1515284573_d3578a4c10668a88efa21c2ab55b70d9 [following]
–2018-01-07 00:18:53– http://download.oracle.com/otn-pub/java/jdk/8u31-b13/jdk-8u31-linux-x64.rpm?AuthParam=1515284573_d3578a4c10668a88efa21c2ab55b70d9
Connecting to download.oracle.com (download.oracle.com)|23.215.104.105|:80… connected.
HTTP request sent, awaiting response… 404 Not Found
2018-01-07 00:18:54 ERROR 404: Not Found.
Fabiano Góes
Hello, congratulation by article,
I’m think if would be possible to parametrize the line: ADD /maven/springboot-docker.jar app.jar ?
Something like that with: “ADD /maven/${ARG_FILEJAR_NAME}.jar app.jar”
jt
Yes, this is possible in more recent versions of the Fabric8 plugin.
[email protected]
The notion of employing containers never occurred to me, but it’s a fantastic one. I really appreciate you sharing.
Azure Trainings in Hyderabad
I think we can make this little simpler. We may not need the centOS and can create the docker image using openJDk.
sclinbio
Excellent weblog, many thanks a lot for your awesome posts! leer mas
our web site sclinbio,com