

Log4J 2 Configuration: Using XML
5 CommentsLast Updated on June 5, 2019 by Michelle Mesiona
In Introducing Log4J 2 – Enterprise Class Logging, my first post of the Log4J 2 series, I discussed about the components of Log4J 2 and how to use Log4J 2 to perform basic logging in Java applications. In the second post, Log4J 2 Configuration: Using Properties File, I explained how to set up Log4J 2 in a Spring Boot application to use properties configuration file.
In addition to properties file, Log4J 2 supports configuration through XML, JSON, and YAML. In this post, I discuss how to configure Log4J 2 using XML and explain few advanced configuration options.
Setting up an XML Configuration File
Like any other configuration files, Log4J 2 expects your XML configuration file to be present in the classpath with the name log4j2.xml. Although, you can have your XML configuration file in a different location, some additional steps are required for that. You can either perform them programmatically or through the command line by setting the log4j.configuration system property to point to the file. The code to programmatically set a different configuration file location is below.
. . .
LoggerContext context = (LoggerContext) LogManager.getContext(false);
File file = new File("path/to/log4j2.xml");
context.setConfigLocation(file.toURI());
. . .
The command to set the log4j.configuration system property through the command line is this.
java -Dlog4j.configurationFile=path/to/log4j2.xml MyApp
Note: In enterprise applications, logging configuration can differ drastically between development(staging) and production environments. Therefore, you will commonly find logger configuration in scripts, rather than being hardcoded into the source code. Generally, it would be considered a bad practice to hard code the file name in source code.
Creating a Logger
Before we start configuring Log4J 2, we will create a logger class that uses the Log4J 2 API to log messages. Here, I am assuming that you have added the required Log4J 2 dependencies for the project, as explained in my previous post here.
Log4J2XmlConf.java
   //package guru.springframework.blog.log4j2xml;

import org.apache.logging.log4j.LogManager;
import org.apache.logging.log4j.Logger;

public class Log4J2XmlConf {
    private static Logger logger = LogManager.getLogger();

    public void performSomeTask(){
        logger.debug("This is a debug message");
        logger.info("This is an info message");
        logger.warn("This is a warn message");
        logger.error("This is an error message");
        logger.fatal("This is a fatal message");
    }
}
We will use JUnit to test the preceding class.
Log4J2XmlConfTest.java
   //package guru.springframework.blog.log4j2xml;

import org.junit.Test;

import static org.junit.Assert.*;
public class Log4J2XmlConfTest {

    @Test
    public void testPerformSomeTask() throws Exception {
        Log4J2XmlConf log4J2XmlConf = new Log4J2XmlConf();
        log4J2XmlConf.performSomeTask();
    }
}
Configuring Console and File Appenders
Assuming that we have log4j2.xml is in the project classpath, let’s inspect how to use it for Log4J 2 configuration. A log4j2.xml file contains the <Configuration> root tag. In this root tag, you can set the monitorInterval attribute with a time value in seconds. This attribute tells Log4J 2 to detect changes to the configuration file and reconfigure itself after the monitorInterval value has elapsed since the last check. The <Configuration> root tag can include a <Properties> tags to specify one or more properties that can be referred from the different parts of this file. The <Configuration> root tag also encloses the <Appenders> and <Loggers> tags to configure one or more appenders and loggers respectively. The skeleton of a log4j2.xml file is like this.
<?xml version="1.0" encoding="UTF-8"?>
<Configuration monitorInterval="60">
    <Properties>
      <!—Configure properties here-->
    </Properties>
    <Appenders>
       <!--Configure appenders here-->
    </Appenders>
    <Loggers>
      <!--Configure loggers here-->
    </Loggers>
</Configuration>
We will start by configuring two appenders to write log messages to the console and a file. We will also configure an application-specific logger along with the root logger to use the appenders, like this.
<?xml version="1.0" encoding="UTF-8"?>
<Configuration monitorInterval="60">
<Properties>
    <Property name="log-path">logs</Property>
    <Property name="archive">${log-path}/archive</Property>
</Properties>

<Appenders>
    <Console name="Console-Appender" target="SYSTEM_OUT">
        <PatternLayout>
            <pattern>
                [%-5level] %d{yyyy-MM-dd HH:mm:ss.SSS} [%t] %c{1} - %msg%n
            </pattern>>
        </PatternLayout>
    </Console>
    <File name="File-Appender" fileName="${log-path}/xmlfilelog.log" >
        <PatternLayout>
            <pattern>
                [%-5level] %d{yyyy-MM-dd HH:mm:ss.SSS} [%t] %c{1} - %msg%n
            </pattern>
        </PatternLayout>
    </File>
</Appenders>

<Loggers>
           <Logger name="guru.springframework.blog.log4j2xml" level="debug">
               <AppenderRef ref="File-Appender" level="error"/>
           </Logger>
        <Root level="debug">
            <AppenderRef ref="Console-Appender"/>
        </Root>
    </Loggers>
</Configuration>
In the configuration code above:
- Line 4 – Line 5 : We declared two properties, named
log-pathandarchivethat will be used by the appenders. - Line 8 – Line 23: We declared the
<Appenders>tag enclosing the<Console>and<File>tags for the console and file appenders respectively. Thetargetattribute of the<Console>tag specifies that log messages will be sent to the system console. Thefilenameattribute of the<File>tag specifies the name and location of the log file to which log messages will be sent. Both the console and file appenders use pattern layout and specifies the pattern string using the<PatternLayout>and<Pattern>tags respectively. You can learn more about pattern layouts here. - Line 25 – Line 32: We defined two loggers within the
<Loggers>tag. The first logger defined by<Logger>configures all loggers under theguru.springframework.blog.log4j2xmlpackage to use the file appender. The second one defined by<Root>is the root logger configured to use the console appender.
If we run the Log4J2XmlConfTest test class, Log4J 2 will generate log messages and send them to both the console and the file, as shown in this figure.
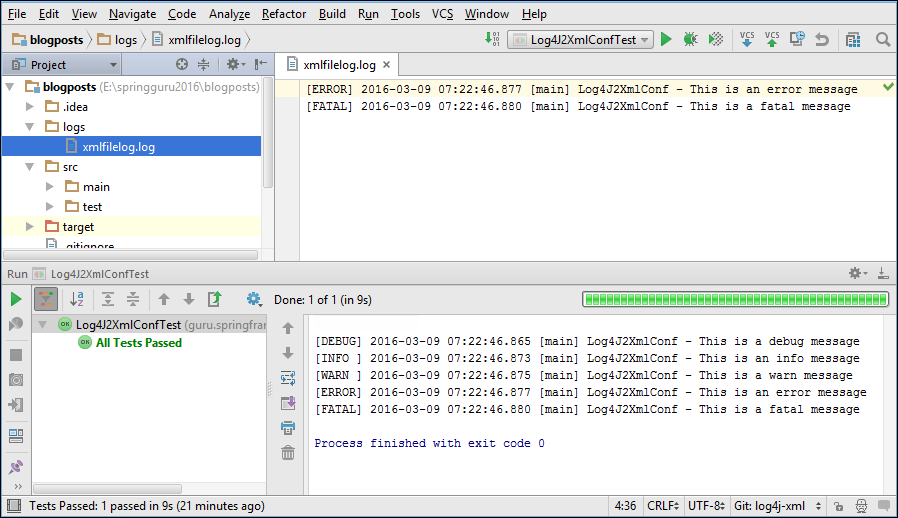
In the figure above, observe that debug and higher log messages were sent to console because we specified debug level for the root appender. Also, as we specified error for the file appender to be used by all the loggers of the guru.springframework.blog.log4j2xml package, only the error and fatal messages got logged to the file.
Configuring a Rolling File Appender
According to Apache, approximately 4% of a typical code base is logging. This can be a significant amount of code in enterprise applications, which typically have very large code bases. Imagine scanning through a log file with 10s of thousands of lines of log statements to find a specific statement. A long running application can easily produce millions and millions of lines of logging information. Which can cause the files to become very large.
To address such concerns, Log4J 2 provides a rolling file appender. This appender supports writing to a file and rolls the file over according to one of your pre-defined policies. For example, you can define a size-based triggering policy that causes a rollover once the file has reached a specified size. You can also define a time-based triggering policy that causes a rollover once the date/time pattern is no longer applies to the active log file. You can refer the Log4J 2 manual to learn more about the rolling file appender and its triggering policies.
To configure a rolling file appender, use the <RollingFile> tag, like this.
. . .
<RollingFile name="RollingFile-Appender"
             fileName="${log-path}/rollingfile.log"
             filePattern="${archive}/rollingfile.log.%d{yyyy-MM-dd-hh-mm}.gz">
    <PatternLayout pattern="[%-5level] %d{yyyy-MM-dd HH:mm:ss.SSS} [%t] %c{1} - %msg%n"/>
        <Policies>
             <TimeBasedTriggeringPolicy/>
             <SizeBasedTriggeringPolicy size="30 MB"/>
        </Policies>
        <DefaultRolloverStrategy max="30"/>
</RollingFile>
. . .
In the code above:
- Line 3 – Line 4: We used the
filenameandfilePatternattributes of<RollingFile>to define the name of the log file to write to and the pattern of the file name of the archived log file respectively. - Line 5: We used the
patternattribute of<Patternlayout>to
define a pattern that specifies when the log file should get rolled for a time-based policy. - Line 6 – Line 9: We used the
<Policies>tag to define two triggering policies: Time-based and sized-based. The time-based policy is set to roll the log file daily while the sized-based policy is set to roll the log file once its size exceeds30 MB. - Line 10: We used the
<DefaultRollover>tag to instruct Log4J 2 to keep up to30rolling files before deleting them.
To use the rolling file appender, add the appender reference to the logger declaration, like this.
. . .
<Logger name="guru.springframework.blog.log4j2xml" level="debug">
    <AppenderRef ref="File-Appender" level="error"/>
    <AppenderRef ref="RollingFile-Appender" level="debug"/>
</Logger>
. . .
To simulate how the rolling file appender works, update the size attribute of <SizeBasedTriggeringPolicy> to 1 KB, like this.
. . .
<SizeBasedTriggeringPolicy size="1 KB"/>
. . .
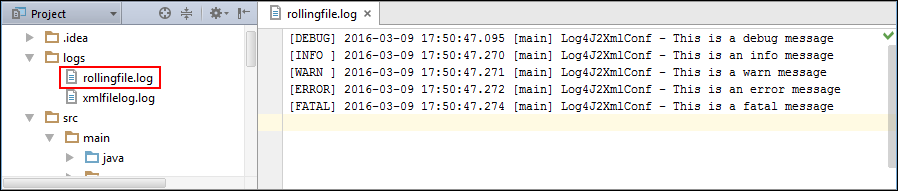
On running the Log4J2XmlConfTest test class now, a rollingfile.log file gets generated with debug and higher level log messages, as shown in the following figure.
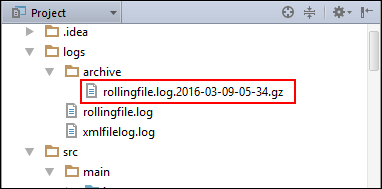
Now run the Log4J2XmlConfTest class couple of more times till the size of the rollingfile.log file exceeds 1 KB. Log4J 2 creates a .gz archive of the generated rolling file in the archive directory.
The complete code of the log4j2.xml file is this.
log4j2.xml
//logs ${log-path}/archive [%-5level] %d{yyyy-MM-dd HH:mm:ss.SSS} [%t] %c{1} - %msg%n >[%-5level] %d{yyyy-MM-dd HH:mm:ss.SSS} [%t] %c{1} - %msg%n
In Line 37 of the code above, I have configured a console appender with the level info to demonstrate the additivity feature of Log4J 2. I disabled logger additivity in Line 34 by adding the additivity attribute of <Logger> with a false value. Now, when you run the test class, our logger will use the newly configured console appender instead of the one in the root logger. You can run the test class again to check that info and higher log messages are now getting sent to the console.

You can see that the Rolling File Appender has a number of configuration options. This appender is very popular for enterprise use. Often the operations team will have requirements for the log files. In some cases, the enterprise will need to archive the files for compliance reasons. Sometimes the files are consumed by Splunk for indexing. Sometimes, the files are simply deleted. Each application and company will have different requirements.
Summary
XML configuration of Log4J 2 opens a number of configuration options, many of which aren’t available through properties file configuration. Therefore, it’s recommended to use XML configuration in enterprise applications having advanced logging requirements. One particular aspect that is very useful in enterprise applications is the ability to divide a large and complex XML configuration file into multiple files. For example, you can have a main log4j2.xml file that includes two other files, say log4j-appenders.xml to configure appenders and log4j-loggers.xml to configure loggers.
Remember, much more time is spent reading code and configuration files than is spent writing it. At some point in the future, you (or someone else) will be reading the source code and configuration files. By logically dividing your Log4J 2 XML configuration files, you improve the long term maintainability of your application. Multiple XML configuration files are not supported out of the box by Log4J 2. You will need to use the XInclude library and use it as described here. It’s fairly easy to do, and large enterprise applications will likely find benefit in using multiple XML configuration files for Log4J 2 configuration properties.


Greg
Thank you! This was very helpful.
jp
“Line 5: We used the pattern attribute of to
define a pattern that specifies when the log file should get rolled for a time-based policy.”
Hello, did you mean the Patternlayout is to define the format of the logged messages for the appender? (why would a Patternlayout have anything to do with the concept of “rolling” or “time-based policies”?)
Many thanks for the tutorial.
Sunny Arya
I configured my logging through XML. I am facing small issue that my log files get created but there is no content being written to those files.
Naathu Baa
bahut Bahu dhanywaad
Sudip
We have log4j set up in our application and it creates logs consistently. There is one problem we are facing. The log timings are UTC timings, but we are in EST timezone, I suppose UTC time is the default timezone configured. How to configure the log4j2 XML file to create logs with US Eastern Timezone.
Thanks in advance for any suggestion.
-Sudip