

Unit Testing with JUnit – Part 2
5 CommentsLast Updated on June 16, 2019 by Simanta
In the first part of the series on unit testing with JUnit, we looked at creating unit tests both using Maven and IntelliJ. In this post, we will look at some core unit testing concepts and apply those using JUnit constructs. We will learn about assertions, JUnit 4 annotations, and test suites.
JUnit Assertions
Assertions, or simply asserts provide programmers a way to validate the intended behavior of code. For example, through an assertion you can check whether a method returns the expected value for a given set of parameters or a method correctly sets up some instance or class variables. When you run the test, the assertion executes. If the method under test behaves exactly as you specified in the assertion, your test passes. Otherwise, an AssertionError is thrown.
JUnit provides support for assertions through a set of assert methods in the org.junit.Assert class. Before we start using them, let’s have a quick overview of the Arrange, Act, Assert (AAA) pattern. This pattern is the recommended way to write unit test methods where you divide a method into three sections, each with a specific purpose:
- Arrange: Initialize objects and set up input data for the method under test.
- Act: Invoke the method under test passing the arranged parameters.
- Assert: Verify that the method under test behaves as expected. This is where you write an assertion method.
Here is a Java class we will be writing some JUnit unit tests to test.
EmployeeEmail.java
package guru.springframework.unittest.asserts;

import java.util.HashMap;
import java.util.Map;
import  java.util.regex.*;

public class EmployeeEmail {

    Map<String, String> hashMap = new HashMap<String, String>();

    public  void addEmployeeEmailId(String key, String value){
        if(isValidEmailId(value)) {
            hashMap.put(key, value);
        }
    }
    public String getEmployeeEmailId(Object key){
        if (!(key instanceof String)) {
            throw new IllegalArgumentException("Object not type of String");
        }
        return hashMap.get(key);
    }
    public boolean isValidEmailId(String email){
        String regex = "^[a-zA-Z0-9.!#$%&'*+/=?^_`{|}~-]+@((\\[[0-9]{1,3}\\.[0-9]{1,3}\\.[0-9]{1,3}\\.[0-9]{1,3}\\])|(([a-zA-Z\\-0-9]+\\.)+[a-zA-Z]{2,}))$";
        Pattern pattern = Pattern.compile(regex);
        Matcher m = pattern.matcher(email);
        return m.matches();
    }
}
In the EmployeeEmail class above, we wrote an addEmployeeEmailId() method that first checks whether an email ID is in valid format, and then adds it to a Map implementation. The isValidEmailId() method performs the email validation using a regular expression. We also wrote a getEmployeeEmailId() method to return an email ID from the Map, given a key.
To test the EmployeeEmail class, we will create a test class, EmployeeEmailTest and add test methods to it. Here, remember that the number of test methods to add and what they should do depends on the behavior of the EmployeeEmail class under test – not on the number of methods in it.
To start with, we will test that the getEmployeeEmailId() method returns true for a valid email ID and false for an invalid one with two test methods.
. . .
@Test
public void testValidEmailId() throws Exception {
    /*Arrange*/
    EmployeeEmail empEmail=new EmployeeEmail();
    /*Act*/
    boolean result = empEmail.isValidEmailId("[email protected]");
    /*Assert*/
    assertTrue("Valid email ID failed ", result );
}

@Test
public void testInvalidEmailId() throws Exception {
    /*Arrange*/
    EmployeeEmail empEmail=new EmployeeEmail();
    /*Act*/
    boolean result= empEmail.isValidEmailId("andy@testdomain");
    /*Assert*/
    assertFalse("Invalid email ID passed ", result);
}
. . .
In both the test methods above, we separated the test code into the AAA sections. In the first test method, we used the assertTrue() method as we expect isValidEmailId() to return true for the email ID, [email protected]. We also want to test that isValidEmailId() returns false for an invalid email ID. For that, we wrote the second test method and used assertFalse().
Couple of things to observe here. In both the assertion methods, we passed a String parameter as the identifying message for an assertion error. It’s common for programmers to set this message to describe the condition that should be met. Instead, to be meaningful, this message should describe what’s wrong if the condition isn’t met.
Also, you might be thinking “Why two separate test methods instead of a single method with both the assert methods?” Having multiple assert methods in a single test method will not cause any errors in tests, and you will frequently encounter such test methods. But a good rule to follow is: “Proper unit tests should fail for exactly one reason”, which sounds similar to the Single Responsibility Principle. In a failed test method having multiple assertions, more effort is required to determine which assertion failed. Also, it is not guaranteed that all of the assertions took place. For an unchecked exception, the assertions after the exception will not execute and JUnit proceeds to the next test method. Therefore, it is generally a best practice to use one assertion per test method.
With the basics in place, let’s write the complete test class and use the following assertions:
assertEquals()andassertNotEquals(): Tests whether two primitives/objects are equal or not. In addition to the string message passed as the first parameter, these methods accept the expected value as the second parameter and the actual value as the third parameter- an important ordering commonly misused.assertNull()andassertNotNull(): Tests whether an object is null or not null.assertSame()andassertNotSame(): Tests whether two object references point to the same object or don’t.
EmployeeEmailTest.java
package guru.springframework.unittest.asserts;
import org.junit.Test;

import java.util.Map;

import static org.junit.Assert.*;

public class EmployeeEmailTest {
    @Test
    public void testValidEmailId() throws Exception {
        /*Arrange*/
        EmployeeEmail empEmail=new EmployeeEmail();
        /*Act*/
        boolean result = empEmail.isValidEmailId("[email protected]");
        /*Assert*/
        assertTrue("Valid email ID failed ", result );
    }

    @Test
    public void testInvalidEmailId() throws Exception {
        /*Arrange*/
        EmployeeEmail empEmail=new EmployeeEmail();
        /*Act*/
        boolean result= empEmail.isValidEmailId("andy@testdomain");
        /*Assert*/
        assertFalse("Invalid email ID passed ", result);
    }

    @Test
    public void testAddEmailId() throws Exception {
        /*Arrange*/
        EmployeeEmail empEmail=new EmployeeEmail();
        empEmail.addEmployeeEmailId("Emp01","[email protected]");
        empEmail.addEmployeeEmailId("Emp02", "[email protected]");
        /*Act*/
        int size=empEmail.hashMap.size();
        /*Assert*/
        assertEquals("Incorrect collection size ", 2, size);
    }
    @Test
    public void testAddEmailIdWithDuplicateKey() throws Exception {
        /*Arrange*/
        EmployeeEmail empEmail=new EmployeeEmail();
        empEmail.addEmployeeEmailId("Emp01","[email protected]");
        empEmail.addEmployeeEmailId("Emp02", "[email protected]");
        empEmail.addEmployeeEmailId("Emp02", "[email protected]");
        /*Act*/
        int size=empEmail.hashMap.size();
        /*Assert*/
        assertNotEquals("Duplicate key in collection ", 3, size);
    }

    @Test
    public void testGetExistingEmailId() throws Exception {
        /*Arrange*/
        EmployeeEmail empEmail=new EmployeeEmail();
        empEmail.addEmployeeEmailId("Emp01","[email protected]");
        empEmail.addEmployeeEmailId("Emp02", "[email protected]");
        /*Act*/
        String val = empEmail.getEmployeeEmailId("Emp02");
        /*Assert*/
        assertNotNull("Returned null for existing employee", val);
    }

    @Test
    public void testGetNonExistingEmailId() throws Exception {
        /*Arrange*/
        EmployeeEmail empEmail=new EmployeeEmail();
        empEmail.addEmployeeEmailId("Emp01","[email protected]");
        empEmail.addEmployeeEmailId("Emp02", "[email protected]");
       /*Act*/
        String val = empEmail.getEmployeeEmailId("Emp05");
       /*Assert*/
        assertNull("Failed to return null for non existing employee", val);
    }

    @Test
    public void testIfObjectsAreSame() throws Exception {
        /*Arrange*/
        EmployeeEmail empEmail1=new EmployeeEmail();
        empEmail1.addEmployeeEmailId("Emp01","[email protected]");
        EmployeeEmail empEmail2=new EmployeeEmail();
        empEmail1.addEmployeeEmailId("Emp02", "[email protected]");
        /*Act*/
        Map map1=empEmail1.hashMap;
        Map map2=empEmail2.hashMap;
        map1= map2;
        /*Assert*/
        assertSame("Failed because objects are not same ", map1, map2);
    }

    @Test
    public void testIfObjectsAreNotSame() throws Exception {
        /*Arrange*/
        EmployeeEmail empEmail1=new EmployeeEmail();
        empEmail1.addEmployeeEmailId("Emp01","[email protected]");
        EmployeeEmail empEmail2=new EmployeeEmail();
        empEmail1.addEmployeeEmailId("Emp02", "[email protected]");
        /*Act*/
        Map map1=empEmail1.hashMap;
        Map map2=empEmail2.hashMap;
        /*Assert*/
        assertNotSame("Failed because objects are same ", map1, map2);
    }


}
In the EmployeeEmailTest class above:
- Line 38: We used
assertEquals()to test the collection size after adding two elements to it throughaddEmployeeEmailId(). - Line 50: We used
assertNotEquals()to test that the collection does not allow duplicate keys added throughaddEmployeeEmailId(). - Line 62: We used
assertNotNull()to test thatgetEmployeeEmailId()does not returnnullfor an email ID present in the collection. - Line 74: We used
assertNull()to test thatgetEmployeeEmailId()returnsnullfor an email ID not present in the collection. - Line 89: We used
assertSame()to test that two collection references point to the same collection object after assigning one to the other through the=operator. - Line 103: We used
assertNotSame()to test that two collection references are not pointing to the same object.
When we run the test in IntelliJ, the output is:
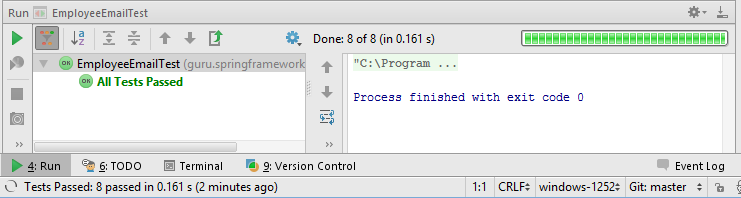
As you can see from the output, all the tests passed as expected.
Note: The order in which JUnit executes test methods is not guaranteed, so don’t count on it.
If you go back and look into the test class, you will notice several lines of code in the Arrange part being repeated across the test methods. Ideally, they should be in a single place and get executed before each test. We can achieve this through the use of JUnit annotations, which we will look into next.
JUnit Annotations
You can use JUnit Annotations, introduced in JUnit 4, to mark and configure test methods. We have already used the @Test annotation to mark public void methods as test methods. When JUnit encounters a method annotated with @Test, it constructs a new instance of the class, and then invokes the method. We can optionally provide a timeout parameter to @Test to specify a time measured in milliseconds. If the test method takes longer to execute than the specified time, the test fails. This is particularly useful when you test against performance in terms of time. This code marks a method as a test method and sets the timeout to 100 milliseconds.
. . .
@Test(timeout = 100)
public void testDataAccessTimeout(){
    String val = empEmail.getEmployeeEmailId("Emp02");
}
. . .
Another important use of the @Test annotation is to test for exceptions. Suppose for a condition, a code throws an exception. We can use the @Test annotation to test whether the code indeed throws the exception when the condition is met. This code checks whether the getEmployeeEmailId() method throws an exception of type IllegalArgumentException when a non-String value is passed to it.
. . .
@Test(expected = IllegalArgumentException.class)
public void testForIllegalArgumentException()
{
    String val = empEmail.getEmployeeEmailId(1);

}
. . .
In addition to the @Test annotation, the other annotations are:
@Before: Causes a method to run before each test method of the class. You typically use this annotation to allocate resource, setup common initialization code, and load configuration files that the test methods require.@After: Causes a method to run after each test method of the class. This method is guaranteed to run even if a@Beforeor@Testmethod throws an exception. Use this annotation to clean up initialization code and release any resource allocations done in@Before.@BeforeClass: Causes a static method to run once and only once before any of the test methods in the class. This is useful in situations where you need to set up computationally expensive resources, say a server connection, a database, or even managing an embedded server for testing. As an example, instead of starting a server for each@Testmethod, start it once in a@BeforeClassmethod for all the tests in the class.@AfterClass: Causes a static method to run once after all the test methods in the class completes. This method is guaranteed to run even if a@BeforeClassor@Testmethod throws an exception. Use this method to free one time resource initialization done in@BeforeClass.@Ignore: Causes a test method to be ignored by JUnit. This can be useful when you have a complicated piece of code that is in transition, and you might want to temporarily disable some tests till that code is ready. Test runners of most IDEs report@Ignoretests as reminders during each test runs. This is essentially to mark tests as “there are things to be done”, which otherwise you might forget if you comment out the test method or remove the@Testannotation.
Here is an example of using all the JUnit annotations.
EmployeeEmailAnnotationsTest.java
package guru.springframework.unittest.asserts;
import org.junit.*;
import java.util.Map;
import static org.junit.Assert.*;

public class EmployeeEmailAnnotationsTest {
    EmployeeEmail empEmail;
    static int num;
    @BeforeClass
    public static void oneTimeSetup(){
     num=1;
     System.out.println("JUnit Call:"+num+" @BeforeClass oneTimeSetup");
    }
    @Before
    public void setup(){
        num+=1;
        System.out.println("JUnit Call:"+num+" @Before setUp");
        empEmail=new EmployeeEmail();
        empEmail.addEmployeeEmailId("Emp01","[email protected]");
        empEmail.addEmployeeEmailId("Emp02", "[email protected]");
    }
    @After
    public void cleanup()
    {
        num+=1;
        System.out.println("JUnit Call:" + num + " @After cleanup");
        empEmail.hashMap.clear();
    }
    @AfterClass
    public static void oneTimeCleanup()
    {
        num+=1;
        System.out.println("JUnit Call:"+num+" @AfterClass oneTimeCleanup");
        num=0;
    }
    @Test(timeout = 100)
    public void testDataAccessTimeout(){
        num+=1;
        System.out.println("JUnit Call:"+num+" @Test testDataAccessTimeout");
        String val = empEmail.getEmployeeEmailId("Emp02");
    }
    @Test
    @Ignore("Test code not ready")
    public void testWithMoreData(){
        /*ToDO: */
    }
    @Test(expected = IllegalArgumentException.class)
    public void testForIllegalArgumentException()
    {
        num+=1;
        System.out.println("JUnit Call:" + num + " @Test testForIllegalArgumentException");
        String val = empEmail.getEmployeeEmailId(1);

    }
}
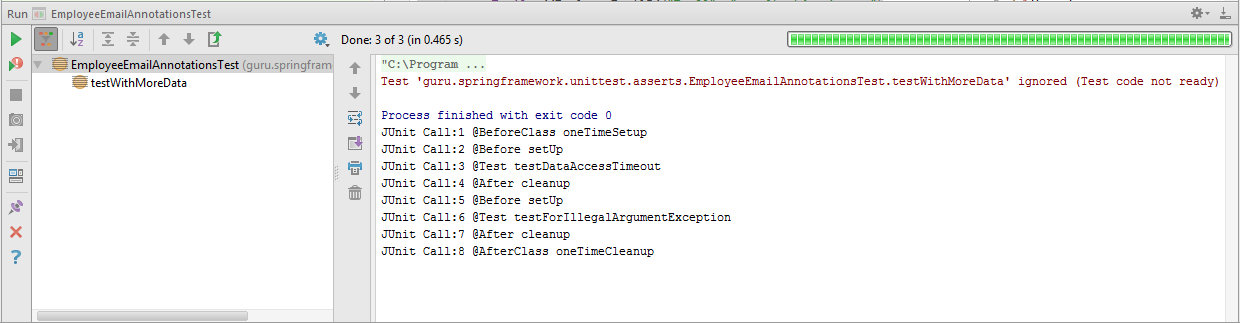
The output on running the test in IntelliJ is:
JUnit Test Suites
If you have large numbers of test classes for different functional areas or modules, you can structure them into test suites. JUnit Test Suites are containers of test classes and gives you finer control over what order your test classes are executed in. JUnit provides org.junit.runners.Suite, a class that runs a group of test classes.
The code to create a test suite is:
EmployeeEmailTestSuite.java
package guru.springframework.unittest.testsuite;

import guru.springframework.unittest.asserts.EmployeeEmailAnnotationsTest;
import guru.springframework.unittest.asserts.EmployeeEmailTest;
import org.junit.runner.RunWith;
import org.junit.runners.Suite;
@RunWith(Suite.class)
@Suite.SuiteClasses({
        EmployeeEmailTest.class,
        EmployeeEmailAnnotationsTest.class

})
public class EmployeeEmailTestSuite {
}
In the test suite class above, we wrote two annotations: @RunWith and @SuiteClasses. The @RunWith annotation instructs JUnit to use the Suite runner class and @SuiteClasses specifies the classes and their order that the Suite runner class should run. The test suite class is itself empty and acts only as a placeholder for the annotations.
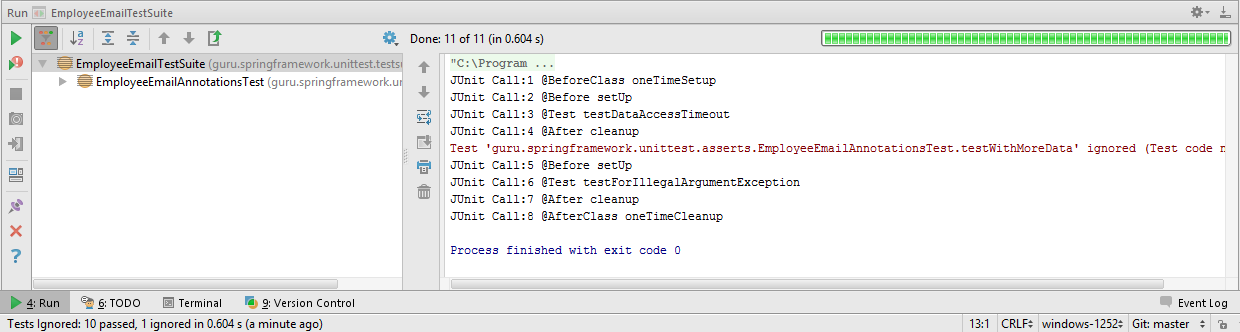
The output on executing the test suite in IntelliJ is.
Summary
JUnit Assertions not only make your code stable but also force you to think differently and think through different scenarios, which ultimately helps you to become better programmers. By understanding the purpose of different assertions and using them properly, testing becomes effective. But the question is “How many asserts per test method?”. It all comes down to the complexity of the method under test. For a method with multiple conditional statements, asserting the outcome for each condition should be done, while for a method performing a simple string manipulation, a single assertion should do. When developing unit tests with JUnit, it is considered a best practice that each test method is testing a specific condition, which will often lead to one assert per test method. Its not uncommon for a method under test to be associated with multiple test methods.
One assertion I have not covered in this post is assertThat(). It’s an important JUnit assertion which I will cover it in my next post on JUnit.
Unit Testing with the Spring Framework
While doing Enterprise Application Development with the Spring Framework and unit testing your code, you will be using lots of assertions. In addition to asserting the regular method behaviors, you will assert whether Spring beans are injected as expected by the Spring application context, whether dependencies between Spring beans are correctly maintained, and so on. While creating those tests ensure that they run fast, especially when testing is integrated in the build cycle. You will keep building your application as you code, and so you obviously won’t want your build to wait for a long running test to complete. If you do have such long running tests, put them in a separate test suite.


5 comments on “Unit Testing with JUnit – Part 2”