

Introducing Log4J 2 – Enterprise Class Logging
10 CommentsLast Updated on October 21, 2024 by jt
If you are still using System.out to print debugging or diagnostic information in your application, it’s time to look for a more elegant and efficient solution in the form of a logging framework. Although there are lots of logging frameworks around for Java applications, Log4J is one of the most widely adopted one because of the simplicity and flexibility it provides.
Note: The Log4J version 1 was first released on 1999 and quickly became the most used logging framework ever. But due to some inherent architectural flaws, Apache announced End of Life of Log4j version 1 on August 2015 and encouraged users to upgrade to Log4j 2 – A framework that is far more reliable, faster, and much easier to develop and maintain. Log4J 2 is almost a compete changed framework with a different API and support for different configuration files having different syntax. Therefore, from here onward, I will refer the framework as Log4J 2
Log4J 2 is an open source logging package distributed under the Apache Software License. The advantages it provides over System.out is monumental. Log4J 2 allows you to define different levels of importance, such as ERROR, WARN, INFO, and DEBUG for log messages. Log4J 2 also allows you to define one or more destinations, such as console, file, database, and SMTP server to send log messages. And the great thing is that using Log4J 2, you can perform logging asynchronously.
Additionally, Log4J 2 allows you to control logging on a class-by-class basis. For example, one class of an application can redirect logs to the console while another to a file. By contrast, a programmer can only control System.out at the granularity of the entire application. If a programmer redirects System.out, the redirect happens for the whole application.
Another important feature of Log4J 2 is that it’s easy to enable or disable only some type of log message. For example, you can configure Log4J 2 to disable every debug message in production.
So how Log4J 2 do all this? It’s through the loggers, appenders, and layouts – the components of the Log4J 2 API. These components work together to provide developer full control on how messages are logged, formatted, and where they are reported.
Loggers
Loggers are the key objects in Log4J 2 that are responsible for capturing logging information. Loggers are stored in a namespace hierarchy and a root logger, an implementation of the Logger interface, sits at the top of the hierarchy. Logger names are case-sensitive and they follow the hierarchical naming rule.
You can retrieve the root logger by calling the LoggerManager.getRootLogger() method. For all other loggers, you can instantiate and retrieve them by calling LoggerManager.getLogger(String loggerName) passing the name of the desired logger as a parameter. Although, you can specify any name for a logger, its recommend to name the logger with the fully qualified name of the class. In a large application, with thousands of log statements, it is easy to identify the origin of a log message as the log output bears the name of the generating logger. Since it is a common practice to name loggers after their owning class, Log4J 2 provides the overloaded convenience method LogManager.getLogger(). This method, by default, uses the fully qualified class name of the owning class.
Loggers can be assigned levels in the following order.
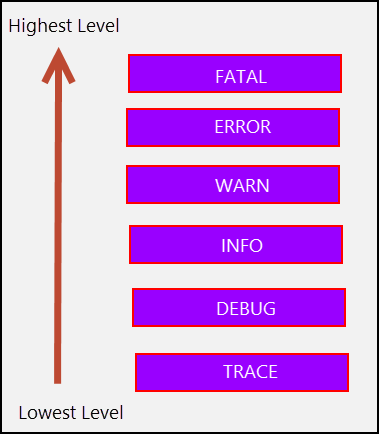
As you can see in the figure above, TRACE is the lowest level and the level moves up through DEBUG, INFO, WARN, ERROR, till FATAL – the highest level. What this means is that if you set the logger level to ERROR then only the ERROR and FATAL level log messages will be displayed and the rest will be ignored.
In addition to the levels I mentioned, there are two special levels:
- ALL: Turns on all levels.
- OFF: Turns off all levels.
While developing in your local machine, it is common to set the log level to DEBUG. This will give you detailed log messages for your development use. While on production, its typical set the log level to ERROR. This is to avoid filling your logs with excessive debug information. And while logging is very efficient, there is still a cost.
In your application, once you have retrieved a logger, you call one of the printing methods debug(), info(), warn(), error(), fatal(), and log() on the logger to log messages. These messages are contained in the Logger interface and part of the root logger that all Log4J 2 loggers inherit.
Appenders
Once you capture logging information through a logger, you need to send it to an output destination. The output destination is called an appender, and it is attached to the logger. Log4J 2 provides appenders for console, files, GUI components, remote socket servers, JMS, NT Event Loggers, and remote UNIX Syslog daemons.
Appenders are inherited additively from the logger hierarchy. This means, if the console appender is attached to the root logger, all child loggers will inherently use the console appender. If you have a child logger named Foo attached with a file appender, then Foo will use both the console and file appenders, unless you explicitly ask it not to do so by setting the additivity attribute to false.
Layouts
In addition to specifying your preferred output destination, you can also specify the format of log messages. You can do so by associating a layout with the appender. Some key layouts that Log4J 2 provides are PatternLayout, Htmlayout, JsonLayout, and XmlLayout. If you want to format logging data in an application-specific way, you can create your own layout class extending from the abstract AbstractStringLayout class – the base class for all Log4J 2 layouts that result in a String.
Using Log4J 2
Let’s jumpstart to create a trivial application to use Log4J 2 and start logging. For the application, I have used Spring Boot and started out with a Spring Boot starter POM. If you are new to Spring Boot, you can start with my introductory post on Spring Boot here.
As the Spring Boot starter POM uses Logback for logging, you need to exclude it and add the Log4J 2 dependencies.
Here is the code of the POM file to use Log4J 2 in a Spring Boot application.
. . .
<dependency>
    <groupId>org.springframework.boot</groupId>
    <artifactId>spring-boot-starter</artifactId>
      <exclusions>
        <exclusion>
          <groupId>org.springframework.boot</groupId>
          <artifactId>spring-boot-starter-logging</artifactId>
        </exclusion>
      </exclusions>
</dependency>
. . .
We can now start logging messages in the classes of the program. Let’s write a class for that.
MyApp.java
package guru.springframework.blog.log4joverview;


import org.apache.logging.log4j.LogManager;
import org.apache.logging.log4j.Logger;

public class MyApp {
    private static Logger logger = LogManager.getLogger("MyApp.class");

    public void performSomeTask(){
        logger.debug("This is a debug message");
        logger.info("This is an info message");
        logger.warn("This is a warn message");
        logger.error("This is an error message");
        logger.fatal("This is a fatal message");
    }
}
In the class we wrote above, we retrieved a logger through a call to getLogger(). We then called the various printing methods on the logger.
Now let’s write a test class.
MyAppTest.java
package guru.springframework.blog.log4joverview;

import org.junit.Test;
import static org.junit.Assert.*;

public class MyAppTest {
    @Test
    public void testPerformSomeTask() throws Exception {
      MyApp app=new MyApp();
      app.performSomeTask();

    }
}
On running the test class, the output in the IntelliJ console is this.

You may have noticed that I did not specify an appender or layout. I did not configure either one, and Log4J 2 rightfully pointed that out with an error message, as shown in the figure above. Rather, I relied upon defaults inherited from the Log4J 2 root logger. The Log4J 2 root logger is associated with the console appender (ConsoleAppender class) by default, and our logger inherited it. Therefore the log messages were sent to the IntelliJ console. If you notice, only the error and fatal messages got logged. This happened because by default Log4j 2 assigns the root logger level to ERROR and without external configuration, messages of the lower levels (WARN, INFO, and DEBUG) were not send to the destination. Also, the root logger by default uses PatternLayout, which our logger inherited and used.
Summary
In this post, I have only scratched the surface of Log4J 2. You will realize the power of Log4J 2 when you start working with external configuration files. These configuration files can be .properties, XML, YAML, and JSON files containing Log4J 2 configuration options. This means, you can set and change the configuration options without having to modify and recompile the application. In upcoming posts, I will discuss using external configuration files to help you explore what a powerful logging tool Log4J 2 is.
There are a number of logging solutions available for Java. Each has its own merits and drawbacks. Yet all of them are far better options than using System.out.println()! Printing out to the console, simply is not an enterprise class solution. Often in the enterprise, your log files need to be secured, and are often indexed by monitoring tools such as Splunk. Professional Java developers will use a logging framework such as Log4J 2.


Vanya Kornienko
Thanks!