Run Spring Boot on Docker
0 CommentsLast Updated on June 27, 2020 by jt
One of the operational challenges in the software industry is related to the shipping of software.
How to ship software to various environments, such as test, staging, and production while ensuring the software behaves as expected?
The advent of Virtual Machines (VMs) solved this to a large extent. However, VMs are heavy as they come with a full-blown Guest Operating System. Resource utilization of the Host Operating system and portability were other issues.
Docker with its lightweight containerization technology addresses most of the concerns of shipping and running software.
In this post, I will show how to run Spring Boot on Docker.
Docker Components
As you start working with Docker, you need to grasp two key facets of how Docker works. Docker image and container.
Image
A Docker image includes the elements needed to run an application as a container. An image contains elements, such as code, config files, environment variables, libraries, and run time.
An image acts as a read-only template with instructions to create a Docker container. Typically, an image will be based on another image with some additional customization. For example, you may build an image that is based on a base Ubuntu image on which you’ll install a Web server such as apache and then your Web application.
Docker images are immutable. This means once built, the files making up an image can not change. As a result, if a file changes, a new image gets created.
A Docker image is built in layers. Layers receive an ID, calculated via an SHA 256 hash of the layer contents. The Layer IDs together are used to compute the image ID. If the layer contents change, the SHA 256 hash also changes. Subsequently, the image ID also changes. This is what makes Docker images immutable.
Container
A container is a runnable instance of a Docker image. When Docker runs a container from an image, it adds a read-write layer on top of the image in which your application runs.
Containers can be connected to one or more networks. In addition, they can also be assigned storage to persist data between container restarts.
Docker containers can be created, started, stopped, and deleted. These operations are performed using the Docker API or the CLI.
You can read more on Docker concepts here.
Docker Installation
We will start by installing Docker Community Edition (CE) on Ubuntu.
1. Update the apt package index and install packages to allow apt to
use a repository over HTTPS.
$ sudo apt-get update
$ sudo apt install apt-transport-https ca-certificates curl software-properties-common
2. Add Docker’s official GPG key.
$ curl -fsSL https://download.docker.com/linux/ubuntu/gpg | sudo apt-key add -
3. Add the Docker repository to APT sources.
$ sudo add-apt-repository "deb [arch=amd64] https://download.docker.com/linux/ubuntu bionic stable"
4. update the package database with the Docker packages from the newly added repo.
$ sudo apt update
5. Finally, install Docker.
$ sudo apt install docker-ce
6. Verify if the Docker is running.
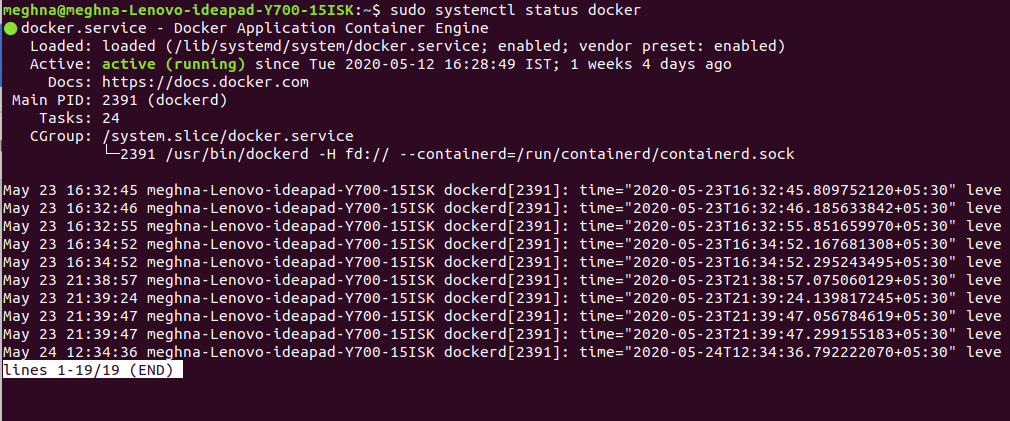
$ sudo systemctl status docker
This figure shows the status of docker.
To install Docker on Windows click here. For Mac, click here.
The Spring Boot Application
I will take you through the steps of:
- Creating a Docker image for a Spring Boot application
- Running the image as a Docker container
For the purpose of this blog, I have a minimalistic Spring Boot application with a single controller.
The code for the controller is this.
DemoController.java
package guru.springframework.docker.controller;

import org.springframework.beans.factory.annotation.Value;
import org.springframework.web.bind.annotation.GetMapping;
import org.springframework.web.bind.annotation.RequestMapping;
import org.springframework.web.bind.annotation.RestController;

@RestController
@RequestMapping(value = "/api/v1")
public class DemoController {

/**
* To get the property values
*/
@Value("${app.message}")
private String message;

@GetMapping("/message")
public String getMessage() {
return message;

}
}
The preceding code has a getMessage() handler method that returns a String.
Run mvn clean package command in terminal. This command packages the application as an executable JAR.
The Dockerfile
In order to run the Spring Boot app in a Docker container, you need to create a Dockerfile.
A Dockerfile is a text document that contains all the commands required to build an image.
The Dockerfile for our Spring Boot application is this.
Dockerfile
FROM openjdk:11
ADD ./target/spring-boot-docker-2.2.6.RELEASE.jar /usr/src/spring-boot-docker-2.2.6.RELEASE.jar
WORKDIR usr/src
ENTRYPOINT ["java","-jar", "spring-boot-docker-2.2.6.RELEASE.jar"]
The first command FROM openjdk:11 specifies the base image from which we want to build our image from. In this example, we are creating an image from openjdk:11.
The ADD command copies the files from a source on the host into the container’s filesystem at the specified destination. In this example, spring-boot-docker-2.2.6.RELEASE.jar from the target directory is copied into /usr/src/ directory of the container filesystem.
The WORKDIR command sets the directory from where Docker should execute subsequent commands.
The final command ENTRYPOINT allows configuring a container that will run as an executable. This is where you tell Docker how to run your application. We passed the command to run the Spring Boot JAR.
Note: You can store Dockerfile in any location in your project. I prefer storing it in the project root directory.
Building Images
In order to build the image, we’ll run this command in the terminal from the directory containing Dockerfile.
$ docker build -t springboot-app .
The above command starts the process of downloading the openjdk:11 image, building the image according to Dockerfile and tagging it as springboot-app.
Once the build is complete, verify the image with the following command:
$ docker images
The preceding command lists the docker image like this.
Running Containers
The command to run the container is this.
$ docker run -d -p 8088:8088 springboot-app
Here –d stands for detached and will run the container in a separate background process. –d prevents the current terminal from getting blocked.
Each container is an isolated environment in itself. Therefore, you need to map the port of the host operating system with the port inside the container. The left value of the –p tag is the port number of the host network while the left value is of the docker network.
We can verify whether the container is running by the command
$ docker ps
This figure shows the currently running Docker containers.
To check the logs of a container, run this command.
$ docker logs fervent_antonelli
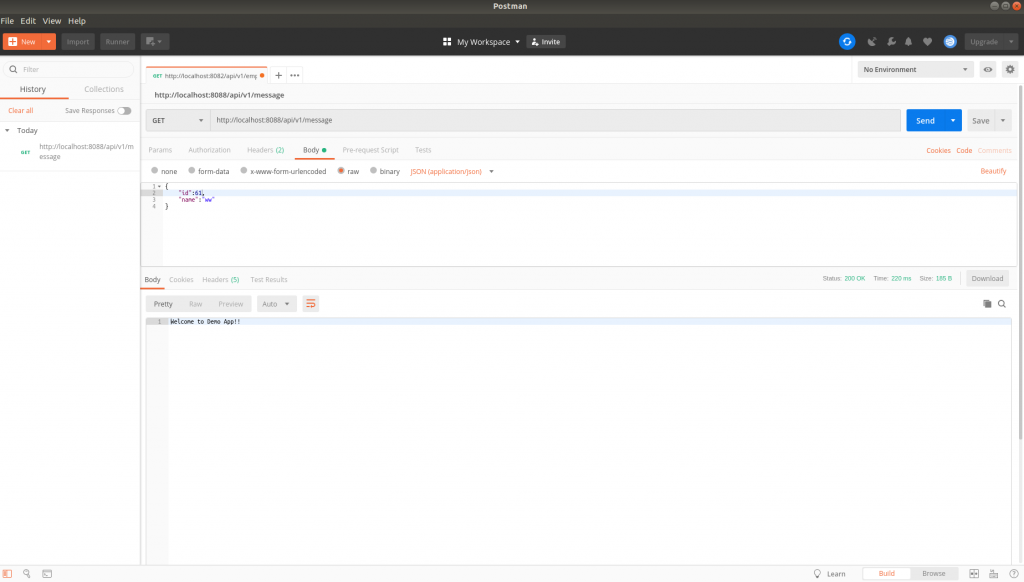
With the container running, test the application by accessing the endpoint on http://localhost:8080/api/v1/message.
I am using Postman. You can also use the browser for this GET request.
Docker Housekeeping
Docker objects, such as images and containers are large in size. At times you might want to clean up unused objects to free up your disk space.
Stop a container: Use the docker stop command and pass the name or id of the container.
$ docker stop fervent_antonelli
Delete stopped or exited containers: Run the docker rm command and pass the name or id of the container.
$ docker rm fervent_antonelli
You can delete all the stopped or exited containers with this command.
$ docker container prune
To delete a docker image, use the docker rmi command and pass the id of the image.
$ docker rmi 3a348ed10b32
To delete all the docker images, run the following command.
$ docker image prune
Summary
With the popularity of Docker, an entire ecosystem of tools and libraries have cropped up for Docker development.
In Spring Boot, the latest buzz word is Spring Boot Docker Layers on which I have recently published a post.
Docker development in Spring Boot has also been made easy by Fabric8 Maven plugin for Docker. I plan to cover this plugin in a subsequent post.
Going ahead, you will also encounter container management tools, such as Docker Compose, Kubernetes, and lots more.
To learn how to use Docker to supercharge your Enterprise Java Development, check the Udemy Docker for Java Developers course.
The source code for this post can be found here on GitHub.
